이 버전에는 잘못된 편집 사항이 있을 수 있습니다. 최신 확인된 스냅샷으로 전환하십시오.
필요한 것
-
이 단계는 번역되지 않았습니다. 번역을 도와주십시오
-
Slide the battery release switch away from the lock symbol until you hear the battery click.
-
Slide the battery towards the back of the laptop until it comes free.
-
-
이 단계는 번역되지 않았습니다. 번역을 도와주십시오
-
Insert the flat end of a spudger into the slot on the right side of the central control cover and pry it up.
-
Carefully pull the central control cover up along its edges.
-
-
이 단계는 번역되지 않았습니다. 번역을 도와주십시오
-
Peel back the silver tape securing the ribbon cable to the cover.
-
Pull the small brown latch on the ribbon cable connector out.
-
Disconnect the ribbon cable to completely free the central control cover.
-
-
이 단계는 번역되지 않았습니다. 번역을 도와주십시오
-
Remove the two 5.75 mm Phillips #1 screws securing the keyboard to the laptop.
-
Gently slide the keyboard towards the display until the tabs on its front side are free.
-
-
-
이 단계는 번역되지 않았습니다. 번역을 도와주십시오
-
Use a spudger to gently lift the ribbon cable retaining flap.
-
Disconnect the ribbon cable.
-
Shift the keyboard sideways enough to free one side from it's retaining tab. Then lift the keyboard away from the laptop.
-
-
이 단계는 번역되지 않았습니다. 번역을 도와주십시오
-
Remove/loosen the eight 4.80 mm Phillips #1 screws securing the bottom panel.
-
The screws may only need to be loosened, as they are generally retained by plastic washers.
-
Remove the bottom panel.
-
-
이 단계는 번역되지 않았습니다. 번역을 도와주십시오
-
Disconnect the five antennas from their respective cards.
-
De-route the antennas from their routing retainers.
-
-
이 단계는 번역되지 않았습니다. 번역을 도와주십시오
-
Remove the two 5.70 mm Phillips #1 screws securing the display assembly to the bottom case half.
-
-
이 단계는 번역되지 않았습니다. 번역을 도와주십시오
-
Use the flat end of a spudger to push the camera connector out of its socket. Alternate pushing on either side to evenly remove the connector.
-
Carefully release the connector from its retaining tabs.
-
-
이 단계는 번역되지 않았습니다. 번역을 도와주십시오
-
Push the antenna wires up through their hole in the bottom case half.
-
Release the antennas from their retaining tabs on the upper case.
-
-
이 단계는 번역되지 않았습니다. 번역을 도와주십시오
-
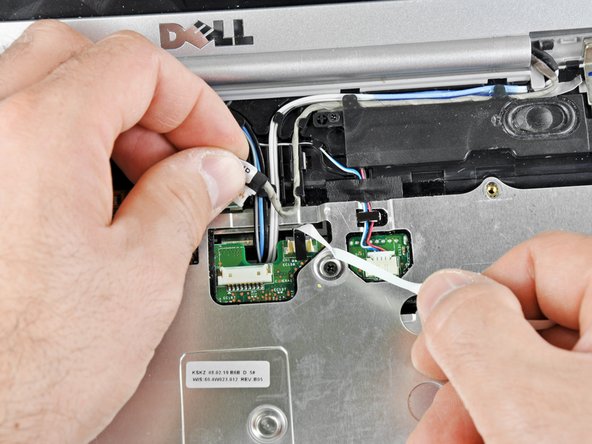
Disconnect the flat LCD ribbon cable by pulling it up by the tab.
-
Free the ribbon cable from its retaining clips.
-
-
이 단계는 번역되지 않았습니다. 번역을 도와주십시오
-
Remove the four 3.45 mm Phillips #1 screws securing the display assembly to the laptop chassis.
-
Remove the display assembly from the laptop.
-
-
이 단계는 번역되지 않았습니다. 번역을 도와주십시오
-
Use the pointed side of a spudger to peel the six small rubber feet off the display assembly.
-
Remove the six 6.05 mm Phillips #1 screws hidden beneath each of the rubber feet.
-
-
이 단계는 번역되지 않았습니다. 번역을 도와주십시오
-
Use the flat end of a spudger to gently pry the front bezel off the display assembly. Start at a corner and work your way around.
-
Remove the front display bezel when it comes free.
-
-
이 단계는 번역되지 않았습니다. 번역을 도와주십시오
-
Remove the two 5.70 mm Phillips #1 screws securing the LCD to the display assembly.
-
Remove the LCD from the display assembly.
-


다른 15명이 해당 안내서를 완성하였습니다.
