주요 콘텐츠로 건너뛰기

Dell Inspiron 17R-N7110 Touchpad Replacement

필요한 것

  1. Dell Inspiron 17R-N7110 Touchpad Replacement, Battery: 1 단계, 이미지 1/3 Dell Inspiron 17R-N7110 Touchpad Replacement, Battery: 1 단계, 이미지 2/3 Dell Inspiron 17R-N7110 Touchpad Replacement, Battery: 1 단계, 이미지 3/3
    이 단계에 사용된 도구:
    Anti-Static Wrist Strap
    $7.95
    구매
    • Do not touch any electronic components without wearing the anti-static wrist strap. Failure to do so poses a risk of static electric shock, and may cause damage to components.

    • Place the laptop on a flat surface with the Dell logo upside down.

    • Flip the laptop over. The battery will be in the top center.

  2. Dell Inspiron 17R-N7110 Touchpad Replacement: 2 단계, 이미지 1/2 Dell Inspiron 17R-N7110 Touchpad Replacement: 2 단계, 이미지 2/2
    • Slide both the left lock and right lock, towards the center of the battery.

    • Push upwards on the grip on the bottom of the battery to remove it.

  3. Dell Inspiron 17R-N7110 Touchpad Replacement, Keyboard: 3 단계, 이미지 1/3 Dell Inspiron 17R-N7110 Touchpad Replacement, Keyboard: 3 단계, 이미지 2/3 Dell Inspiron 17R-N7110 Touchpad Replacement, Keyboard: 3 단계, 이미지 3/3
    • Do not pull the keyboard away from the laptop. The keyboard is connected to the motherboard by a cable. Pulling the keyboard may cause damage to the keyboard and/or motherboard.

    • Metal spudgers and similar prying tools can damage internal components like the motherboard. It is ideal to use a regular black nylon spudger or a plastic opening tool, but for this device the metal jimmy was the only tool to work.

    • Flip over and open your device. Gently wedge the metal Jimmy into the rightmost hole at a 45-degree angle. Make sure that the Jimmy is between the silver metal portion of the keyboard and the silver plastic edge around the keyboard.

    • Tilt the metal jimmy away from you to pry up the edge of the keyboard.

    • Repeat the previous actions on each of the other three holes to release the keyboard.

  4. Dell Inspiron 17R-N7110 Touchpad Replacement: 4 단계, 이미지 1/2 Dell Inspiron 17R-N7110 Touchpad Replacement: 4 단계, 이미지 2/2
    • Gently flip the keyboard over and lay it on the touchpad area.

  5. Dell Inspiron 17R-N7110 Touchpad Replacement: 5 단계, 이미지 1/3 Dell Inspiron 17R-N7110 Touchpad Replacement: 5 단계, 이미지 2/3 Dell Inspiron 17R-N7110 Touchpad Replacement: 5 단계, 이미지 3/3
    • Flip up the black flap where the keyboard cable connects to the motherboard

    • Gently pull the cable away from the slot to release the keyboard.

    • Remove the keyboard from the device.

  6. Dell Inspiron 17R-N7110 Touchpad Replacement, Touchpad: 6 단계, 이미지 1/2 Dell Inspiron 17R-N7110 Touchpad Replacement, Touchpad: 6 단계, 이미지 2/2
    • Flip the laptop over so it is bottom-up.

    • Use a Phillips #0 screwdriver to unscrew the fifteen 5mm screws pictured.

    • Flip the laptop over.

  7. Dell Inspiron 17R-N7110 Touchpad Replacement: 7 단계, 이미지 1/3 Dell Inspiron 17R-N7110 Touchpad Replacement: 7 단계, 이미지 2/3 Dell Inspiron 17R-N7110 Touchpad Replacement: 7 단계, 이미지 3/3
    이 단계에 사용된 도구:
    Anti-Static Wrist Strap
    $7.95
    구매
    • Use a Phillips #0 screwdriver to unscrew the four 5mm screws from the palmrest.

    • Do not touch any electronic components without wearing the anti-static wrist strap. Failure to do so poses a risk of static electric shock, and may damage components.

    • Flip up the black flaps over the three cables pictured and gently pull each cable out.

  8. Dell Inspiron 17R-N7110 Touchpad Replacement: 8 단계, 이미지 1/2 Dell Inspiron 17R-N7110 Touchpad Replacement: 8 단계, 이미지 2/2
    • Do not proceed without holding the laptop screen/lid for support. The screen is very heavy and may cause the device to fall if not held and supported.

    • Use a plastic opening tool to pry up the edges of the palmrest cover.

    • Lift off the palmrest cover.

    • Flip palmrest over to access the touchpad and buttons.

  9. Dell Inspiron 17R-N7110 Touchpad Replacement: 9 단계, 이미지 1/3 Dell Inspiron 17R-N7110 Touchpad Replacement: 9 단계, 이미지 2/3 Dell Inspiron 17R-N7110 Touchpad Replacement: 9 단계, 이미지 3/3
    • Use a Phillips #0 screwdriver to unscrew the three 4mm screws from the touchpad buttons on the back of the palmrest.

    • Flip up the black flaps over the two cables pictured and pull the cables out.

  10. Dell Inspiron 17R-N7110 Touchpad Replacement: 10 단계, 이미지 1/3 Dell Inspiron 17R-N7110 Touchpad Replacement: 10 단계, 이미지 2/3 Dell Inspiron 17R-N7110 Touchpad Replacement: 10 단계, 이미지 3/3
    • Use your finger nail to lift up the silver tape.

    • The iOpener gets very hot. Use the tabs on each end of the iOpener to handle it when hot. Failure to do so may result in injury. Do not microwave iOpener for any longer than 30 seconds at a time.

    • Use an iOpener to heat up the touch pad. Place the iOpener on the touch pad as pictured for one minute.

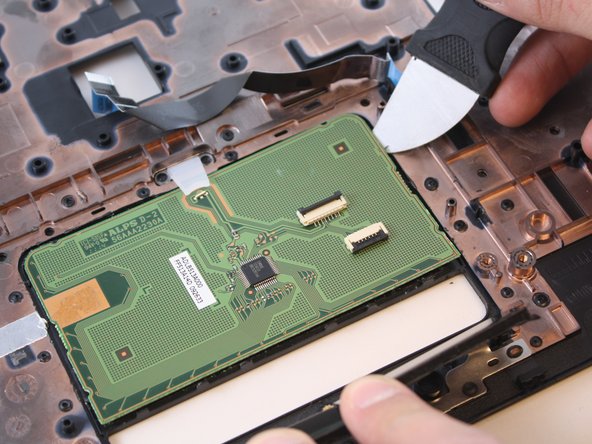
    • Use a metal jimmy to gently pry up the touch pad sensor.

    • If the touch pad sensor has not loosened enough to remove, repeat heating with the iOpener in one-minute intervals until the sensor can be removed.

    • Metal spudgers and similar prying tools can harm internal components like the touchpad sensor. It is ideal to use a regular black nylon spudger or a plastic opening tool, but for this device the metal jimmy was the only tool to work.

결론

To reassemble your device, follow these instructions in reverse order.

Emily Cone

회원 가입일: 04/09/18

1,366 평판

안내서 7개 작성하였습니다

댓글 0개

댓글 쓰기

조회 통계:

24 시간 전: 0

7일 전: 0

30일 전: 7

전체 시간: 979