주요 콘텐츠로 건너뛰기

Dell Inspiron 5758 DC Jack Replacement

필요한 것

  1. Dell Inspiron 5758 DC Jack Replacement, Battery: 1 단계, 이미지 1/2 Dell Inspiron 5758 DC Jack Replacement, Battery: 1 단계, 이미지 2/2
    • Flip the laptop with the serial number facing up. You should be able to see the battery release switch.

  2. Dell Inspiron 5758 DC Jack Replacement: 2 단계, 이미지 1/3 Dell Inspiron 5758 DC Jack Replacement: 2 단계, 이미지 2/3 Dell Inspiron 5758 DC Jack Replacement: 2 단계, 이미지 3/3
    • Slide the battery release switch towards the unlock icon.

    • You should hear a click.

    • Lift and pull the ejected battery to remove it.

  3. Dell Inspiron 5758 DC Jack Replacement, DC Jack: 3 단계, 이미지 1/3 Dell Inspiron 5758 DC Jack Replacement, DC Jack: 3 단계, 이미지 2/3 Dell Inspiron 5758 DC Jack Replacement, DC Jack: 3 단계, 이미지 3/3
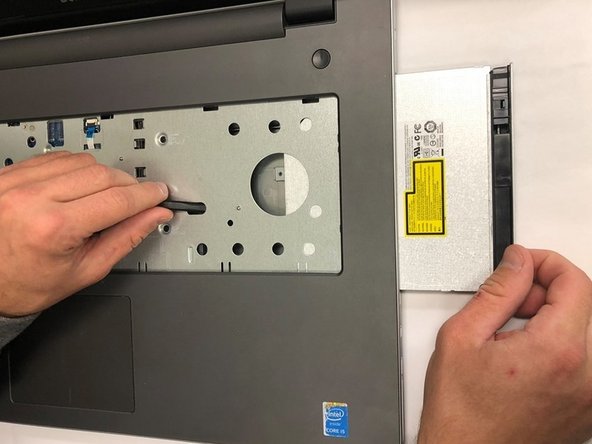
    • Remove the one 3mm optical drive screw.

    • Remove the two 8 mm screws.

    • Pry up and remove the access door.

  4. Dell Inspiron 5758 DC Jack Replacement: 4 단계, 이미지 1/1
    • Remove the one 3 mm screw.

    • Remove the bracket.

  5. Dell Inspiron 5758 DC Jack Replacement: 5 단계, 이미지 1/2 Dell Inspiron 5758 DC Jack Replacement: 5 단계, 이미지 2/2
    • Unplug the antenna cables.

    • Remove the Wireless Card.

  6. Dell Inspiron 5758 DC Jack Replacement: 6 단계, 이미지 1/2 Dell Inspiron 5758 DC Jack Replacement: 6 단계, 이미지 2/2
    • Unplug the hard drive cable.

    • Use a plastic opening tool or your fingernail to pop the tab of the cable connector. Then you will be able to disconnect the cable.

    • Remove the four 8 mm screws.

    • Remove the hard drive.

  7. Dell Inspiron 5758 DC Jack Replacement: 7 단계, 이미지 1/3 Dell Inspiron 5758 DC Jack Replacement: 7 단계, 이미지 2/3 Dell Inspiron 5758 DC Jack Replacement: 7 단계, 이미지 3/3
    • Remove the two 3 mm screws under the battery.

    • Remove the three 2 mm wafer screws under the optical drive.

    • Remove the ten 8 mm base screws.

  8. Dell Inspiron 5758 DC Jack Replacement: 8 단계, 이미지 1/1
    • Unplug the speaker cable by sliding to the right.

  9. Dell Inspiron 5758 DC Jack Replacement: 9 단계, 이미지 1/2 Dell Inspiron 5758 DC Jack Replacement: 9 단계, 이미지 2/2
    • Press in the tabs to loosen the keyboard.

    • Carefully lift the keyboard up and turn it over.

  10. Dell Inspiron 5758 DC Jack Replacement: 10 단계, 이미지 1/1
    • Unplug the keyboard cable & remove the keyboard.

  11. Dell Inspiron 5758 DC Jack Replacement: 11 단계, 이미지 1/2 Dell Inspiron 5758 DC Jack Replacement: 11 단계, 이미지 2/2
    • Slide the DVD optical drive over & remove it from the laptop.

  12. Dell Inspiron 5758 DC Jack Replacement: 12 단계, 이미지 1/2 Dell Inspiron 5758 DC Jack Replacement: 12 단계, 이미지 2/2
    • Remove the four 5 mm screws.

    • Unplug the optical drive interposer cable.

  13. Dell Inspiron 5758 DC Jack Replacement: 13 단계, 이미지 1/2 Dell Inspiron 5758 DC Jack Replacement: 13 단계, 이미지 2/2
    • Unplug the power button cable.

    • Unplug the touchpad cable.

  14. Dell Inspiron 5758 DC Jack Replacement: 14 단계, 이미지 1/3 Dell Inspiron 5758 DC Jack Replacement: 14 단계, 이미지 2/3 Dell Inspiron 5758 DC Jack Replacement: 14 단계, 이미지 3/3
    • Carefully pry off & loosen the bottom base.

  15. Dell Inspiron 5758 DC Jack Replacement: 15 단계, 이미지 1/1
    • Remove the bottom base.

  16. Dell Inspiron 5758 DC Jack Replacement: 16 단계, 이미지 1/2 Dell Inspiron 5758 DC Jack Replacement: 16 단계, 이미지 2/2
    • Remove the one 5mm screw.

    • Lift the circuit board & turn it over.

    • Unplug the cable.

    • Remove the audio/USB circuit board.

  17. Dell Inspiron 5758 DC Jack Replacement: 17 단계, 이미지 1/3 Dell Inspiron 5758 DC Jack Replacement: 17 단계, 이미지 2/3 Dell Inspiron 5758 DC Jack Replacement: 17 단계, 이미지 3/3
    • Loosen the audio / USB cable.

    • Remove the one 3mm motherboard screw.

    • Lift the motherboard & carefully move it out of the way.

  18. Dell Inspiron 5758 DC Jack Replacement: 18 단계, 이미지 1/3 Dell Inspiron 5758 DC Jack Replacement: 18 단계, 이미지 2/3 Dell Inspiron 5758 DC Jack Replacement: 18 단계, 이미지 3/3
    • Unplug the DC jack cable.

    • Remove the one 3mm screw.

    • Remove the DC Jack.

결론

To reassemble your device, follow these instructions in reverse order.

다른 한 분이 해당 안내서를 완성하였습니다.

Antonio Zuniga

회원 가입일: 09/18/18

273 평판

안내서 1개 작성함

University of North Texas, Team S3-G4, Raign Fall 2018 University of North Texas, Team S3-G4, Raign Fall 2018 회원

UNT-RAIGN-F18S3G4

5 회원들

안내서 5개 작성하였습니다

댓글 0개

댓글 쓰기

조회 통계:

24 시간 전: 0

7일 전: 1

30일 전: 4

전체 시간: 1,012