주요 콘텐츠로 건너뛰기

Dell Inspiron 5758 LCD Screen Replacement

필요한 것

  1. Dell Inspiron 5758 LCD Screen Replacement, Battery: 1 단계, 이미지 1/2 Dell Inspiron 5758 LCD Screen Replacement, Battery: 1 단계, 이미지 2/2
    • Flip the laptop with the serial number facing up. You should be able to see the battery release switch.

  2. Dell Inspiron 5758 LCD Screen Replacement: 2 단계, 이미지 1/3 Dell Inspiron 5758 LCD Screen Replacement: 2 단계, 이미지 2/3 Dell Inspiron 5758 LCD Screen Replacement: 2 단계, 이미지 3/3
    • Slide the battery release switch towards the unlock icon.

    • You should hear a click.

    • Lift and pull the ejected battery to remove it.

  3. Dell Inspiron 5758 LCD Screen Replacement, DC Jack: 3 단계, 이미지 1/3 Dell Inspiron 5758 LCD Screen Replacement, DC Jack: 3 단계, 이미지 2/3 Dell Inspiron 5758 LCD Screen Replacement, DC Jack: 3 단계, 이미지 3/3
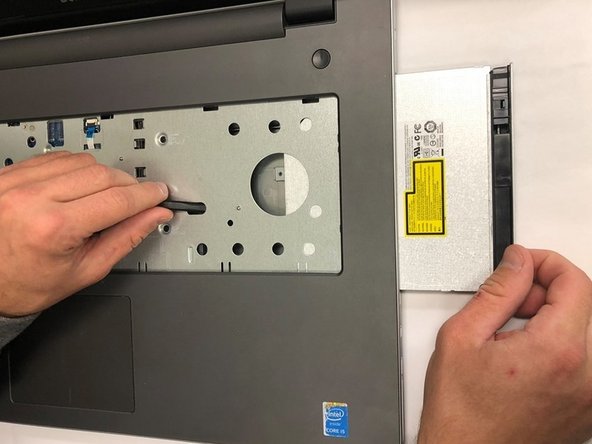
    • Remove the one 3mm optical drive screw.

    • Remove the two 8 mm screws.

    • Pry up and remove the access door.

  4. Dell Inspiron 5758 LCD Screen Replacement: 4 단계, 이미지 1/1
    • Remove the one 3 mm screw.

    • Remove the bracket.

  5. Dell Inspiron 5758 LCD Screen Replacement: 5 단계, 이미지 1/2 Dell Inspiron 5758 LCD Screen Replacement: 5 단계, 이미지 2/2
    • Unplug the antenna cables.

    • Remove the Wireless Card.

  6. Dell Inspiron 5758 LCD Screen Replacement: 6 단계, 이미지 1/2 Dell Inspiron 5758 LCD Screen Replacement: 6 단계, 이미지 2/2
    • Unplug the hard drive cable.

    • Use a plastic opening tool or your fingernail to pop the tab of the cable connector. Then you will be able to disconnect the cable.

    • Remove the four 8 mm screws.

    • Remove the hard drive.

  7. Dell Inspiron 5758 LCD Screen Replacement: 7 단계, 이미지 1/3 Dell Inspiron 5758 LCD Screen Replacement: 7 단계, 이미지 2/3 Dell Inspiron 5758 LCD Screen Replacement: 7 단계, 이미지 3/3
    • Remove the two 3 mm screws under the battery.

    • Remove the three 2 mm wafer screws under the optical drive.

    • Remove the ten 8 mm base screws.

  8. Dell Inspiron 5758 LCD Screen Replacement: 8 단계, 이미지 1/1
    • Unplug the speaker cable by sliding to the right.

  9. Dell Inspiron 5758 LCD Screen Replacement: 9 단계, 이미지 1/2 Dell Inspiron 5758 LCD Screen Replacement: 9 단계, 이미지 2/2
    • Press in the tabs to loosen the keyboard.

    • Carefully lift the keyboard up and turn it over.

  10. Dell Inspiron 5758 LCD Screen Replacement: 10 단계, 이미지 1/1
    • Unplug the keyboard cable & remove the keyboard.

  11. Dell Inspiron 5758 LCD Screen Replacement: 11 단계, 이미지 1/2 Dell Inspiron 5758 LCD Screen Replacement: 11 단계, 이미지 2/2
    • Slide the DVD optical drive over & remove it from the laptop.

  12. Dell Inspiron 5758 LCD Screen Replacement: 12 단계, 이미지 1/2 Dell Inspiron 5758 LCD Screen Replacement: 12 단계, 이미지 2/2
    • Remove the four 5 mm screws.

    • Unplug the optical drive interposer cable.

  13. Dell Inspiron 5758 LCD Screen Replacement: 13 단계, 이미지 1/2 Dell Inspiron 5758 LCD Screen Replacement: 13 단계, 이미지 2/2
    • Unplug the power button cable.

    • Unplug the touchpad cable.

  14. Dell Inspiron 5758 LCD Screen Replacement: 14 단계, 이미지 1/3 Dell Inspiron 5758 LCD Screen Replacement: 14 단계, 이미지 2/3 Dell Inspiron 5758 LCD Screen Replacement: 14 단계, 이미지 3/3
    • Carefully pry off & loosen the bottom base.

  15. Dell Inspiron 5758 LCD Screen Replacement: 15 단계, 이미지 1/1
    • Remove the bottom base.

  16. Dell Inspiron 5758 LCD Screen Replacement: 16 단계, 이미지 1/2 Dell Inspiron 5758 LCD Screen Replacement: 16 단계, 이미지 2/2
    • Remove the one 5mm screw.

    • Lift the circuit board & turn it over.

    • Unplug the cable.

    • Remove the audio/USB circuit board.

  17. Dell Inspiron 5758 LCD Screen Replacement: 17 단계, 이미지 1/3 Dell Inspiron 5758 LCD Screen Replacement: 17 단계, 이미지 2/3 Dell Inspiron 5758 LCD Screen Replacement: 17 단계, 이미지 3/3
    • Loosen the audio / USB cable.

    • Remove the one 3mm motherboard screw.

    • Lift the motherboard & carefully move it out of the way.

  18. Dell Inspiron 5758 LCD Screen Replacement: 18 단계, 이미지 1/3 Dell Inspiron 5758 LCD Screen Replacement: 18 단계, 이미지 2/3 Dell Inspiron 5758 LCD Screen Replacement: 18 단계, 이미지 3/3
    • Unplug the DC jack cable.

    • Remove the one 3mm screw.

    • Remove the DC Jack.

  19. Dell Inspiron 5758 LCD Screen Replacement, Touchpad: 19 단계, 이미지 1/2 Dell Inspiron 5758 LCD Screen Replacement, Touchpad: 19 단계, 이미지 2/2
    • Release the antenna cable tape.

    • Release the antenna cables.

  20. Dell Inspiron 5758 LCD Screen Replacement: 20 단계, 이미지 1/3 Dell Inspiron 5758 LCD Screen Replacement: 20 단계, 이미지 2/3 Dell Inspiron 5758 LCD Screen Replacement: 20 단계, 이미지 3/3
    • Remove the four 5mm right hinge screws using the Phillips #00 screwdriver.

    • Remove the three 5mm left hinge screws using Phillips #00 screwdriver.

    • Open the hinges carefully and remove the LCD display assembly.

  21. Dell Inspiron 5758 LCD Screen Replacement: 21 단계, 이미지 1/2 Dell Inspiron 5758 LCD Screen Replacement: 21 단계, 이미지 2/2
    • Remove the one 2mm wafer screw using Phillips #0 screwdriver.

    • Loosen the cable and remove the power button circuit board.

  22. Dell Inspiron 5758 LCD Screen Replacement: 22 단계, 이미지 1/2 Dell Inspiron 5758 LCD Screen Replacement: 22 단계, 이미지 2/2
    • Push up on the touchpad to release it from the housing.

    • Remove the touchpad.

  23. Dell Inspiron 5758 LCD Screen Replacement, LCD Screen: 23 단계, 이미지 1/3 Dell Inspiron 5758 LCD Screen Replacement, LCD Screen: 23 단계, 이미지 2/3 Dell Inspiron 5758 LCD Screen Replacement, LCD Screen: 23 단계, 이미지 3/3
    • Once you have removed the LCD display assembly from the palmrest touchpad, use a spudger to unsnap the LCD bezel via the notches on the outside edge of the bezel .

    • The bezel may require some force to unsnap.

    • When you have removed the LCD bezel, place it to the side.

  24. Dell Inspiron 5758 LCD Screen Replacement: 24 단계, 이미지 1/3 Dell Inspiron 5758 LCD Screen Replacement: 24 단계, 이미지 2/3 Dell Inspiron 5758 LCD Screen Replacement: 24 단계, 이미지 3/3
    • Remove the ten 4.5mm screen screws.

    • There is one screw in the top left, one screw in the top right, four in the bottom left, and four in the bottom right.

  25. Dell Inspiron 5758 LCD Screen Replacement: 25 단계, 이미지 1/2 Dell Inspiron 5758 LCD Screen Replacement: 25 단계, 이미지 2/2
    • Lift the LCD screen from the display assembly, flip the LCD screen over, and place the screen face down.

    • Unplug the LCD cable.

    • Place the display assembly to the side.

  26. Dell Inspiron 5758 LCD Screen Replacement: 26 단계, 이미지 1/2 Dell Inspiron 5758 LCD Screen Replacement: 26 단계, 이미지 2/2
    • Remove the three 3mm screws that connect each hinge rail to the LCD screen.

    • Remove the hinge rails.

    • There are two hinge rails, one on the left edge of the screen and one on the right edge.

결론

To reassemble your device, follow these instructions in reverse order.

다른 2명이 해당 안내서를 완성하였습니다.

Blase Martin

회원 가입일: 09/18/18

401 평판

안내서 2개 작성하였습니다

University of North Texas, Team S3-G4, Raign Fall 2018 University of North Texas, Team S3-G4, Raign Fall 2018 회원

UNT-RAIGN-F18S3G4

5 회원들

안내서 5개 작성하였습니다

댓글 0개

댓글 쓰기

조회 통계:

24 시간 전: 3

7일 전: 4

30일 전: 4

전체 시간: 823