주요 콘텐츠로 건너뛰기

Dell Inspiron 7568 Cooling Fan Replacement Guide

필요한 것

  1. Dell Inspiron 7568 Cooling Fan Replacement Guide, Battery: 1 단계, 이미지 1/2 Dell Inspiron 7568 Cooling Fan Replacement Guide, Battery: 1 단계, 이미지 2/2
    • Remove the ten 7mm Phillips #1 screws on the bottom cover.

    • Remove the bottom cover.

  2. Dell Inspiron 7568 Cooling Fan Replacement Guide: 2 단계, 이미지 1/2 Dell Inspiron 7568 Cooling Fan Replacement Guide: 2 단계, 이미지 2/2
    • Remove the four 3mm Phillips #1 screws holding the battery.

    • Unhinge the connector cable to the battery.

    • Remove the battery.

  3. Dell Inspiron 7568 Cooling Fan Replacement Guide, Cooling Fan: 3 단계, 이미지 1/2 Dell Inspiron 7568 Cooling Fan Replacement Guide, Cooling Fan: 3 단계, 이미지 2/2
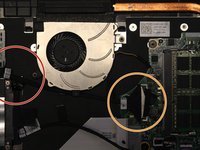
    • Begin by unclipping the cable connecting the fan and the motherboard.

    • Gently separate the motherboard cable from the clamp at the bottom of the fan.
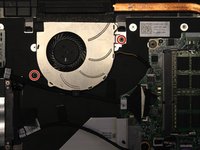
    • Remove the cable.

  4. Dell Inspiron 7568 Cooling Fan Replacement Guide: 4 단계, 이미지 1/2 Dell Inspiron 7568 Cooling Fan Replacement Guide: 4 단계, 이미지 2/2
    • Remove the two 3mm Phillips #1 screws that hold the fan into place.

    • Remove the fan.

결론

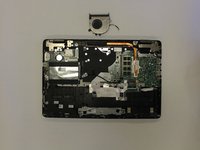
To reassemble your device, follow these instructions in reverse order.

다른 3명이 해당 안내서를 완성하였습니다.

Yash Samant

회원 가입일: 02/22/17

394 평판

안내서 3개 작성하였습니다

USF Tampa, Team S2-G2, Lacy Spring 2017 USF Tampa, Team S2-G2, Lacy Spring 2017 회원

USFT-LACY-S17S2G2

4 회원들

안내서 7개 작성하였습니다

댓글 0개

댓글 쓰기

조회 통계:

24 시간 전: 0

7일 전: 0

30일 전: 0

전체 시간: 567