주요 콘텐츠로 건너뛰기

Dell Inspiron N4110 Motherboard Replacement

필요한 것

  1. Dell Inspiron N4110 Motherboard Replacement, Battery: 1 단계, 이미지 1/1
    • Make sure the laptop is off and unplugged before starting this step.

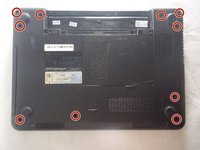
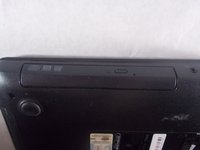
    • Locate the battery on the underside of the laptop.

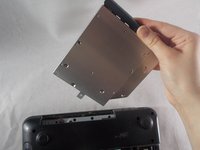
    • Push the two battery clips following the direction of the arrows.

  2. Dell Inspiron N4110 Motherboard Replacement: 2 단계, 이미지 1/1
    • Push upward from the base of the battery.

  3. Dell Inspiron N4110 Motherboard Replacement: 3 단계, 이미지 1/1
    • Pull battery away from computer until it is fully removed.

  4. Dell Inspiron N4110 Motherboard Replacement, Fan: 4 단계, 이미지 1/2 Dell Inspiron N4110 Motherboard Replacement, Fan: 4 단계, 이미지 2/2
    • Remove the 10 2.5x5 mm screws from the base of the laptop.

  5. Dell Inspiron N4110 Motherboard Replacement: 5 단계, 이미지 1/1
    • Unscrew the final 2.5x5 mm screw attached to the cover.

    • This screw is "captive" and does not detach from the cover. Make sure the screw is fully unscrewed before attempting to remove the cover.

  6. Dell Inspiron N4110 Motherboard Replacement: 6 단계, 이미지 1/2 Dell Inspiron N4110 Motherboard Replacement: 6 단계, 이미지 2/2
    • Remove the cover from the laptop.

  7. Dell Inspiron N4110 Motherboard Replacement: 7 단계, 이미지 1/2 Dell Inspiron N4110 Motherboard Replacement: 7 단계, 이미지 2/2
    • Unscrew the 2.5x5 mm screw inside the RAM compartment.

  8. Dell Inspiron N4110 Motherboard Replacement: 8 단계, 이미지 1/2 Dell Inspiron N4110 Motherboard Replacement: 8 단계, 이미지 2/2
    • Remove the disk drive from the side of the computer.

    • There is no need to press the button, the drive will come out.

  9. Dell Inspiron N4110 Motherboard Replacement: 9 단계, 이미지 1/2 Dell Inspiron N4110 Motherboard Replacement: 9 단계, 이미지 2/2
    • Unscrew the two 2x3 mm screws inside the disk drive compartment.

  10. Dell Inspiron N4110 Motherboard Replacement: 10 단계, 이미지 1/3 Dell Inspiron N4110 Motherboard Replacement: 10 단계, 이미지 2/3 Dell Inspiron N4110 Motherboard Replacement: 10 단계, 이미지 3/3
    • Flip the computer over, and open the laptop.

    • Use a plastic opening tool to begin to remove the keyboard.

    • Use your hands to finish separating the keyboard from the laptop.

    • This can be a bit challenging, but it will come loose.

  11. Dell Inspiron N4110 Motherboard Replacement: 11 단계, 이미지 1/1
    • Lift the black clip from the tan connection for the keyboard.

    • Pull the the connection away from the clip.

    • Move the keyboard away from the laptop.

    • With the keyboard removed, consider this opportunity to more freely clean it out with some compressed air.

  12. Dell Inspiron N4110 Motherboard Replacement: 12 단계, 이미지 1/1
    • Lift the black clips from the tan connections for all 3 locations marked.

    • Remove the connections from the clips.

  13. Dell Inspiron N4110 Motherboard Replacement: 13 단계, 이미지 1/1
    • Unscrew the five 2.5x5 mm screws.

  14. Dell Inspiron N4110 Motherboard Replacement: 14 단계, 이미지 1/2 Dell Inspiron N4110 Motherboard Replacement: 14 단계, 이미지 2/2
    • Use plastic opening tools to remove base cover.

    • Use your hands to fully remove cover from the base.

    • This may be difficult, but it is possible.

  15. Dell Inspiron N4110 Motherboard Replacement: 15 단계, 이미지 1/1
    • Disconnect the two cables that connect the speaker and the fan.

    • These can just be pulled out, they do not have clips.

  16. Dell Inspiron N4110 Motherboard Replacement: 16 단계, 이미지 1/1
    • Disconnect the ribbon cable over the screw to reveal it. Flip up the latch and pull gently on the ribbon to remove it from the connector.

    • Unscrew the 2.5x5 mm screw from the fan.

  17. Dell Inspiron N4110 Motherboard Replacement: 17 단계, 이미지 1/2 Dell Inspiron N4110 Motherboard Replacement: 17 단계, 이미지 2/2
    • Pull up and remove the fan from the laptop.

  18. Dell Inspiron N4110 Motherboard Replacement, Motherboard: 18 단계, 이미지 1/1
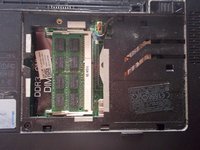
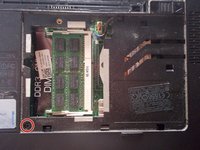
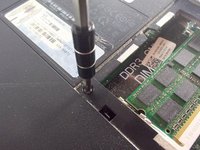
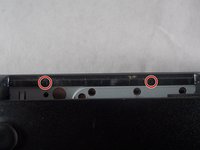
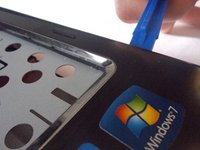
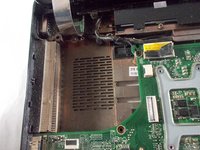
    • Unscrew the six 2.5x5mm screws from the motherboard.

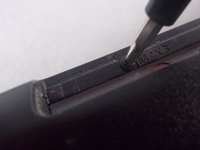
    • Note that this screw may be "retained" by the loop at the end of the grounding wire.

  19. Dell Inspiron N4110 Motherboard Replacement: 19 단계, 이미지 1/2 Dell Inspiron N4110 Motherboard Replacement: 19 단계, 이미지 2/2
    • Disconnect the black and yellow cable from the motherboard.

  20. Dell Inspiron N4110 Motherboard Replacement: 20 단계, 이미지 1/1
    • Begin to separate the motherboard from the laptop

    • Pull up to separate from the other internal pieces, and then pull to the right away from the case

  21. Dell Inspiron N4110 Motherboard Replacement: 21 단계, 이미지 1/1
    • Remove the final cable from the motherboard

    • This will allow the motherboard to fully come out of the computer

    • When reinstalling motherboard, ensure the two connectors are precisely aligned with the daughterboard below. If slightly misaligned, you may bend the pins on the daughterboard connector.

결론

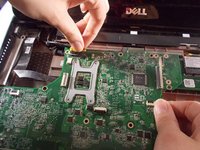
To reassemble your device, follow these instructions in reverse order.

다른 2명이 해당 안내서를 완성하였습니다.

Olivia

회원 가입일: 03/20/18

752 평판

안내서 3개 작성하였습니다

UMass Dartmouth, Team S5-G1, Peak Spring 2018 UMass Dartmouth, Team S5-G1, Peak Spring 2018 회원

UMASSD-PEAK-S18S5G1

3 회원들

안내서 6개 작성하였습니다

댓글 2개

After pulling off the battery, the step to remove the four M2x3 mm screws was forgotten. Please update the guide.

apocalypse612 - 답글

Hi my Friend, can you send me a picture in this zone, i need change a transistor smd to controller the battery charged.

The transistor is near to connector display

Sorry for my English, I'm a uruguayan thanks

Agustin - 답글

댓글 쓰기

조회 통계:

24 시간 전: 2

7일 전: 19

30일 전: 50

전체 시간: 2,565