주요 콘텐츠로 건너뛰기

Dell Inspiron n5110 - HDD Replacement / Upgrade

필요한 것

동영상 개요

  1. Dell Inspiron n5110 - HDD Replacement / Upgrade, HDD - replacement / upgrade: 1 단계, 이미지 1/3 Dell Inspiron n5110 - HDD Replacement / Upgrade, HDD - replacement / upgrade: 1 단계, 이미지 2/3 Dell Inspiron n5110 - HDD Replacement / Upgrade, HDD - replacement / upgrade: 1 단계, 이미지 3/3
    • Switch off the laptop and remove the battery.

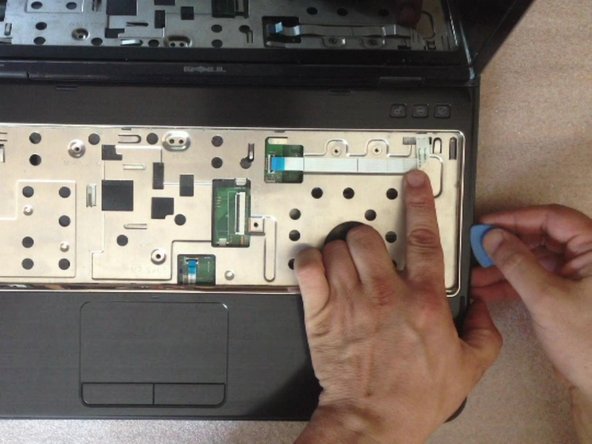
    • The keyboard is held by 4x locking clips.

    • By using cutter, carefully lift up the one side of the keyboard and start opening the locking clips.

  2. Dell Inspiron n5110 - HDD Replacement / Upgrade: 2 단계, 이미지 1/3 Dell Inspiron n5110 - HDD Replacement / Upgrade: 2 단계, 이미지 2/3 Dell Inspiron n5110 - HDD Replacement / Upgrade: 2 단계, 이미지 3/3
    • Remove the RAM memory cover and the DVD drive.

    • Now you have 12x M 2.5x5.0 screws.

  3. Dell Inspiron n5110 - HDD Replacement / Upgrade: 3 단계, 이미지 1/3 Dell Inspiron n5110 - HDD Replacement / Upgrade: 3 단계, 이미지 2/3 Dell Inspiron n5110 - HDD Replacement / Upgrade: 3 단계, 이미지 3/3
    • Unscrew 4x M 2.5x5.0 screws and disconnect the 3x flex cables:

    • Power on flex cable

    • Mouse pad flex cable

    • Hot keys flex cable

    • By using a plastic tool remove the upper case.

  4. Dell Inspiron n5110 - HDD Replacement / Upgrade: 4 단계, 이미지 1/3 Dell Inspiron n5110 - HDD Replacement / Upgrade: 4 단계, 이미지 2/3 Dell Inspiron n5110 - HDD Replacement / Upgrade: 4 단계, 이미지 3/3
    • Disconnect:

    • The LCD display flex cable

    • The WiFi & Blue-tooth coaxial cables

    • The speaker connector.

    • Remove 4x M 2.5.0.5 screws from the Display module hinges.

    • Now you can remove the LCD display module.

  5. Dell Inspiron n5110 - HDD Replacement / Upgrade: 5 단계, 이미지 1/3 Dell Inspiron n5110 - HDD Replacement / Upgrade: 5 단계, 이미지 2/3 Dell Inspiron n5110 - HDD Replacement / Upgrade: 5 단계, 이미지 3/3
    • 5x M 2,5x5.0 screws hold the motherboard to the down bezel.

    • Be careful with these two connectors:

    • between motherboard and the additional charging port board,

    • between motherboard and the additional WiFi card slot, USB connectors board.

    • Start removing the motherboard from right side, near to the DVD drive connector.

  6. Dell Inspiron n5110 - HDD Replacement / Upgrade: 6 단계, 이미지 1/3 Dell Inspiron n5110 - HDD Replacement / Upgrade: 6 단계, 이미지 2/3 Dell Inspiron n5110 - HDD Replacement / Upgrade: 6 단계, 이미지 3/3
    • Finally you can find the hard disk drive on the back side of the motherboard.

    • Remove the last two screws securing the hard drive.

    • There are two strips of foam to prevent shock under the hard drive, which may stick to the drive due to heat—so, pull slowly away from the SATA connector so you don't damage any components.

  7. Dell Inspiron n5110 - HDD Replacement / Upgrade: 7 단계, 이미지 1/1
    • When you are installing the new HDD, hold the SATA connector with one finger.

    • Now assemble the system. I hope everything was successful.

    • .

    • Please SUBSCRIBE to my channel ツ

결론

To reassemble your device, follow these instructions in reverse order.

다른 48명이 해당 안내서를 완성하였습니다.

ZFix

회원 가입일: 12/09/13

191,182 평판

안내서 330개 작성하였습니다

Master Techs Master Techs 회원

Community

322 회원들

안내서 2,521개 작성하였습니다

댓글 20개

Thank You for labeling what each of the flex cables is for. If there is an issue with the laptop after reassembly it will make finding the lose cable easier.

JPWhite - 답글

Truly this laptop was designed by a madman with no regard for easy of disassembly/reassembly.

ford423 - 답글

My model seemed to be slightly different and I couldn't get the upper case off from the side. I started from the top left near the power button.

Martin Pickett - 답글

My model was also just a little different. There were two screws holding a bracket to the MB located on the upper edge of the hard drive in your final picture. I had to remove these two screws and then there were 4 screws mounting this bracket to the HD. Also there was some adhesive strips on the under side of the hard drive that stuck the HD to the MB. I had to slowly pull the hard drive from the SATA connector.

jondonze - 답글

Well I think I will leave it to the experts

malcolmmcelwee - 답글

댓글 쓰기

조회 통계:

24 시간 전: 3

7일 전: 38

30일 전: 241

전체 시간: 83,603