주요 콘텐츠로 건너뛰기

Dell Latitude 3520 Screen Replacement

필요한 것

  1. Dell Latitude 3520 Screen Replacement, Remove MicroSD-card: 1 단계, 이미지 1/1
    • Push the microSD-card to eject it from the slot.

    • Remove the microSD-card from the computer.

  2. Dell Latitude 3520 Screen Replacement, Bottom Case: 2 단계, 이미지 1/3 Dell Latitude 3520 Screen Replacement, Bottom Case: 2 단계, 이미지 2/3 Dell Latitude 3520 Screen Replacement, Bottom Case: 2 단계, 이미지 3/3
    • Loosen the nine screws 2mm Phillips #0 that secure the base cover to the assembly.

    • Using a plastic scribe, pry open the base cover starting from the recesses located in the indents near the hinges at the top edge of the base cover.

    • Carefully lift and remove the base cover.

  3. Dell Latitude 3520 Screen Replacement, Screen Removal: 3 단계, 이미지 1/3 Dell Latitude 3520 Screen Replacement, Screen Removal: 3 단계, 이미지 2/3 Dell Latitude 3520 Screen Replacement, Screen Removal: 3 단계, 이미지 3/3
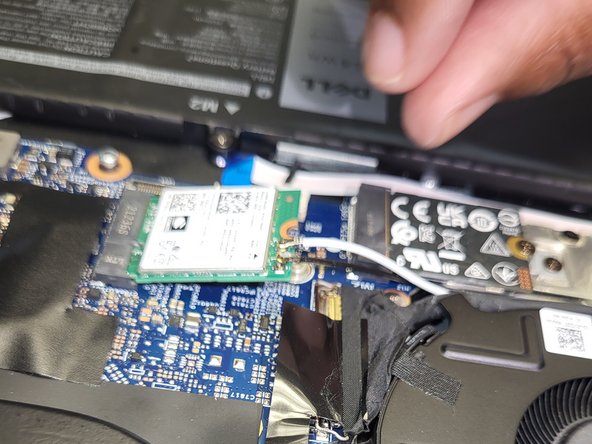
    • Remove the 2mm Phillip #0 screw that secures the WLAN card bracket to the WLAN card on the system board.

    • Lift and remove the WLAN card bracket from the WLAN card that secures the two antenna cables.

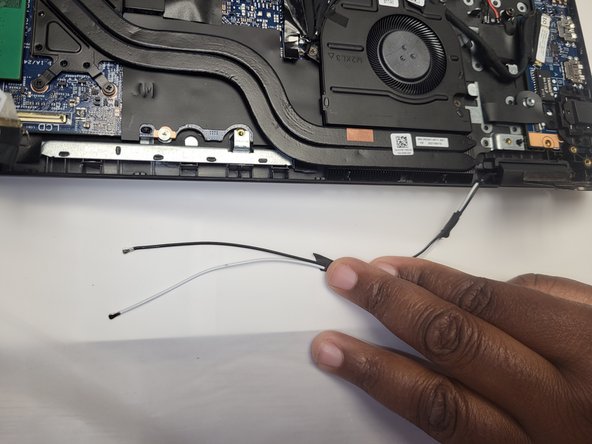
    • Disconnect the antenna cables from the connectors on the WLAN card.

    • Disconnect and remove the WLAN card from the WLAN card slot.

  4. Dell Latitude 3520 Screen Replacement: 4 단계, 이미지 1/3 Dell Latitude 3520 Screen Replacement: 4 단계, 이미지 2/3 Dell Latitude 3520 Screen Replacement: 4 단계, 이미지 3/3
    • Peel the adhesive tape, open the latch, and disconnect the I/O cable from the connector on the system board.

    • Lift and remove the I/O cable from the assembly.

  5. Dell Latitude 3520 Screen Replacement: 5 단계, 이미지 1/1
    • Unroute the display cable from the routing guides in the assembly.

    • Peel the adhesive tape that secures the display cable in place.

  6. Dell Latitude 3520 Screen Replacement: 6 단계, 이미지 1/3 Dell Latitude 3520 Screen Replacement: 6 단계, 이미지 2/3 Dell Latitude 3520 Screen Replacement: 6 단계, 이미지 3/3
    • Remove the one 4.55mm Phillip # 0 screw and six 2.5mm Phillip #0 screws that secure the display hinges to the system.

  7. Dell Latitude 3520 Screen Replacement: 7 단계, 이미지 1/1
    • Lift the left and right hinges in an upward direction away from the assembly.

  8. Dell Latitude 3520 Screen Replacement: 8 단계, 이미지 1/1
    • Lift the assembly off the display assembly.

결론

To reassemble your device, follow these instructions in reverse order.

Shawn Smith

회원 가입일: 09/08/23

871 평판

안내서 7개 작성하였습니다

University of New Orleans, Team 4-2, McDonald Fall 2023 University of New Orleans, Team 4-2, McDonald Fall 2023 회원

UNO-MCDONALD-F23S4G2

4 회원들

안내서 7개 작성하였습니다

댓글 0개

댓글 쓰기

조회 통계:

24 시간 전: 0

7일 전: 24

30일 전: 97

전체 시간: 383