주요 콘텐츠로 건너뛰기

Dell Latitude E6420 Fan Replacement

필요한 것

  1. Dell Latitude E6420 Fan Replacement, Battery: 1 단계, 이미지 1/2 Dell Latitude E6420 Fan Replacement, Battery: 1 단계, 이미지 2/2
    • Push the tabs on the left and right of the battery out towards the edge of the case.

  2. Dell Latitude E6420 Fan Replacement: 2 단계, 이미지 1/1
    • While still pushing in the tabs, using your pinky finger, lift the battery out of the laptop.

  3. Dell Latitude E6420 Fan Replacement, CD/DVD Drive: 3 단계, 이미지 1/2 Dell Latitude E6420 Fan Replacement, CD/DVD Drive: 3 단계, 이미지 2/2
    • Push the button in on the CD/DVD drive to eject the drive.

  4. Dell Latitude E6420 Fan Replacement: 4 단계, 이미지 1/2 Dell Latitude E6420 Fan Replacement: 4 단계, 이미지 2/2
    • Slide the drive out of the laptop.

    • When removing the drive, keep it flat to prevent damage to anything inside the laptop.

  5. Dell Latitude E6420 Fan Replacement, Backplate: 5 단계, 이미지 1/2 Dell Latitude E6420 Fan Replacement, Backplate: 5 단계, 이미지 2/2
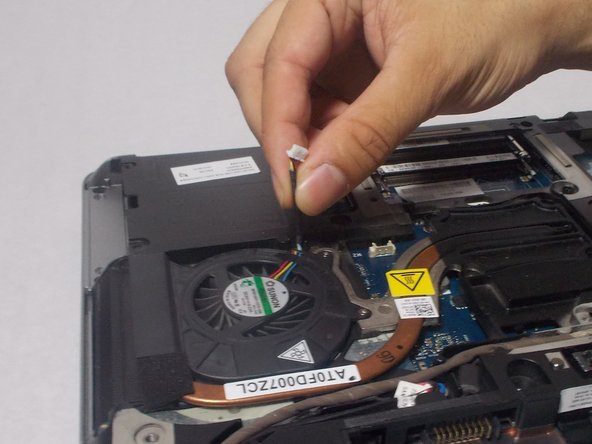
    • Using the screwdriver, remove seven 4mm Phillips #1 screws from the bottom of the laptop.

    • Using the screwdriver, remove two 9mm Phillips #00 screws from the bottom of the laptop.

  6. Dell Latitude E6420 Fan Replacement: 6 단계, 이미지 1/2 Dell Latitude E6420 Fan Replacement: 6 단계, 이미지 2/2
    • Gently lift the back plate off of the laptop making sure all of the tabs on the inside perimeter of the back plate are unhooked before lifting.

    • Be careful when removing the backplate. Lifting the backplate while the tabs are still hooked in will result in broken tabs.

  7. Dell Latitude E6420 Fan Replacement, Fan: 7 단계, 이미지 1/2 Dell Latitude E6420 Fan Replacement, Fan: 7 단계, 이미지 2/2
    • Using the screwdriver, remove four 10mm Phillips #0 spring screws from the fan assembly.

  8. Dell Latitude E6420 Fan Replacement: 8 단계, 이미지 1/2 Dell Latitude E6420 Fan Replacement: 8 단계, 이미지 2/2
    • Use the plastic opening tool to unclip the connector.

  9. Dell Latitude E6420 Fan Replacement: 9 단계, 이미지 1/1
    • Lift the fan out of the laptop.

결론

To reassemble your device, follow these instructions in reverse order.

다른 4명이 해당 안내서를 완성하였습니다.

Madysen Eames

회원 가입일: 02/27/18

1,528 평판

안내서 7개 작성하였습니다

UMass Dartmouth, Team S2-G3, Simcock Spring 2018 UMass Dartmouth, Team S2-G3, Simcock Spring 2018 회원

UMASSD-SIMCOCK-S18S2G3

3 회원들

안내서 7개 작성하였습니다

댓글 한 개

very good explanatory steps. but you did not talk about the application of thermal paste for reassembly

Godwin Nwachukwu - 답글

댓글 쓰기

조회 통계:

24 시간 전: 0

7일 전: 8

30일 전: 18

전체 시간: 2,125