주요 콘텐츠로 건너뛰기

Dell Latitude E6510 USB Ports Replacement

필요한 것

  1. 주의: 1-3 단계들은 진행 중으로 표시된 안내서에서 제공되었습니다.

    Dell Latitude E6510  USB Ports Replacement, Fan: 1 단계, 이미지 1/2 Dell Latitude E6510  USB Ports Replacement, Fan: 1 단계, 이미지 2/2
    • Slide the two black clips toward the middle to release battery

  2. Dell Latitude E6510  USB Ports Replacement: 2 단계, 이미지 1/2 Dell Latitude E6510  USB Ports Replacement: 2 단계, 이미지 2/2
    • Remove the back plate from the back of the device

    • Remove the 6 screws with the J1 screwdriver.

    • once the screws are out, slide back panel towards front of the device and lift up

  3. Dell Latitude E6510  USB Ports Replacement: 3 단계, 이미지 1/3 Dell Latitude E6510  USB Ports Replacement: 3 단계, 이미지 2/3 Dell Latitude E6510  USB Ports Replacement: 3 단계, 이미지 3/3
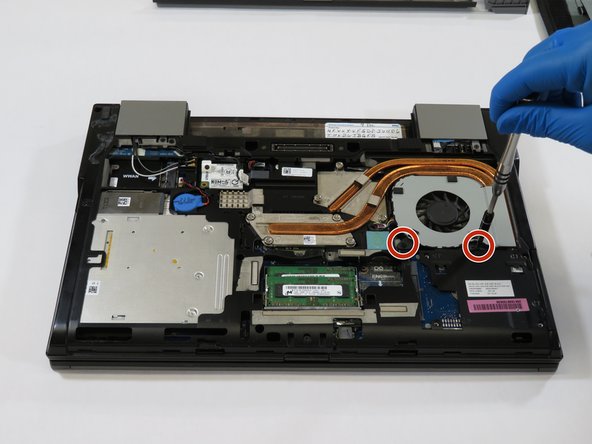
    • Remove two screws holding the fan

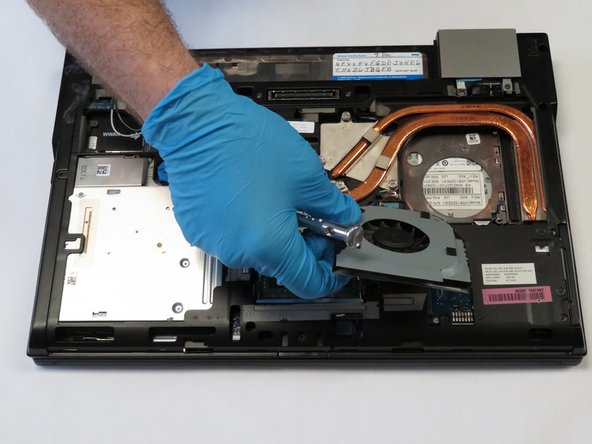
    • Slide from under copper heat sink

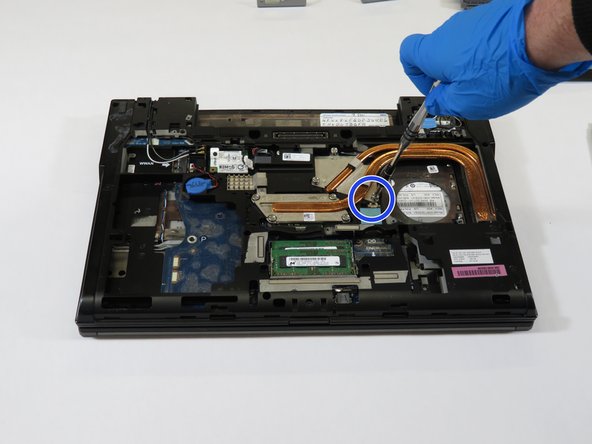
    • Unplug connector and remove

    • To reassemble, follow directions in reverse

  4. Dell Latitude E6510  USB Ports Replacement, USB Ports: 4 단계, 이미지 1/2 Dell Latitude E6510  USB Ports Replacement, USB Ports: 4 단계, 이미지 2/2
    • Remove the battery

    • Flip the computer so that it is facing downward.

    • Next locate the two black clips as shown in the image.

    • Slide the clips toward the middle in order to release the battery.

  5. Dell Latitude E6510  USB Ports Replacement: 5 단계, 이미지 1/3 Dell Latitude E6510  USB Ports Replacement: 5 단계, 이미지 2/3 Dell Latitude E6510  USB Ports Replacement: 5 단계, 이미지 3/3
    • Remove the back plate from the back of the device.

    • Using the Philips head screwdriver remove the 6 screws marked in red.

    • Next, slide the panel down and then lift up til completely removed.

  6. Dell Latitude E6510  USB Ports Replacement: 6 단계, 이미지 1/3 Dell Latitude E6510  USB Ports Replacement: 6 단계, 이미지 2/3 Dell Latitude E6510  USB Ports Replacement: 6 단계, 이미지 3/3
    • Press the button on the side of the optical drive in order to release the pull tab.

    • Next, pull out the optical drive located on the lower left hand side.

    • Locate the hard drive on the lower right hand side and remove it from the computer.

  7. Dell Latitude E6510  USB Ports Replacement: 7 단계, 이미지 1/3 Dell Latitude E6510  USB Ports Replacement: 7 단계, 이미지 2/3 Dell Latitude E6510  USB Ports Replacement: 7 단계, 이미지 3/3
    • Using the Philips head screwdriver unscrew the two screws holding the fan.

    • Next, slide the fan out from under the copper heat sink.

    • Unplug the connector marked in blue and remove the fan.

  8. Dell Latitude E6510  USB Ports Replacement: 8 단계, 이미지 1/2 Dell Latitude E6510  USB Ports Replacement: 8 단계, 이미지 2/2
    • Using the Philips head screwdriver unscrew the seven screws holding down the copper heat sink.

    • Lift the heat sink slightly and slide out to remove it.

  9. Dell Latitude E6510  USB Ports Replacement: 9 단계, 이미지 1/3 Dell Latitude E6510  USB Ports Replacement: 9 단계, 이미지 2/3 Dell Latitude E6510  USB Ports Replacement: 9 단계, 이미지 3/3
    • Using a spudger remove the volume bar above the keyboard

    • Using the Philips head screwdriver unscrew the two screws near the top of the keyboard.

    • Lift the keyboard membrane slightly by tab, and slide the keyboard towards the screen in order to remove.

    • Using the Philips head screwdriver unscrew the three screws marked in green.

  10. Dell Latitude E6510  USB Ports Replacement: 10 단계, 이미지 1/1
    • Using the Philip head screwdriver unscrew the eight screws holding down the chassis to get to the USB ports.

  11. Dell Latitude E6510  USB Ports Replacement: 11 단계, 이미지 1/1
    • Remove the USB port by using a soldering iron to take out the connections on either side of the port.

결론

To reassemble your device, follow these instructions in reverse order.

Ronald Denardo

회원 가입일: 02/05/19

157 평판

안내서 1개 작성함

댓글 0개

댓글 쓰기

조회 통계:

24 시간 전: 0

7일 전: 1

30일 전: 5

전체 시간: 1,312