주요 콘텐츠로 건너뛰기

Dell Latitude E6510 LCD Screen Assembly Replacement

필요한 것

  1. Dell Latitude E6510 LCD Screen Assembly Replacement, LCD Screen Assembly: 1 단계, 이미지 1/3 Dell Latitude E6510 LCD Screen Assembly Replacement, LCD Screen Assembly: 1 단계, 이미지 2/3 Dell Latitude E6510 LCD Screen Assembly Replacement, LCD Screen Assembly: 1 단계, 이미지 3/3
    • Orient your laptop so that the bottom is facing up towards you.

    • Place your thumbs on the grooved sections above the battery and firmly pull away from each other.

    • Slide the battery out and separate it from the laptop.

  2. Dell Latitude E6510 LCD Screen Assembly Replacement: 2 단계, 이미지 1/3 Dell Latitude E6510 LCD Screen Assembly Replacement: 2 단계, 이미지 2/3 Dell Latitude E6510 LCD Screen Assembly Replacement: 2 단계, 이미지 3/3
    • Remove the 5 screws from the back panel with a type 0 Philips head.

    • Then pull the panel towards you in a slightly upwards motion.

    • Separate the panel from the laptop.

  3. Dell Latitude E6510 LCD Screen Assembly Replacement: 3 단계, 이미지 1/3 Dell Latitude E6510 LCD Screen Assembly Replacement: 3 단계, 이미지 2/3 Dell Latitude E6510 LCD Screen Assembly Replacement: 3 단계, 이미지 3/3
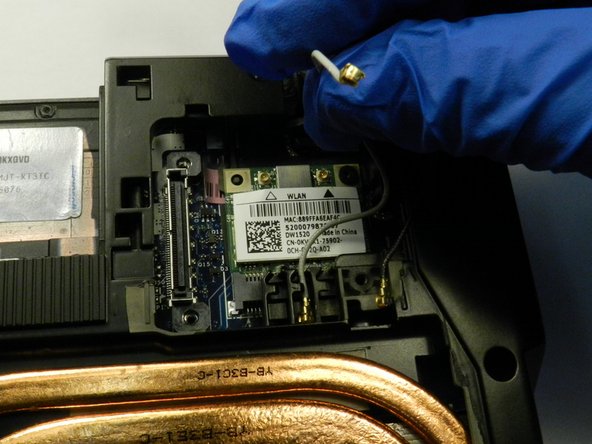
    • Take the silver panels from both sides of the back of the laptop by removing the screw using a type 0 Philips head.

    • Slide the silver panel away from you to revel some wires.

    • Remove the two wires white and gray by gently pulling up and detaching them.

    • After the wires are detached, gently pull the wires away from you to remove them from the groove they are in.

  4. Dell Latitude E6510 LCD Screen Assembly Replacement: 4 단계, 이미지 1/3 Dell Latitude E6510 LCD Screen Assembly Replacement: 4 단계, 이미지 2/3 Dell Latitude E6510 LCD Screen Assembly Replacement: 4 단계, 이미지 3/3
    • Under the ride silver panel, there is a channel. To disconnect gently use your nail and flick it up and to the right.

    • Once the channel is disconnect, there are two wires. Repeat the same method as the channel to disconnect the wires.

    • Move the channel and wires out of the groove to remove the screen.

  5. Dell Latitude E6510 LCD Screen Assembly Replacement: 5 단계, 이미지 1/3 Dell Latitude E6510 LCD Screen Assembly Replacement: 5 단계, 이미지 2/3 Dell Latitude E6510 LCD Screen Assembly Replacement: 5 단계, 이미지 3/3
    • Orient the laptop on its side, prop it slightly open to keep it stable on your desk.

    • Unscrew the silver screw on the left side using a type 0 Phillip's head.

    • Unscrew the black screw on the right side using a type 0 Philips head.

  6. Dell Latitude E6510 LCD Screen Assembly Replacement: 6 단계, 이미지 1/3 Dell Latitude E6510 LCD Screen Assembly Replacement: 6 단계, 이미지 2/3 Dell Latitude E6510 LCD Screen Assembly Replacement: 6 단계, 이미지 3/3
    • Since the screws and wires are disconnect, the screen is ready to be disconnected also.

    • Gently hold the LCD screen with your pointer fingers on either side.

    • While firmly holding the bottom of the laptop with your thumbs pull the two parts away from each other.

결론

To reassemble your device, follow these instructions in reverse order.

다른 3명이 해당 안내서를 완성하였습니다.

댓글 0개

댓글 쓰기

조회 통계:

24 시간 전: 0

7일 전: 1

30일 전: 10

전체 시간: 1,630