주요 콘텐츠로 건너뛰기

Dell OptiPlex 3070 Micro-PC Hard Drive Replacement

필요한 것

  1. Dell OptiPlex 3070 Micro-PC Hard Drive Replacement, Hard Drive: 1 단계, 이미지 1/3 Dell OptiPlex 3070 Micro-PC Hard Drive Replacement, Hard Drive: 1 단계, 이미지 2/3 Dell OptiPlex 3070 Micro-PC Hard Drive Replacement, Hard Drive: 1 단계, 이미지 3/3
    • Prior to beginning this repair, power off the PC and remove all the cables, (including the power cable), to avoid damaging your device.

    • Use the Phillips #00 screwdriver to remove the single screw securing the case.

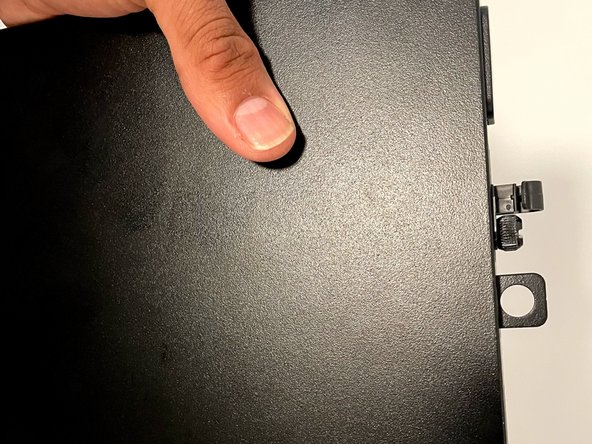
    • Slide the case horizontally away from the screw.

    • Remove the back case.

  2. Dell OptiPlex 3070 Micro-PC Hard Drive Replacement: 2 단계, 이미지 1/3 Dell OptiPlex 3070 Micro-PC Hard Drive Replacement: 2 단계, 이미지 2/3 Dell OptiPlex 3070 Micro-PC Hard Drive Replacement: 2 단계, 이미지 3/3
    • Unlock and remove the hard drive from the connector.

    • Push the two tabs on the hard drive caddy and slide it away from the connector.

    • Once unlocked, remove the hard drive from the main board.

  3. Dell OptiPlex 3070 Micro-PC Hard Drive Replacement: 3 단계, 이미지 1/3 Dell OptiPlex 3070 Micro-PC Hard Drive Replacement: 3 단계, 이미지 2/3 Dell OptiPlex 3070 Micro-PC Hard Drive Replacement: 3 단계, 이미지 3/3
    • Pull the case away from the four screws at each corner of the old hard drive to remove it from the case.

    • The hard drive should come out easily and you don't need screwdriver to remove it.

  4. Dell OptiPlex 3070 Micro-PC Hard Drive Replacement: 4 단계, 이미지 1/3 Dell OptiPlex 3070 Micro-PC Hard Drive Replacement: 4 단계, 이미지 2/3 Dell OptiPlex 3070 Micro-PC Hard Drive Replacement: 4 단계, 이미지 3/3
    • Put your new hard drive in the case but match the SATA connection to the lines in the hard drive case so you know it is placed correctly.

    • Lock the four screws from case into the new hard drive.

    • No need to use a screwdriver as these screws are just a press and lock type.

  5. Dell OptiPlex 3070 Micro-PC Hard Drive Replacement: 5 단계, 이미지 1/3 Dell OptiPlex 3070 Micro-PC Hard Drive Replacement: 5 단계, 이미지 2/3 Dell OptiPlex 3070 Micro-PC Hard Drive Replacement: 5 단계, 이미지 3/3
    • Flip the hard drive upside down.

    • Insert the hard drive into the connector.

    • Push the hard drive to lock it in.

    • You will hear a "click" sound when it locks.

  6. Dell OptiPlex 3070 Micro-PC Hard Drive Replacement: 6 단계, 이미지 1/3 Dell OptiPlex 3070 Micro-PC Hard Drive Replacement: 6 단계, 이미지 2/3 Dell OptiPlex 3070 Micro-PC Hard Drive Replacement: 6 단계, 이미지 3/3
    • Put the cover back on and slide it with the steel tab towards the screw.

    • Make sure it is securely locked in. Check all the sides for any gaps.

    • Use the Phillips #00 screwdriver to replace the single screw and securely lock the cover.

결론

I hope the guide helped you to replace the hard-drive and you will now enjoy more space and faster PC. Thank you.

다른 4명이 해당 안내서를 완성하였습니다.

Krushi Patel

회원 가입일: 07/01/22

217 평판

안내서 1개 작성함

York University, Team M-21, Allen Summer 2022 York University, Team M-21, Allen Summer 2022 회원

YORK-ALLEN-SU22SMG21

1 회원

안내서 1개 작성하였습니다

댓글 한 개

I love the simplicity yet concise feel of your guide. There are just enough steps to keep the reader motivated to go through with the repair, too many steps and your average reader would back off.

Your instructions were very clear and straight to the point and I appreciate the fact that you did not use any complex words to describe the steps so as to cater to an audience with little technical knowledge.

The photos were awesome as most of them had both your hands in them which gave a first person view perspective. On top of that, they were clear; without any motion blur . The pictures were also organized in a flip book style which further gives a sense of orientation to the reader. Nice use of markups on the pictures too!

Great work and well done.

Derek Anthony Hau Kau Fong - 답글

댓글 쓰기

조회 통계:

24 시간 전: 1

7일 전: 18

30일 전: 93

전체 시간: 2,577