소개
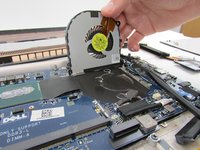
If the Dell Precision M3800 fans are nonfunctional and the computer is overheating, use this guide to replace the fan(s).
The fans run to prevent the computer from overheating and continue normal function. Faulty fan(s) will fail at cooling down the laptop and can be an obstacle to normal functions.
Before using this guide, check faulty fan(s) for foreign objects that cause underperformance. You may be able to fix his issue by dislodging said objects with an ESD-safe brush or small dust blower, instead of replacing the equipment. Be sure to isolate fan(s) that are nonfunctional as a replacement of only one fan may be needed.
Before beginning, be sure to power down the laptop, and unplug from the external power source(s).
필요한 것
-
-
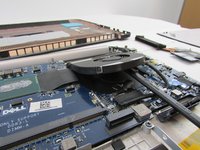
Use a T5 Torx screwdriver to unscrew the ten 3mm screws on the laptop back cover.
-
Lift up the silver cover from the back panel to reveal two screws.
-
Use a Phillips screwdriver to remove the two screws underneath the silver cover.
-
-


To reassemble your device, follow these instructions in reverse order.
To reassemble your device, follow these instructions in reverse order.
다른 3명이 해당 안내서를 완성하였습니다.

팀

Embry-Riddle Aeronautical University, Team S12-G2, Lamothe Fall 2019 Embry-Riddle Aeronautical University, Team S12-G2, Lamothe Fall 2019 회원
ERAU-LAMOTHE-F19S12G2
4 회원들
안내서 7개를 작성함