주요 콘텐츠로 건너뛰기

Dell Venue 7 Motherboard Replacement

필요한 것

  1. Dell Venue 7 Motherboard Replacement, Rear Case: 1 단계, 이미지 1/2 Dell Venue 7 Motherboard Replacement, Rear Case: 1 단계, 이미지 2/2
    • Use a spudger or your fingers to pry off the back case.

    • If your case is badly damaged, use caution because the fragments may be sharp.

  2. Dell Venue 7 Motherboard Replacement, Battery: 2 단계, 이미지 1/1
    • Gently disconnect the battery from the motherboard using your fingers or a pair of tweezers.

  3. Dell Venue 7 Motherboard Replacement: 3 단계, 이미지 1/1
    • Remove the battery by pulling it from the edges and carefully peeling it off of the base.

    • There is adhesive keeping the battery in place, so don't be afraid to use a little extra force.

    • Do not bend or warp the battery in any way as it can be a fire hazard.

  4. Dell Venue 7 Motherboard Replacement, Rear Facing Camera: 4 단계, 이미지 1/1
    • Use a spudger to disconnect the camera from the motherboard.

  5. Dell Venue 7 Motherboard Replacement: 5 단계, 이미지 1/1
    • Remove the camera from the device.

  6. Dell Venue 7 Motherboard Replacement, Speaker: 6 단계, 이미지 1/2 Dell Venue 7 Motherboard Replacement, Speaker: 6 단계, 이미지 2/2
    • Use a spudger to remove the ribbon cable that is around the speaker wire.

  7. Dell Venue 7 Motherboard Replacement: 7 단계, 이미지 1/2 Dell Venue 7 Motherboard Replacement: 7 단계, 이미지 2/2
    • Disconnect the speaker wire from the motherboard by prying the connector upwards with the spudger.

  8. Dell Venue 7 Motherboard Replacement: 8 단계, 이미지 1/1
    • Remove the plastic covering on the speaker.

  9. Dell Venue 7 Motherboard Replacement: 9 단계, 이미지 1/2 Dell Venue 7 Motherboard Replacement: 9 단계, 이미지 2/2
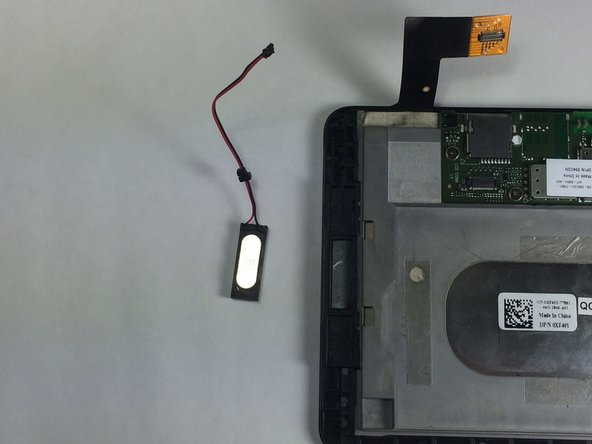
    • Gently pull on the wire and remove the speaker.

    When I was pulling the speaker out the wire had broken where can I get the speaker?

    ginovirgiltthiruchudar - 답글

  10. Dell Venue 7 Motherboard Replacement, Motherboard: 10 단계, 이미지 1/3 Dell Venue 7 Motherboard Replacement, Motherboard: 10 단계, 이미지 2/3 Dell Venue 7 Motherboard Replacement, Motherboard: 10 단계, 이미지 3/3
    • Disconnect the two remaining connections on the motherboard.

    • To remove the first connector, lift up the clasp and remove the ribbon cable.

    • To remove the second one, use a spudger to gently pry the connector from the motherboard.

  11. Dell Venue 7 Motherboard Replacement: 11 단계, 이미지 1/2 Dell Venue 7 Motherboard Replacement: 11 단계, 이미지 2/2
    • Remove all 8 of the 2.1mm Phillips head screws from the motherboard.

  12. Dell Venue 7 Motherboard Replacement: 12 단계, 이미지 1/1
    • Lift and remove the motherboard from the device.

결론

To reassemble your device, follow these instructions in reverse order.

다른 8명이 해당 안내서를 완성하였습니다.

Stephen Rousseau

회원 가입일: 01/20/15

663 평판

안내서 4개 작성하였습니다

USF Tampa, Team 11-4, Blackwell Winter 2015 USF Tampa, Team 11-4, Blackwell Winter 2015 회원

USFT-BLACKWELL-W15S11G4

4 회원들

안내서 10개 작성하였습니다

댓글 2개

unable to open the lock, can the mother board be changed

Amitabh Mishra - 답글

댓글 쓰기

조회 통계:

24 시간 전: 0

7일 전: 1

30일 전: 7

전체 시간: 4,409