주요 콘텐츠로 건너뛰기

Dell Venue 8 7840 Power and Volume Button Replacement

필요한 것

  1. Dell Venue 8 7840 Power and Volume Button Replacement, Screen: 1 단계, 이미지 1/1
    • Make sure your device is turned off. Leaving it turned on may cause an electric shock.

    • Face the device with the screen towards you.

  2. Dell Venue 8 7840 Power and Volume Button Replacement: 2 단계, 이미지 1/1
    • With a plastic opening tool, pry open the bottom left corner of the screen.

    • The screen is tightly attached to the tablet, so you may have to use a metal spudger to pry it open if the plastic spudger does not do the task.

  3. Dell Venue 8 7840 Power and Volume Button Replacement: 3 단계, 이미지 1/1
    • Next, pry open the top left corner of the screen.

  4. Dell Venue 8 7840 Power and Volume Button Replacement: 4 단계, 이미지 1/1
    • Then, pry open the top right corner of the screen.

  5. Dell Venue 8 7840 Power and Volume Button Replacement: 5 단계, 이미지 1/1
    • Lastly, pry open the bottom right corner of the screen.

  6. Dell Venue 8 7840 Power and Volume Button Replacement: 6 단계, 이미지 1/1
    • Once you have pried open all the corners of the tablet, carefully open the screen from the right side of the tablet.

    • Do not try and open the screen from the left side of the tablet, because the screen is attached on the left side of the tablet; doing this can damage the tablet.

  7. Dell Venue 8 7840 Power and Volume Button Replacement: 7 단계, 이미지 1/1
    • Once the tablet is opened, locate the connector.

  8. Dell Venue 8 7840 Power and Volume Button Replacement: 8 단계, 이미지 1/1
    • Disconnect the connector from the tablet.

  9. Dell Venue 8 7840 Power and Volume Button Replacement, Battery: 9 단계, 이미지 1/1
    • Unscrew the eight 7 mm Philips #1 screws.

    • After the screws are unscrewed, you can take off the silver cover.

  10. Dell Venue 8 7840 Power and Volume Button Replacement: 10 단계, 이미지 1/1
    • Using tweezers, disconnect the battery from the tablet.

    • After disconnecting the battery, you can remove the battery from the tablet.

  11. Dell Venue 8 7840 Power and Volume Button Replacement, Power and Volume Button: 11 단계, 이미지 1/2 Dell Venue 8 7840 Power and Volume Button Replacement, Power and Volume Button: 11 단계, 이미지 2/2
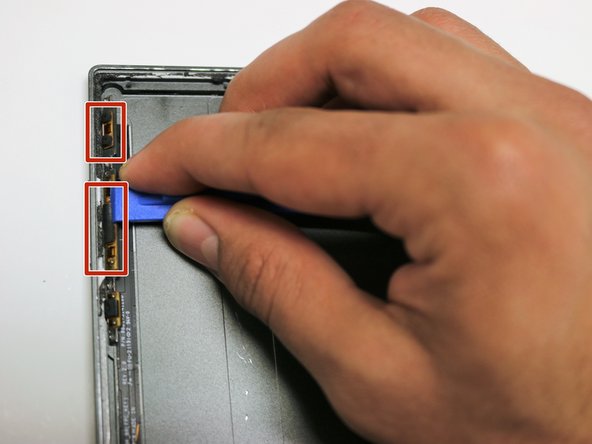
    • Using a plastic opening tool, pry open the left side of the tablet.

    • Locate the power and volume buttons.

  12. Dell Venue 8 7840 Power and Volume Button Replacement: 12 단계, 이미지 1/1
    • Using a plastic opening tool, push out the volume button from the left side of the tablet.

  13. Dell Venue 8 7840 Power and Volume Button Replacement: 13 단계, 이미지 1/1
    • Make sure that you hold the left side of the tablet open with a plastic opening tool so that you will be able to take out the volume button.

    • With tweezers, pull out the volume button.

  14. Dell Venue 8 7840 Power and Volume Button Replacement: 14 단계, 이미지 1/1
    • With a plastic opening tool, push out the power button from the left side of the tablet.

  15. Dell Venue 8 7840 Power and Volume Button Replacement: 15 단계, 이미지 1/1
    • Just like the volume button, you want to make sure that you hold the left side of the tablet open with a plastic opening tool so that you will be able to take out the power button.

    • With tweezers, pull out the power button.

결론

To reassemble your device, follow these instructions in reverse order.

Donnelle January

회원 가입일: 09/12/16

429 평판

안내서 3개 작성하였습니다

USF Tampa, Team 6-5, Remmell Fall 2016 USF Tampa, Team 6-5, Remmell Fall 2016 회원

USFT-REMMELL-F16S6G5

3 회원들

안내서 6개 작성하였습니다

댓글 0개

댓글 쓰기

조회 통계:

24 시간 전: 0

7일 전: 1

30일 전: 2

전체 시간: 740