주요 콘텐츠로 건너뛰기

Dell Vostro 1400 Screen Replacement

필요한 것

  1. Dell Vostro 1400 Screen Replacement, Battery: 1 단계, 이미지 1/1
    • Be sure the power is off and all cables are unplugged from the device before starting.

    • After flipping over the laptop, the battery is on the bottom side of the laptop.

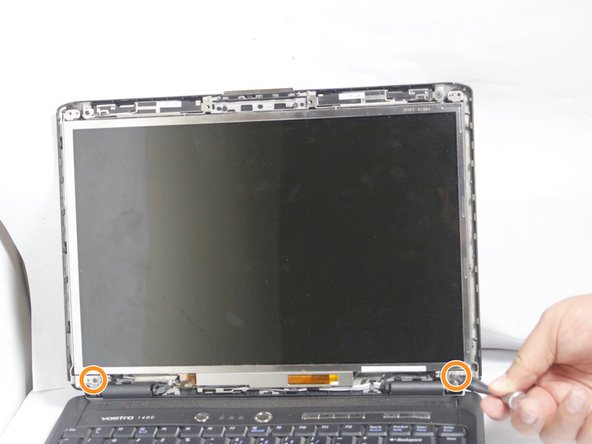
    • Find the tabs on both the left and right side of the battery.

  2. Dell Vostro 1400 Screen Replacement: 2 단계, 이미지 1/1
    • Push tabs toward the outside of the laptop until they lock in place.

  3. Dell Vostro 1400 Screen Replacement: 3 단계, 이미지 1/2 Dell Vostro 1400 Screen Replacement: 3 단계, 이미지 2/2
    • Push the battery forward to eject it from the laptop.

  4. Dell Vostro 1400 Screen Replacement, Screen: 4 단계, 이미지 1/1
    • Please make sure your device is completely turned off and everything is unplugged from the device

    • Open the laptop.

  5. Dell Vostro 1400 Screen Replacement: 5 단계, 이미지 1/2 Dell Vostro 1400 Screen Replacement: 5 단계, 이미지 2/2
    • Remove the 6 screw hole covers surrounding the screen.

    • Remove the 6 screws that were underneath the screw covers.

  6. Dell Vostro 1400 Screen Replacement: 6 단계, 이미지 1/2 Dell Vostro 1400 Screen Replacement: 6 단계, 이미지 2/2
    • Carefully remove the plastic surrounding the screen by pulling off, starting at the bottom.

    • Remove the two (2.5mm x 5mm) screws at the top, by the camera.

  7. Dell Vostro 1400 Screen Replacement: 7 단계, 이미지 1/2 Dell Vostro 1400 Screen Replacement: 7 단계, 이미지 2/2
    • Remove the two 5mm screws from the camera above the screen.

    • Remove the two 5mm screws from the bottom of the screen.

  8. Dell Vostro 1400 Screen Replacement: 8 단계, 이미지 1/2 Dell Vostro 1400 Screen Replacement: 8 단계, 이미지 2/2
    • Carefully remove the screen from the back cover.

  9. Dell Vostro 1400 Screen Replacement: 9 단계, 이미지 1/2 Dell Vostro 1400 Screen Replacement: 9 단계, 이미지 2/2
    • Lift up the black tag holding the camera and cable together.

    • Unplug the camera from the cable.

  10. Dell Vostro 1400 Screen Replacement: 10 단계, 이미지 1/3 Dell Vostro 1400 Screen Replacement: 10 단계, 이미지 2/3 Dell Vostro 1400 Screen Replacement: 10 단계, 이미지 3/3
    • Unplug the two cables connected to the screen.

  11. Dell Vostro 1400 Screen Replacement: 11 단계, 이미지 1/2 Dell Vostro 1400 Screen Replacement: 11 단계, 이미지 2/2
    • Remove the six 3mm screws on each side of the screen.

    • Remove the railing on each side of the screen.

    • The railing will be marked "L" for left side or "R" for the right. This should assist in reassembly.

결론

To reassemble your device, follow these instructions in reverse order.

다른 2명이 해당 안내서를 완성하였습니다.

David Hogg

회원 가입일: 03/20/17

727 평판

안내서 5개 작성하였습니다

Texas Tech, Team S8-G2, Bennett Spring 2017 Texas Tech, Team S8-G2, Bennett Spring 2017 회원

TTU-BENNETT-S17S8G2

4 회원들

안내서 5개 작성하였습니다

댓글 0개

댓글 쓰기

조회 통계:

24 시간 전: 0

7일 전: 1

30일 전: 2

전체 시간: 622