주요 콘텐츠로 건너뛰기

Dell Vostro 3500 Fan Cleaning and Replacement

필요한 것

  1. Dell Vostro 3500 Fan Cleaning and Replacement, Sliding the Battery Latch: 1 단계, 이미지 1/1
    • Flip the computer over.

    • Slide the battery release latch to the unlock position.

  2. Dell Vostro 3500 Fan Cleaning and Replacement, Sliding the Battery Release Latch: 2 단계, 이미지 1/1
    • Slide the other battery release latch to the unlock position.

  3. Dell Vostro 3500 Fan Cleaning and Replacement, Removing the Battery: 3 단계, 이미지 1/1
    • Slide the battery and remove it from the computer.

  4. Dell Vostro 3500 Fan Cleaning and Replacement, Remove the Screws: 4 단계, 이미지 1/1
    • Turn the laptop over and remove two screws securing the service cover.

  5. Dell Vostro 3500 Fan Cleaning and Replacement, Removing the Base Cover: 5 단계, 이미지 1/1
    • Prise up the service cover and remove it from the computer. Clips along the edges can be snapped open except for those on the left hand edge (as shown in the photo) which have to be disengaged after all the others by romoving the cover in the direction shown.

    • On resassembly, insert the clips on the left hand edge then snap all te others home by applying firm pressure along the other edges of the cover.

  6. Dell Vostro 3500 Fan Cleaning and Replacement, Releasing the Memory Module: 6 단계, 이미지 1/1
    • Push apart the memory retention clips to release the memory module.

  7. Dell Vostro 3500 Fan Cleaning and Replacement, Remove the Memory Module: 7 단계, 이미지 1/1
    • Remove the memory module from its connector on the system board.

  8. Dell Vostro 3500 Fan Cleaning and Replacement, Remove the Screws: 8 단계, 이미지 1/1
    • Remove the screws that secure the hard-drive assembly to the computer.

  9. Dell Vostro 3500 Fan Cleaning and Replacement, Sliding the Hard-Drive Assembly: 9 단계, 이미지 1/1
    • Slide the hard-drive assembly towards the center of the computer.

  10. Dell Vostro 3500 Fan Cleaning and Replacement, Lifting the Hard-Drive Assembly: 10 단계, 이미지 1/1
    • Lift the hard-drive assembly up and away from the computer.

  11. Dell Vostro 3500 Fan Cleaning and Replacement, Remove the Screws: 11 단계, 이미지 1/1
    • Remove the screws that secure the hard-drive bracket to the hard drive

  12. Dell Vostro 3500 Fan Cleaning and Replacement, Remove the Hard-Drive Adapter: 12 단계, 이미지 1/1
    • Remove the hard-drive adapter from the hard-drive assembly.

  13. Dell Vostro 3500 Fan Cleaning and Replacement, Lifting the Hard-Drive Bracket: 13 단계, 이미지 1/1
    • Lift the hard-drive bracket up and away from the hard drive.

  14. Dell Vostro 3500 Fan Cleaning and Replacement, CD/DVD drive removal: 14 단계, 이미지 1/1
    • Remove a single screw from under the service cover.

    • You should now be able to slide the CD/DVD drive out.

  15. Dell Vostro 3500 Fan Cleaning and Replacement, WiFi card removal: 15 단계, 이미지 1/1
    • Gently snap off the two aerial connectors from the WiFi card.

    • On reassembly they simply snap back on with firm pressure, but first make sure they are positioned correctly over their sockets.

    • Remove a single screw adjacent to one of the aerial sockets retaining the wWiFi card, then lift it out.

    • On resassembly, ensure that the WiFi card is fully inserted into its sovket before angling it down and reinserting the screw.

  16. Dell Vostro 3500 Fan Cleaning and Replacement, Keyboard: 16 단계, 이미지 1/1
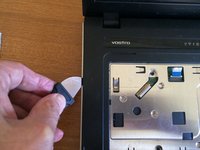
    • There are 4 tabs along the top of the keyboard and two along each side which need to be released. The iFixit Jimmy is ideal for this, but you can use a thin spatula.

    • Feel along the gap with the jimmy until you come to a tab. Angle the jimmy away from the keyboard in order to release the tab. As you release each tab, gently lift that part of the keyboard in order to encourage the next tab to disengage, but take care not to bend it.

  17. Dell Vostro 3500 Fan Cleaning and Replacement: 17 단계, 이미지 1/1
    • Lift the top edge of the keyboard and turn it over, laying it flat.

    • Very gently lift the black retaining tab on the keyboard ribbon and withdraw the ribbon.

    • On reassembly, make sure the ribbon is fully inserted in its socket before pressing down the tab.

  18. Dell Vostro 3500 Fan Cleaning and Replacement, Motherboard: 18 단계, 이미지 1/2 Dell Vostro 3500 Fan Cleaning and Replacement, Motherboard: 18 단계, 이미지 2/2
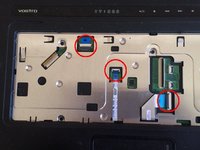
    • In the well beneath the keyboard, disconnect 3 ribbon cables by gently lifting the locking bar then withdrawing the ribbon.

    • Remove 3 screws.

  19. Dell Vostro 3500 Fan Cleaning and Replacement: 19 단계, 이미지 1/1
    • With the laptop closed, lay it upside down on the bench and remove 2 screws from the CD/DVD bay opening.

  20. Dell Vostro 3500 Fan Cleaning and Replacement: 20 단계, 이미지 1/1
    • Remove 6 screws from the base of the laptop.

    • Using a small flat screwdriver or a pointed knife, remove the adhesive covers from 3 more screws in the front corners of the laptop. Remove the screws.

    • DO NOT remove 3 silver-headed screws between the WiFi card and the hard disk. These secure the processor heat sink.

  21. Dell Vostro 3500 Fan Cleaning and Replacement: 21 단계, 이미지 1/3 Dell Vostro 3500 Fan Cleaning and Replacement: 21 단계, 이미지 2/3 Dell Vostro 3500 Fan Cleaning and Replacement: 21 단계, 이미지 3/3
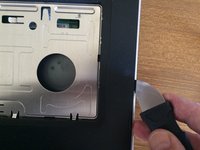
    • Separate the top cover of the laptop by inserting a jimmy or similar tool into the crack and angling it so as to lift the cover. Do this on both sides, te rear, and the front.

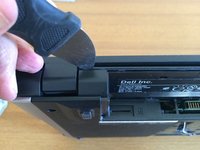
    • Lift off the front cover. If you feel you are having to force it, it'll be because you omitted to remove one or more screws.

  22. Dell Vostro 3500 Fan Cleaning and Replacement: 22 단계, 이미지 1/2 Dell Vostro 3500 Fan Cleaning and Replacement: 22 단계, 이미지 2/2
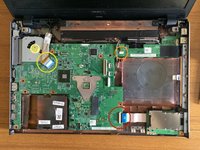
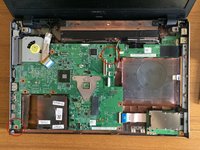
    • Lift the locking tab and remove the ribbon cable on the right hand lower edge of the motherboard.

    • Disconnect the mu;it-way connector on the top edge of the motherboard. Do not pull on th wires, but rather rock the body of the connector from side to side until it easily pulls free.

    • Gently lift off the video cable connector.

  23. Dell Vostro 3500 Fan Cleaning and Replacement: 23 단계, 이미지 1/1
    • Remove two screws securing the motherboard.

    • On reassembly, note that these two screws (only) have triangular indicator marks against them. The other holes are for screws which you removed from the bottom of the laptop.

    • You should now be able to lift out the motherboard out of the shell, gently easing the connectors on the left hand edge out of the shell.

    • As you lift out the motherboard it's a good idea to lean the screen against some kind of support as it will no longer be counter-balanced by the base.

  24. Dell Vostro 3500 Fan Cleaning and Replacement, Fan removal - 1: 24 단계, 이미지 1/3 Dell Vostro 3500 Fan Cleaning and Replacement, Fan removal - 1: 24 단계, 이미지 2/3 Dell Vostro 3500 Fan Cleaning and Replacement, Fan removal - 1: 24 단계, 이미지 3/3
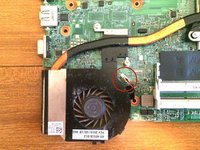
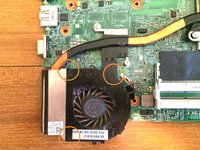
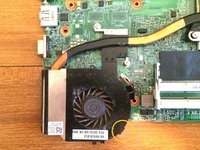
    • Disconnect the fan connector by rocking it back and forth until it easily pulls free. Only pull gently on the wires.

    • Remove 3 screws from the fan cover. Do not attempy to remove the cover.

    • Disengage a clip on the side of the fan cover.

  25. Dell Vostro 3500 Fan Cleaning and Replacement, Fan removal - 2: 25 단계, 이미지 1/2 Dell Vostro 3500 Fan Cleaning and Replacement, Fan removal - 2: 25 단계, 이미지 2/2
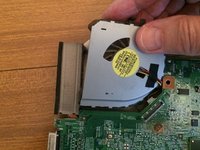
    • Turn the motherboard and remove the fan in the direction shown.

    • you will probably find a matted layer of dust and fluff on the cooling fins. Remove this then clear further dust either by blowing through the fins from the outside or by applying a vacuum cleaner to the inside.

    • Remove dust from the fan blades with a brush or vacuum cleaner.

결론

To reassemble your device, follow these instructions in reverse order.

다른 4명이 해당 안내서를 완성하였습니다.

Philip Le Riche

회원 가입일: 02/18/14

30,083 평판

안내서 47개 작성하였습니다

Restart Project Restart Project 회원

Community

18 회원들

안내서 493개 작성하였습니다

댓글 3개

Nice Job, thanks a lot!!!

farhod1177 - 답글

Great manual. But have to admit it was the worst nightmare removing this fan I ever had… It was much easier in many other laptops I had.

Hubert Kowalski - 답글

Perfectly describes everything step by step. Thanks very much!

Yoyo Baa - 답글

댓글 쓰기

조회 통계:

24 시간 전: 0

7일 전: 2

30일 전: 35

전체 시간: 3,821