주요 콘텐츠로 건너뛰기

Dell Vostro 3560 Hard Drive Replacement

필요한 것

  1. Dell Vostro 3560 Hard Drive Replacement, Identify your laptop: 1 단계, 이미지 2개 중 1개 Dell Vostro 3560 Hard Drive Replacement, Identify your laptop: 1 단계, 이미지 2개 중 2개
    • Make sure you have the right laptop by checking the sticker.

  2. Dell Vostro 3560 Hard Drive Replacement, Remove Battery: 2 단계, 이미지 2개 중 1개 Dell Vostro 3560 Hard Drive Replacement, Remove Battery: 2 단계, 이미지 2개 중 2개
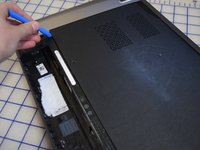
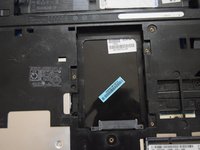
    • Start with your PC shut off and upside down.
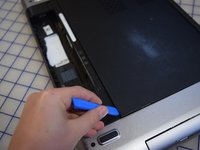
    • Pull out tabs.

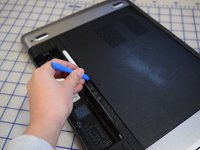
    • Pull up on rail to remove battery.

  3. Dell Vostro 3560 Hard Drive Replacement, Remove Back Panel: 3 단계, 이미지 1개 중 1개
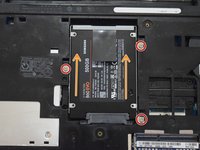
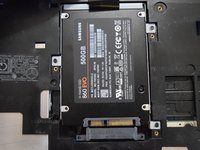
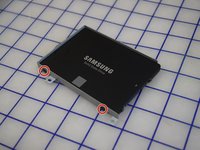
    • Remove the two screws:

    • One M2 Phillips screw (Fixed)

    • One 5-mm M2 Phillips screw

  4. Dell Vostro 3560 Hard Drive Replacement: 4 단계, 이미지 3개 중 1개 Dell Vostro 3560 Hard Drive Replacement: 4 단계, 이미지 3개 중 2개 Dell Vostro 3560 Hard Drive Replacement: 4 단계, 이미지 3개 중 3개
    • Use a iFixit opening tool to remove the back panel.

  5. Dell Vostro 3560 Hard Drive Replacement: 5 단계, 이미지 1개 중 1개
    • From here you can access:

    • The hard drive

    • The RAM.

    • The CD Drive.

  6. Dell Vostro 3560 Hard Drive Replacement, Hard Drive Removal: 6 단계, 이미지 1개 중 1개
    • We will work on the hard drive.

  7. Dell Vostro 3560 Hard Drive Replacement: 7 단계, 이미지 3개 중 1개 Dell Vostro 3560 Hard Drive Replacement: 7 단계, 이미지 3개 중 2개 Dell Vostro 3560 Hard Drive Replacement: 7 단계, 이미지 3개 중 3개
    • Remove the three 2.8-mm M2 Phillips screws.

    • Once you have removed the screws, gently pull the tab up to disconnect the hard drive.

    • Remove the hard drive assembly from the frame by pulling it straight up.

  8. Dell Vostro 3560 Hard Drive Replacement: 8 단계, 이미지 3개 중 1개 Dell Vostro 3560 Hard Drive Replacement: 8 단계, 이미지 3개 중 2개 Dell Vostro 3560 Hard Drive Replacement: 8 단계, 이미지 3개 중 3개
    • After removing the hard drive assembly from the frame, remove the four 3-mm M3 Phillips screws.

    • Once the screws are removed, remove the hard drive from the hard drive frame.

    • When re-mounting the hard drive into the hard drive frame, be sure to install the hard drive so that the underside of the hard drive is on the side of the frame with the tab. Also, make sure to put the Sata ports on the side opposite the tab so that they are not covered.

결론

To reassemble your device, follow these instructions in reverse order.

다른 2명이 해당 안내서를 완성하였습니다.

작성자

2다른 기여자 명과 함께

Max Bareilles

회원 가입일: 02/24/20

664 평판

안내서 5개를 작성함

댓글 0개

댓글 쓰기

조회 통계:

지난 24시간: 0

지난 7일: 4

지난 30일: 22

전체 시간: 1,732