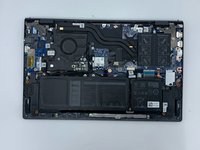
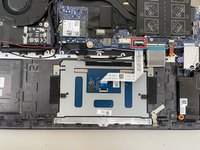
주요 콘텐츠로 건너뛰기

Dell Vostro 5510 Touchpad Replacement

필요한 것

  1. Dell Vostro 5510 Touchpad Replacement, Back Cover: 1 단계, 이미지 1/1
    • Power off your laptop before beginning disassembly.

    • Place the laptop so the bottom cover is facing upwards.

  2. Dell Vostro 5510 Touchpad Replacement: 2 단계, 이미지 1/1
    • Remove the remaining (M2x4mm) screws with the screwdriver.

    • Loosen the two captive (M2x7.5mm) corner screws with the screwdriver.

  3. Dell Vostro 5510 Touchpad Replacement: 3 단계, 이미지 1/3 Dell Vostro 5510 Touchpad Replacement: 3 단계, 이미지 2/3 Dell Vostro 5510 Touchpad Replacement: 3 단계, 이미지 3/3
    • Pry open the top left corner of the cover with the opening tool.

    • Pry open the top right corner of the cover with the opening tool.

    • Pry the rest of the cover with the opening tool, working in a clockwise motion until it is completely loosened.

  4. Dell Vostro 5510 Touchpad Replacement: 4 단계, 이미지 1/3 Dell Vostro 5510 Touchpad Replacement: 4 단계, 이미지 2/3 Dell Vostro 5510 Touchpad Replacement: 4 단계, 이미지 3/3
    • Lift the cover to remove it from the rest of the laptop.

  5. Dell Vostro 5510 Touchpad Replacement, Battery: 5 단계, 이미지 1/1
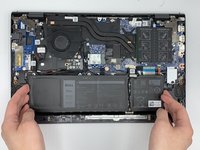
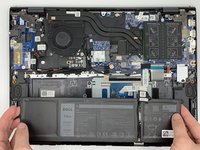
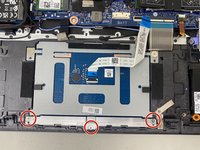
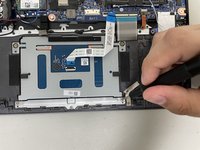
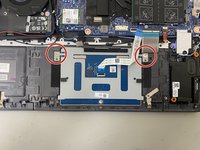
    • Unscrew the corner and top middle screws (M2x3mm) from the battery with the screwdriver.

  6. Dell Vostro 5510 Touchpad Replacement: 6 단계, 이미지 1/3 Dell Vostro 5510 Touchpad Replacement: 6 단계, 이미지 2/3 Dell Vostro 5510 Touchpad Replacement: 6 단계, 이미지 3/3
    • Lift the battery to remove it

  7. Dell Vostro 5510 Touchpad Replacement, Touchpad: 7 단계, 이미지 1/3 Dell Vostro 5510 Touchpad Replacement, Touchpad: 7 단계, 이미지 2/3 Dell Vostro 5510 Touchpad Replacement, Touchpad: 7 단계, 이미지 3/3
    • Disconnect the touchpad from the motherboard using a pair of tweezers.

    • Use a gentle and slow outward movement to minimize the risk of breaking the connection.

  8. Dell Vostro 5510 Touchpad Replacement: 8 단계, 이미지 1/2 Dell Vostro 5510 Touchpad Replacement: 8 단계, 이미지 2/2
    • Remove the three 2.2mm screws holding the guard bar in place with the Phillips #0 screwdriver.

  9. Dell Vostro 5510 Touchpad Replacement: 9 단계, 이미지 1/1
    • Remove the guard bar using a pair of tweezers.

  10. Dell Vostro 5510 Touchpad Replacement: 10 단계, 이미지 1/2 Dell Vostro 5510 Touchpad Replacement: 10 단계, 이미지 2/2
    • Unscrew the two 7 mm base head screws from the touchpad with the Phillips #0 screwdriver.

  11. Dell Vostro 5510 Touchpad Replacement: 11 단계, 이미지 1/1
    • Remove the touchpad from the computer by lifting the side closest to the edge and pulling out.

결론

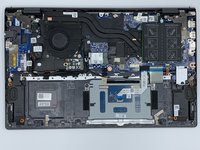
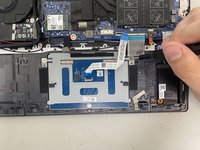
To reassemble your device, follow these instructions in reverse order.

Emanuel

회원 가입일: 02/08/24

121 평판

안내서 1개 작성함

댓글 0개

댓글 쓰기

조회 통계:

24 시간 전: 2

7일 전: 4

30일 전: 12

전체 시간: 45