주요 콘텐츠로 건너뛰기

이 버전에는 잘못된 편집 사항이 있을 수 있습니다. 최신 확인된 스냅샷으로 전환하십시오.

보관된 가이드
해당 안내서는 단지 역사적인 목적으로 보관됩니다. 최신 버전 안내서를 사용하여 수리 하십시오.

필요한 것

  1. 이 단계는 번역되지 않았습니다. 번역을 도와주십시오

    : 1 단계, 이미지 1/2 : 1 단계, 이미지 2/2
    • Remove the eight 4 mm T5 Torx screws from the bottom cover.

  2. 이 단계는 번역되지 않았습니다. 번역을 도와주십시오

    : 2 단계, 이미지 1/2 : 2 단계, 이미지 2/2
    • Use a plastic opening tool to pry open the 'XPS' flap in the middle.

  3. 이 단계는 번역되지 않았습니다. 번역을 도와주십시오

    : 3 단계, 이미지 1/1
    • Remove the single Phillips screw hidden beneath the flap.

  4. 이 단계는 번역되지 않았습니다. 번역을 도와주십시오

    : 4 단계, 이미지 1/1
    • Use opening picks or a plastic pry tool to pry open the case clips, beginning from the back edge.

  5. 이 단계는 번역되지 않았습니다. 번역을 도와주십시오

    : 5 단계, 이미지 1/1
    • Remove the bottom cover.

  6. 이 단계는 번역되지 않았습니다. 번역을 도와주십시오

    : 6 단계, 이미지 1/2 : 6 단계, 이미지 2/2
    • Pull the battery cable connector towards the battery to disconnect it from its socket.

    • If the connector is stubborn, push a little at one side, then the other, to "walk" it out of its socket.

    • If you have trouble walking the connector out of the socket, use the point of a spudger to gently push on the connector indent to slide the connector out.

    • Do not pull up.

    • Open the display and press the power button for five seconds to drain any remaining charge from the system.

  7. 이 단계는 번역되지 않았습니다. 번역을 도와주십시오

    : 7 단계, 이미지 1/2 : 7 단계, 이미지 2/2
    • Remove the four 3 mm Phillips #0 screws located on each corner of the battery.

  8. 이 단계는 번역되지 않았습니다. 번역을 도와주십시오

    : 8 단계, 이미지 1/2 : 8 단계, 이미지 2/2
    • Pull the battery cable connector towards the battery to disconnect it from its socket.

    • Do not pull up.

  9. 이 단계는 번역되지 않았습니다. 번역을 도와주십시오

    : 9 단계, 이미지 1/1
    • Peel up any tape securing the speaker cables to the battery.

    • You do not need to remove the speakers, only the tape, allowing the battery to be removed out under the speaker cables.

  10. 이 단계는 번역되지 않았습니다. 번역을 도와주십시오

    : 10 단계, 이미지 1/1
    • Remove the battery.

  11. 이 단계는 번역되지 않았습니다. 번역을 도와주십시오

    : 11 단계, 이미지 1/3 : 11 단계, 이미지 2/3 : 11 단계, 이미지 3/3
    • Pull the sliding touchscreen connector gently to the right and out of the motherboard.

  12. 이 단계는 번역되지 않았습니다. 번역을 도와주십시오

    : 12 단계, 이미지 1/2 : 12 단계, 이미지 2/2
    • Use your fingers to remove the sliding camera connector out from the motherboard.

  13. 이 단계는 번역되지 않았습니다. 번역을 도와주십시오

    : 13 단계, 이미지 1/2 : 13 단계, 이미지 2/2
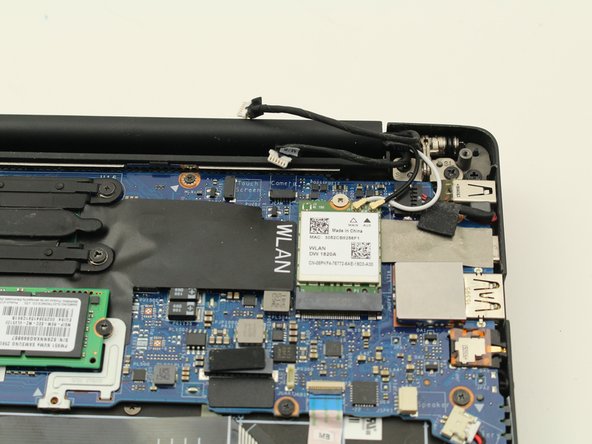
    • Pop the coaxial antenna cables up from the wireless card with the flat end of the spudger.

  14. 이 단계는 번역되지 않았습니다. 번역을 도와주십시오

    : 14 단계, 이미지 1/3 : 14 단계, 이미지 2/3 : 14 단계, 이미지 3/3
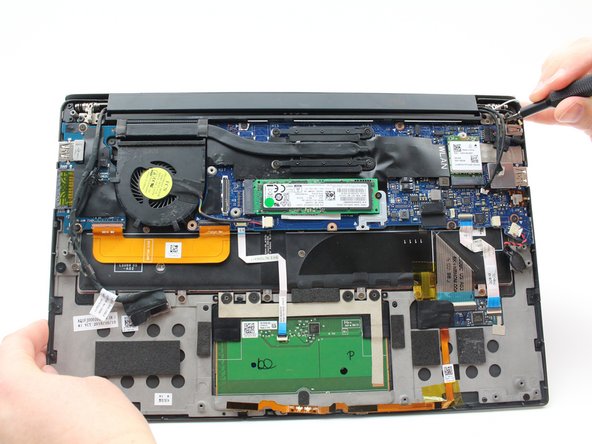
    • Using a spudger, pry up the press fit connector on the end of the left cable bundle.

    • Gently remove the sliding cable connector from its port to the left of the fan.

  15. 이 단계는 번역되지 않았습니다. 번역을 도와주십시오

    : 15 단계, 이미지 1/3 : 15 단계, 이미지 2/3 : 15 단계, 이미지 3/3
    • Remove the four, black 4.6 mm screws from the display mounts using a Phillips #0 screwdriver.

    • The laptop needs to be open for the display to clear the cutouts of the bottom case, so you may find it easier to remove the screws while already in an open configuration.

    • Remove the display assembly.

결승점

다른 10명이 해당 안내서를 완성하였습니다.

Austin Blakely

회원 가입일: 03/11/19

19,536 평판

안내서 53개 작성하였습니다

iFixit iFixit 회원

Staff

135 회원들

안내서 17,182개 작성하였습니다

댓글 2개

After disassembling the screen, how do I peel it off the metal screen cover?

Jon - 답글

I need to find out what screen model I have to buy a display controller to re-use the screen on a different project, but I’m not able to see behind the screen to find out the exact model.

Jon - 답글

댓글 쓰기

조회 통계:

24 시간 전: 21

7일 전: 99

30일 전: 398

전체 시간: 27,762