소개
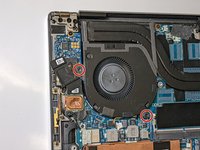
Like any laptop, the Dell XPS 15 9500's fans keep crucial components cool and functional. If your laptop's performance has become increasingly sluggish, or you notice that you could probably fry an egg on the heatsink, odds are there's an issue with your fans.
First, check if the fans are spinning while your laptop's powered on. If they're spinning, check the blades for any buildup of dust or debris, and clean them appropriately.
If the fans aren't spinning whatsoever, they've likely reached the end of their lifespan, and it's time to replace them.
Before beginning, power off and unplug your laptop.
필요한 것


To reassemble your device, follow these instructions in reverse order.
To reassemble your device, follow these instructions in reverse order.
다른 한 분이 해당 안내서를 완성하였습니다.

팀

UC Santa Barbara, Team A-1, Bator Winter 2022 UC Santa Barbara, Team A-1, Bator Winter 2022 회원
UCSB-BATOR-W22SAG1
4 회원들
안내서 4개를 작성함