주요 콘텐츠로 건너뛰기

Dell XPS 15 9570 Keyboard Replacement

필요한 것

  1. Dell XPS 15 9570 Keyboard Replacement, Base Cover: 1 단계, 이미지 1/1
    • Make sure your device is powered off and unplugged before starting

    • Flip the device over so the base cover of the computer is facing upwards.

  2. Dell XPS 15 9570 Keyboard Replacement: 2 단계, 이미지 1/3 Dell XPS 15 9570 Keyboard Replacement: 2 단계, 이미지 2/3 Dell XPS 15 9570 Keyboard Replacement: 2 단계, 이미지 3/3
    • Using a Torx T5 screwdriver, remove the ten 3 mm screws on the back.

  3. Dell XPS 15 9570 Keyboard Replacement: 3 단계, 이미지 1/2 Dell XPS 15 9570 Keyboard Replacement: 3 단계, 이미지 2/2
    • Flip open the system badge and with a Phillips #00 screwdriver, remove the two 8.5 mm screws.

  4. Dell XPS 15 9570 Keyboard Replacement: 4 단계, 이미지 1/1
    • Lift the back cover off of the device.

  5. Dell XPS 15 9570 Keyboard Replacement, Battery: 5 단계, 이미지 1/1
    • Using the Phillips #00 screwdriver, remove the four 4 mm screws holding the battery in place.

  6. Dell XPS 15 9570 Keyboard Replacement: 6 단계, 이미지 1/1
    • Use the iFixit opening tool to disconnect the battery connector from the motherboard.

  7. Dell XPS 15 9570 Keyboard Replacement: 7 단계, 이미지 1/1
    • With your hands, pick up and remove the battery from the system.

  8. Dell XPS 15 9570 Keyboard Replacement, Heat Sink: 8 단계, 이미지 1/2 Dell XPS 15 9570 Keyboard Replacement, Heat Sink: 8 단계, 이미지 2/2
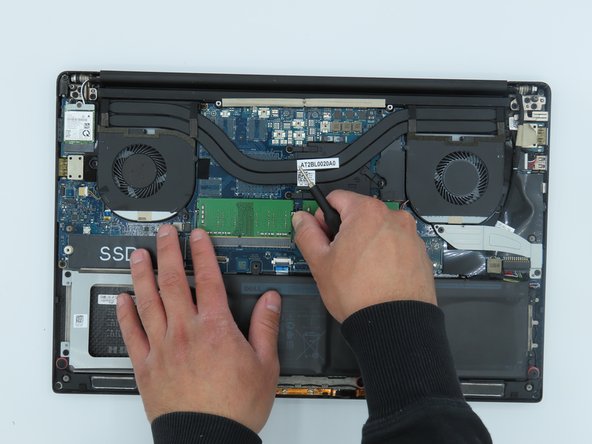
    • Use the Phillips #00 to remove the three (without graphics card) or four (with graphics card) 3 mm screws that connect the heat sink to the system board.

  9. Dell XPS 15 9570 Keyboard Replacement: 9 단계, 이미지 1/1
    • Lift the heat sink from the device. The thermal paste may have dried and make this handling more complicated, be careful.

  10. Dell XPS 15 9570 Keyboard Replacement, Fan: 10 단계, 이미지 1/2 Dell XPS 15 9570 Keyboard Replacement, Fan: 10 단계, 이미지 2/2
    • Use the Phillips #00 screwdriver to remove the two 4 mm screws securing the grey display cable bracket.

  11. Dell XPS 15 9570 Keyboard Replacement: 11 단계, 이미지 1/1
    • Using the Phillips #00 screwdriver, remove the 4 mm screw at the back right corner of the fan.

  12. Dell XPS 15 9570 Keyboard Replacement: 12 단계, 이미지 1/2 Dell XPS 15 9570 Keyboard Replacement: 12 단계, 이미지 2/2
    • Disconnect the fan cable on the left of the fan and on the right side from the RAM, using the opening tool.

  13. Dell XPS 15 9570 Keyboard Replacement: 13 단계, 이미지 1/1
    • Lift the right fan off of the device.

    • Repeat steps 8-11 to remove the left fan from the system board.

    • The left fan is fixed with two 4 mm screws. Make sure you have removed them if the fan does not come off easily.

  14. Dell XPS 15 9570 Keyboard Replacement, RAM: 14 단계, 이미지 1/2 Dell XPS 15 9570 Keyboard Replacement, RAM: 14 단계, 이미지 2/2
    • Use your fingers to pinch down the metal tabs holding the RAM in place. Do this for each tab.

  15. Dell XPS 15 9570 Keyboard Replacement: 15 단계, 이미지 1/1
    • Use your hands to carefully lift the RAM up and away from the tabs to safely take it out.

  16. Dell XPS 15 9570 Keyboard Replacement, SSD: 16 단계, 이미지 1/2 Dell XPS 15 9570 Keyboard Replacement, SSD: 16 단계, 이미지 2/2
    • Use the Phillips #00 screwdriver to remove the 5.5 mm screw next to the SSD.

  17. Dell XPS 15 9570 Keyboard Replacement: 17 단계, 이미지 1/2 Dell XPS 15 9570 Keyboard Replacement: 17 단계, 이미지 2/2
    • Using your hands, hold the SSD and slightly pull to the left.

  18. Dell XPS 15 9570 Keyboard Replacement, Wireless Card: 18 단계, 이미지 1/2 Dell XPS 15 9570 Keyboard Replacement, Wireless Card: 18 단계, 이미지 2/2
    • Using a Phillips #00 screwdriver, loosen the captive screw holding the wireless card bracket in place.

  19. Dell XPS 15 9570 Keyboard Replacement: 19 단계, 이미지 1/1
    • Lift the wireless card bracket off of the wireless card.

  20. Dell XPS 15 9570 Keyboard Replacement: 20 단계, 이미지 1/2 Dell XPS 15 9570 Keyboard Replacement: 20 단계, 이미지 2/2
    • Using a spudger, disconnect the coaxial antenna cables from the Wi-Fi card by popping them gently off.

  21. Dell XPS 15 9570 Keyboard Replacement: 21 단계, 이미지 1/1
    • Carefully remove the wireless card.

  22. Dell XPS 15 9570 Keyboard Replacement, Keyboard: 22 단계, 이미지 1/2 Dell XPS 15 9570 Keyboard Replacement, Keyboard: 22 단계, 이미지 2/2
    • Disconnect the two motherboard cables using the opening tool.

  23. Dell XPS 15 9570 Keyboard Replacement: 23 단계, 이미지 1/3 Dell XPS 15 9570 Keyboard Replacement: 23 단계, 이미지 2/3 Dell XPS 15 9570 Keyboard Replacement: 23 단계, 이미지 3/3
    • Using a Phillips #0 screwdriver, remove the four 4mm screws securing the hard drive cover.

  24. Dell XPS 15 9570 Keyboard Replacement: 24 단계, 이미지 1/3 Dell XPS 15 9570 Keyboard Replacement: 24 단계, 이미지 2/3 Dell XPS 15 9570 Keyboard Replacement: 24 단계, 이미지 3/3
    • Disconnect the two motherboard cables located on the right of the motherboard using the opening tool.

  25. Dell XPS 15 9570 Keyboard Replacement: 25 단계, 이미지 1/2 Dell XPS 15 9570 Keyboard Replacement: 25 단계, 이미지 2/2
    • Using a Phillips #0 screwdriver, unscrew the 4 remaining 4mm screws holding the motherboard in place.

    • Remove the motherboard.

  26. Dell XPS 15 9570 Keyboard Replacement: 26 단계, 이미지 1/2 Dell XPS 15 9570 Keyboard Replacement: 26 단계, 이미지 2/2
    • Disconnect the keyboard cables, labeled BL and KB, using the opening tool.

  27. Dell XPS 15 9570 Keyboard Replacement: 27 단계, 이미지 1/3 Dell XPS 15 9570 Keyboard Replacement: 27 단계, 이미지 2/3 Dell XPS 15 9570 Keyboard Replacement: 27 단계, 이미지 3/3
    • Unscrew the 1.9mm screws using a Phillips #00 screwdriver.

    • Flip the cutouts on the keyboard to reveal and unscrew remaining 1.9mm screws underneath.

    • Remove the keyboard.

결론

To reassemble your device, follow these instructions in reverse order.

다른 한 분이 해당 안내서를 완성하였습니다.

Sophie

회원 가입일: 11/09/23

289 평판

안내서 2개 작성하였습니다

IUPUI, Team 3-1, Harley Fall 2023 IUPUI, Team 3-1, Harley Fall 2023 회원

IUPUI-HARLEY-F23S3G1

4 회원들

안내서 3개 작성하였습니다

댓글 0개

댓글 쓰기

조회 통계:

24 시간 전: 4

7일 전: 28

30일 전: 89

전체 시간: 390