주요 콘텐츠로 건너뛰기

Dell c1760nw Clean main mechanics cleaning and making it work

필요한 것

  1. Dell c1760nw Clean main mechanics cleaning and making it work, Remove error 007-371: 1 단계, 이미지 1/1
    • Does your Dell C1760nw ( and some other LED/laserprinter models) show you incessantly the error 007-371? Then this repair guide is made for you!

  2. Dell c1760nw Clean main mechanics cleaning and making it work, Remove the paper tray: 2 단계, 이미지 1/2 Dell c1760nw Clean main mechanics cleaning and making it work, Remove the paper tray: 2 단계, 이미지 2/2
    • Remove the front paper tray by slightly bending it carefully and angling it to release the peg from the hinge slot.

  3. Dell c1760nw Clean main mechanics cleaning and making it work, Remove front housing parts: 3 단계, 이미지 1/3 Dell c1760nw Clean main mechanics cleaning and making it work, Remove front housing parts: 3 단계, 이미지 2/3 Dell c1760nw Clean main mechanics cleaning and making it work, Remove front housing parts: 3 단계, 이미지 3/3
    • Remove the bar at the top and the front. (It snaps out with a little effort.)

  4. Dell c1760nw Clean main mechanics cleaning and making it work, Remove TopCase: 4 단계, 이미지 1/2 Dell c1760nw Clean main mechanics cleaning and making it work, Remove TopCase: 4 단계, 이미지 2/2
    • Remove two srews from the front. And to take off the cover leverage remove the tabs diagonally from the front over the latching.

  5. Dell c1760nw Clean main mechanics cleaning and making it work, Continued: Remove TopCase: 5 단계, 이미지 1/1
    • Carefully lift the cover (Attention: cable connection to the display is hanging there) and rack it to the back of the printer (move it back and forth to unhook the locking nipple): unplug the display connector (yellow lines) from the I/O board, unroute the cable and remove the cover.

  6. Dell c1760nw Clean main mechanics cleaning and making it work, Remove left housing part: 6 단계, 이미지 1/1
    • Place the printer on the right side and remove the left side panel (there are 2 lugs under the printer)

  7. Dell c1760nw Clean main mechanics cleaning and making it work, Next: Remove the left housing part: 7 단계, 이미지 1/1
    • Reposition the printer and hold the disengaged lugs in the disengaged position. Open the rear flap and slide the side panel backwards while moving away from the printer.

  8. Dell c1760nw Clean main mechanics cleaning and making it work, Remove the WLAN card: 8 단계, 이미지 1/2 Dell c1760nw Clean main mechanics cleaning and making it work, Remove the WLAN card: 8 단계, 이미지 2/2
    • The WLAN card is secured with a screw-> remove it, carefully unplug the WLAN card and remove the WLAN bracket together with the cable

  9. Dell c1760nw Clean main mechanics cleaning and making it work, Remove I / O card: 9 단계, 이미지 1/3 Dell c1760nw Clean main mechanics cleaning and making it work, Remove I / O card: 9 단계, 이미지 2/3 Dell c1760nw Clean main mechanics cleaning and making it work, Remove I / O card: 9 단계, 이미지 3/3
    • Loosen all connectors (pull plugs carefully out of sockets)

    • Pull both flexible cables out of sockets. Caution: the wider flexible cable has a base with lock. Lift it carefully with a fingernail, this releases the flexible cable and allows it to be easily pulled out of the socket.

    • I/O card is secured with 4 screws, loosen all 4.

    • There is another screw on the USB port: Loosen it

  10. Dell c1760nw Clean main mechanics cleaning and making it work, Remove metal plate (beneath I / O card): 10 단계, 이미지 1/3 Dell c1760nw Clean main mechanics cleaning and making it work, Remove metal plate (beneath I / O card): 10 단계, 이미지 2/3 Dell c1760nw Clean main mechanics cleaning and making it work, Remove metal plate (beneath I / O card): 10 단계, 이미지 3/3
    • The metal plate under the I/O card (which holds the I/O card) is secured with 3 screws. Remove all 3 screws

  11. Dell c1760nw Clean main mechanics cleaning and making it work, Remove the fan: 11 단계, 이미지 1/1
    • The fan is secured to this plate with a screw (red arrow): Loosen the screw and unlock the locking device on the other side of the fan.

    • Remove the fan, disconnect the cables and plugs on the upper control board (no photo).

  12. Dell c1760nw Clean main mechanics cleaning and making it work, Unroute wiring harnesses: 12 단계, 이미지 1/1
    • Unroute all cable harnesses on the left side from the guides.

    • Remove the cable guide bracket and hang it from the remaining cable harnesses on the printer.

  13. Dell c1760nw Clean main mechanics cleaning and making it work, Remove other components: 13 단계, 이미지 1/1
    • A) Remove plastic bracket with gear for paper feed (2 screws) - No photo!

    • B) Remove main drive

    • C) Remove board with color control (4 screws)
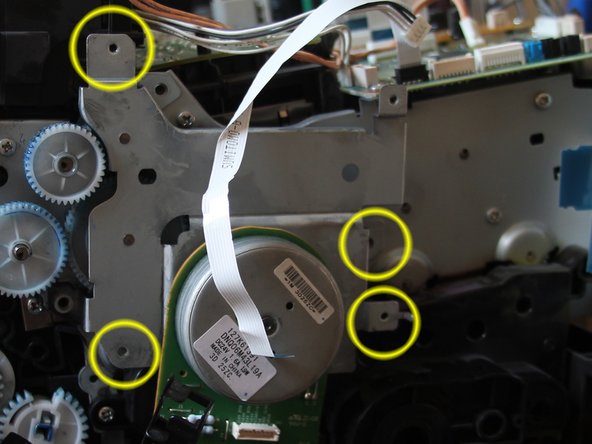
  14. Dell c1760nw Clean main mechanics cleaning and making it work, B) Remove main drive: 14 단계, 이미지 1/3 Dell c1760nw Clean main mechanics cleaning and making it work, B) Remove main drive: 14 단계, 이미지 2/3 Dell c1760nw Clean main mechanics cleaning and making it work, B) Remove main drive: 14 단계, 이미지 3/3
    • Loosen 4 screws

    • Pull the main gearbox carefully and straight off the printer. (Caution: loose gears!)

    • Last photo: This is what the dismantled main gearbox looks like: The completely muddy (color & grease) drive gear is the black (below)

  15. Dell c1760nw Clean main mechanics cleaning and making it work, C) Remove board with color control: 15 단계, 이미지 1/1
    • Carefully pull the upper flexible cable out of the base

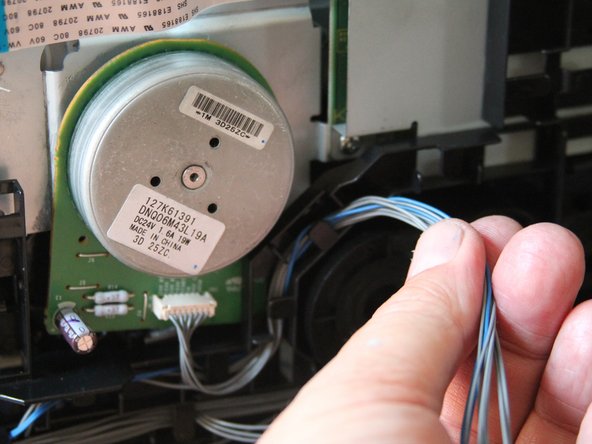
    • on the right side: 4 flexible cables with base lock. With fingernail: Open the lock, then carefully lift the flexible cable by the blue tab and remove it from the base. (hand)

  16. Dell c1760nw Clean main mechanics cleaning and making it work, Remove the color control gear: 16 단계, 이미지 1/2 Dell c1760nw Clean main mechanics cleaning and making it work, Remove the color control gear: 16 단계, 이미지 2/2
    • Next, we remove the color control gear (black, large plastic bracket with 15 meshing gears (5 screws have to be loosened).

    • CAUTION when removing the bracket so that the gears do not fall out!

    • 2nd photo: removed condition and THE central problem: The paint particles have combined to form a sticky mass with the gear grease.

  17. Dell c1760nw Clean main mechanics cleaning and making it work, Washing the gearwheels ...: 17 단계, 이미지 1/3 Dell c1760nw Clean main mechanics cleaning and making it work, Washing the gearwheels ...: 17 단계, 이미지 2/3 Dell c1760nw Clean main mechanics cleaning and making it work, Washing the gearwheels ...: 17 단계, 이미지 3/3
    • Washing the gearwheels.

    • A toothbrush with plenty of hand soap brings good success here!

    • Attention: Every gear wheel has its position! Do not mix them up!

    • Attention: Dry all parts (brackets, gears) very well! "Knocking" the ingredients on paper towels helps!

  18. Dell c1760nw Clean main mechanics cleaning and making it work, First success: 18 단계, 이미지 1/2 Dell c1760nw Clean main mechanics cleaning and making it work, First success: 18 단계, 이미지 2/2
    • The "before / after" evidence ;-)

    • I used low-viscosity grease to grease the axles and the teeth. Finally, add a splash of Balistol to the grease on the axles.

  19. Dell c1760nw Clean main mechanics cleaning and making it work, Second success: 19 단계, 이미지 1/2 Dell c1760nw Clean main mechanics cleaning and making it work, Second success: 19 단계, 이미지 2/2
    • And once again: before and after

    This takes no little time. Teardown in 2 hours, I’ll go with. Getting it clean and back together is entirely different matter.

    B. A. Computer Services - 답글

  20. Dell c1760nw Clean main mechanics cleaning and making it work, Clean the chassis: 20 단계, 이미지 1/2 Dell c1760nw Clean main mechanics cleaning and making it work, Clean the chassis: 20 단계, 이미지 2/2
    • Now the chassis should be cleaned (only for the good feeling! and because of the care...)

    • Moist all-purpose wipes" in a resealable plastic cover are ideal for cleaning.

  21. Dell c1760nw Clean main mechanics cleaning and making it work, After assembly: 21 단계, 이미지 1/2 Dell c1760nw Clean main mechanics cleaning and making it work, After assembly: 21 단계, 이미지 2/2
    • The assembly is done in reverse order... Until the printer only needs the right and front housing part plus the paper flap.

    • If the error message 007-371 appears again at the first attempt of the printout, this is nothing unusual. The paint mixing drive usually still needs a "boost".

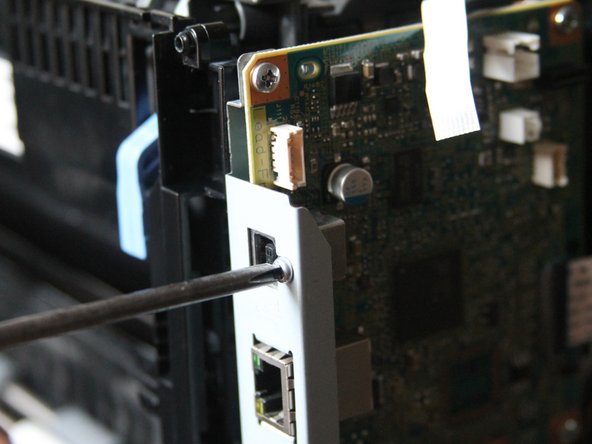
    • Turn the printer off and on again a short time later. Now you help the gear a little bit on the jumps: for this you put on a screwdriver as shown in picture 1, hold it with a little pressure so that you can get the gear wheel touched with it a little in motion when it is released by the small relay.

    • This usually does not happen by itself during the first printing process (although the spring in the gearbox, which you probably noticed earlier, should actually trigger this momentum). So, put on the screwdriver like this and send a print job.

    • In picture 2 you can see a better close-up to attach the screwdriver exactly.

    • If everything works, then reassemble everything else and: DONE!

결론

Congratulations, you did it!

다른 5명이 해당 안내서를 완성하였습니다.

다음 번역가들에게 특별히 감사 드립니다:

de en

100%

이 번역자 분들은 저희가 세상을 수리하는데 동참해 주시는 분입니다! 기여하시겠습니까?
번역 시작하기 ›

첨부 문서

GeorgG

회원 가입일: 01/14/11

1,000 평판

안내서 1개 작성함

댓글 3개

could really use a service manual for the c1760nw if anyone has one. email is johnnysemail62@yahoo.com. Thanks in advance!

johnny - 답글

do u have manual now?

dr.wot -

it looks so easy LOL but then when you know what your doing it helps!

Thanks all the same.

BC

Ben Cowell - 답글

댓글 쓰기

조회 통계:

24 시간 전: 9

7일 전: 56

30일 전: 227

전체 시간: 17,716