소개
¡Es hora de desmontar! Estamos en la Ronda 3 de desmontaje esta semana y no vamos a detenernos. Nuestro próximo contendiente: la recién llegada MacBook Pro 13" con Pantalla de Retina. La edición de este año es liviana, pero estamos seguros que va a tener gran repercusión. No importa lo mucho que pegue, no es competencia para nuestros defensores del equipo de desmontadores. Acompáñanos mientras damos batalla para entrar en la última laptop de Apple.
Pero, espera, hay más en Facebook y también en
Twitter, y no te olvides de
Instagram para asegurarte de no perderte ninguna ronda.
필요한 것
동영상 개요
-
-
Hemos hecho esto siete veces ya, pero hincar los dientes en este Apple de 13 pulgadas y grado profesional es siempre una jugosa sorpresa.
-
Veamos las últimas especificaciones técnicas:
-
Pantalla de retina de 13.3 pulgadas 2560 por 1600 píxeles (227 ppi)
-
Procesador de 2.4 GHz o 2.6 GHz Core i5 de Intel de doble núcleo (Opcional 2.8 GHz Intel Core i7 de doble núcleo disponible)
-
4, 8 o 16 GB DDR3L RAM integrada
-
128, 256, 512 GB o 1 TB de almacenamiento SSD
-
Intel Iris Graphics
-
Thunderbolt 2, USB 3 y tamaño completo HDMI E/S
-
-
-
Enseguida espiamos algo no conocido: Model A1502 nunca ha sido visto antes suelto. ¿Esto significa que este bicho es totalmente nuevo? Ahora vamos a enterarnos.
-
Los puertos del lado estribor incluyen:
-
Ranura para Tarjeta SDXC
-
HDMI tamaño completo con salida 1080p
-
USB 3.0
-
¡Más puertos del lado del puerto!
-
Otro USB 3.0
-
2x Thunderbolt 2
-
-
-
A esta altura, no estamos ni siquiera sorprendidos de encontrar la caja inferior sujetada con tornillos pentalobe. Solo estamos...decepcionados.
-
Parece que esta nueva actualización ha perdido su calma... y también un ventilador.
-
La redecoración de Apple para las fiestas no terminó allí: cableado reorganizado, SSD desplazada, y una batería drásticamente revisada ahora decoran estos pasillos.
Does anybody notice there is a small connector sitting right above the SSD in step 3? I just noticed it after opening my own MBP. What's it for? Diagnostic? It's gone in 2015 models.
-
-
-
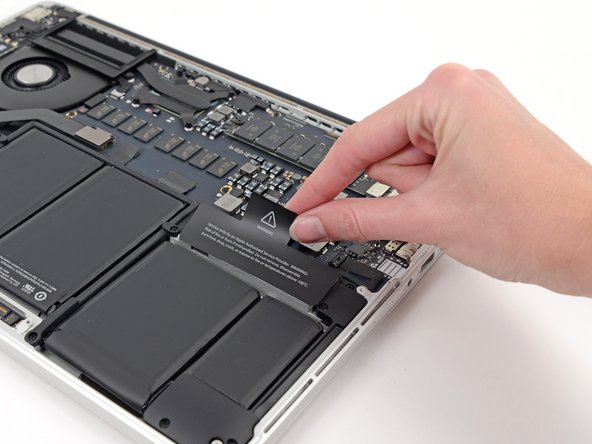
Como siempre, Apple nos advierte de consecuencias trágicas si intentamos de reparar, remover o conversar amablemente con la batería.
-
Advertencia... tonterías. Ya sabes lo que sentimos acerca de estas etiquetas.
-
La primera regla de desmontaje: desconectar la energía. No hay peor shock como olvidarse dónde reside el poder.
-
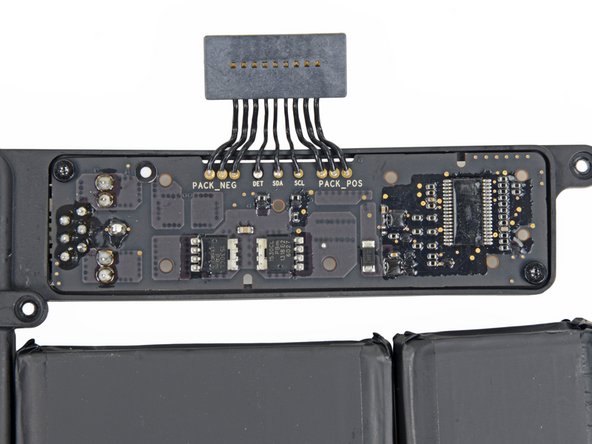
Sacamos el conector de batería, pero esa placa nueva y elegante de controlador de batería no se va a ningún lado.
-
Esos pequeños tornillos...¡no hacen nada! La placa ostenta algunos cables complicados que están soldados y enrutados para que se mantenga en su lugar. Este ensamblaje está volviéndose un rompecabezas.
-
-
-
Usamos nuestro spudger para llegar a los cables de antena y extraer la tarjeta durmiente AirPort.
-
No te preocupes—te prometemos que la pondremos de vuelta antes de que se despierte.
-
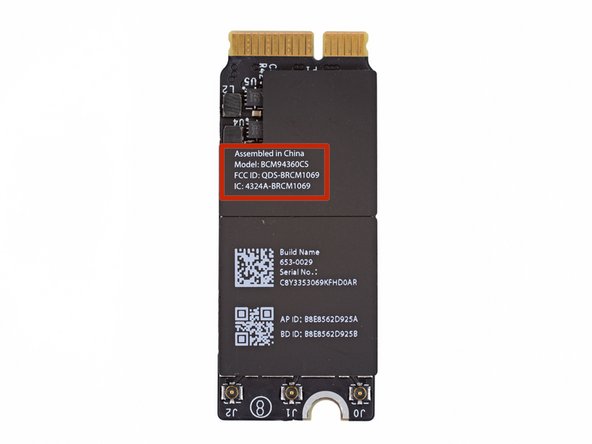
Podría resider en la misma ubicación del lado derecho como el el modelo antiguo, pero este Broadcom BCM94360CS es un animal diferente.
-
La nueva tecnología 802.11ac Wi-Fi asegura que tiene el triple de rendimiento de 802.11n.
There are three antennas, I think. They can be seen on the first picture at step five.
Are these antenna's going into the plastic part underneath the screen?
-
-
-
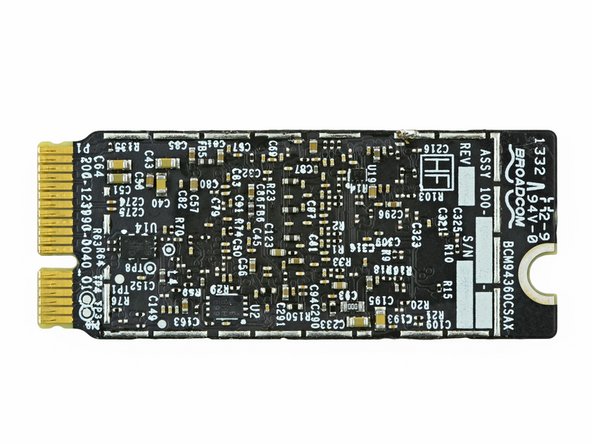
Espiamos debajo de la Tarjeta AirPort actualizada, encontramos:
-
Trasceptor Gigabit Broadcom BCM4360 5G Wi-Fi 3-Stream 802.11ac
-
Procesador Bluetooth Broadcom BCM20702 de Chip Único con un Transceptor Integrado de Rendimiento Alto 2.4-GHz RF
-
Módulo Fron-End WLAN 802.11a/b/g/n/ac de Banda Dual Skyworks SE5516
-
-
-
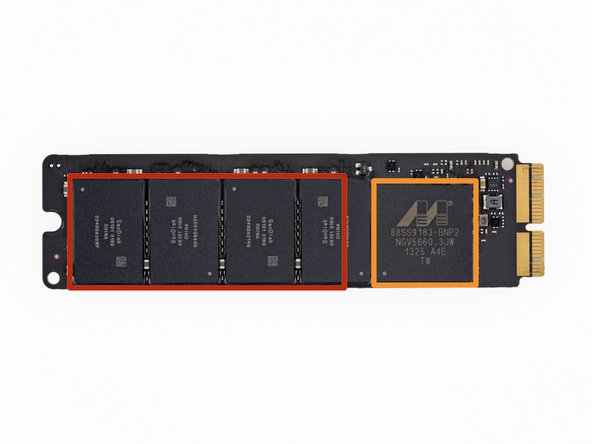
Los SSD pueden no girar como otros disco duros, pero al de la MacBook Pro 13" con Pantalla de Retina le gusta saltar.
-
Esta Pro viene como una base de 128 GB de almacenamiento flash, con modelos más grandes con 256 o 512 GB.
-
Algunas cosillas notables:
-
SanDisk 05131 016G 16 GB NAND Flash (total de 8 x 16 GB = 128 GB)
-
Controlador SSD Marvell Semiconductor 88SS9183
-
SK Hynix H5TQ2G63DFR DDR3-1600
Since you have torn down both the new 13" and 15" rMBPs, can you advise whether the PCIe SSD modules are cross-compatible between models (and with the mid 2013 Airs)? I.e do they use the same PCIe connector and are they the same physical size?
I would hope after much chopping and changing that Apple has finally settled on a common module design, making it easier to repair / upgrade one of the few remaining user-replaceable parts.
i just bought a MBP today, and i think the SSD size will be a problem for me in some years because i bought the 128GB model, do you think that i would can buy a new SSD in the future?
So, is the SSD in fact upgradable and can someone give example of where to get modules?
It is indeed upgradeable, Transcend is on to it. But as long as the SSD-controllers are rare it will take some time.
What's that RAM module here? I've seen the main RAM solded on de MB...
-
-
-
-
¡Wingardium leviosa! El cable de placa E/S prácticamente flota de su enchufe.
-
Nuestro Pro Tech Destornillador (varita mágica) versátil hace que remover el altavoz sea mágico.
-
Otra vez agitamos la varita y los altavoces salen de la caja trasera.
-
Estamos felices de informarte que estos altavoces que no deben ser nombrados son bastante fáciles de remover— no se requiere magia negra.
How easy is the speakers removal? But it is difficult to return back
Can you help
-
-
-
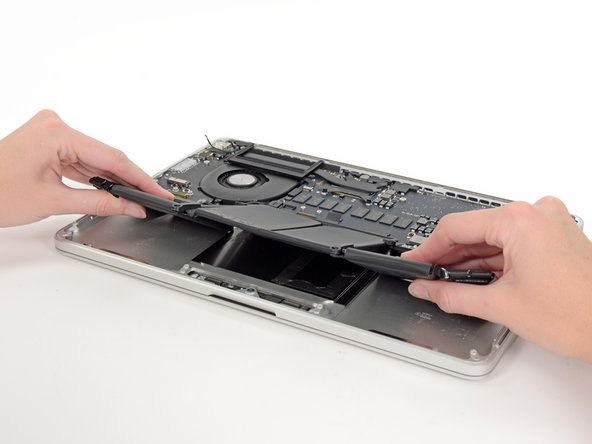
Para empeorar las cosas, las latitas de batería atornilladas del año pasado se han mudado hacia el panel táctil, enterrándolo al pobre panel vivo.
-
Lanzamos el equipo de rescate con nuestros amigos, iOpener y tarjeta de plástico. Luego de un abundante trago de paciencia, nos ponemos a trabajar.
-
¡Victoria! Por fin, el raro ensamblaje de batería sale de la caja.
Hi iFixers,
Spilling half a glass of sparkling water on a MBP-13" retina (late 2013) is not best idea. Washing and drying all PCBs got it back to work for few months, but recently battery stoped charging. I noticed few pins around one SMD chip of battery charging controller were corroded. I got an iOpener kit and a new battery.
I can say iOpener is fantastic. Although I did not use much plastic card part of the tool kit as it is difficult to insert between case edges and smallest batteries on each side. Instead I used a rectangular painting palette knife (2 1/2 x 1/2 in) which is quite flexible and perfect dimension. It took me around 30 minutes to get old battery pack out, reheating iOpener 4 or 5 times, inserting palette gently under each cells (one by one) and slowly rocking palette underneath to gradually cut melted glue layer.
MBP works again as a new one, charging happily.
Thanks to iFixit guys....
Pierre d, Aug 12, 2014
Hi,
Where did you buy your new battery? My battery stopped working after I dropped water on my computer.
Thank you,
-
-
-
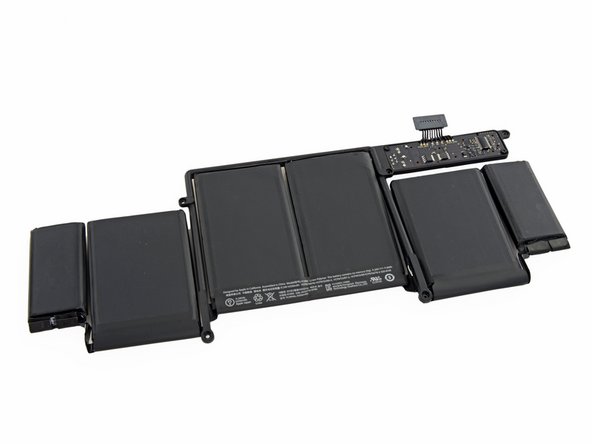
¡Mira esos abdominales bien marcados!
-
Aquí esta el músculo: esta batería con 71.8 Wh y 11.34 V tiene un poco menos brío que la del año pasado. Pero gracias a otras mejoras, Apple afirma que la vida de la batería es de 9 horas durante uso normal.
-
Con la batería libre, finalmente podemos observar de cerca el conector.
-
Es ciertamente bueno ver un conector de batería más convencional en vez de la modificación anterior en la placa de contacto. ¿Pero a qué costo, Apple?
-
-
-
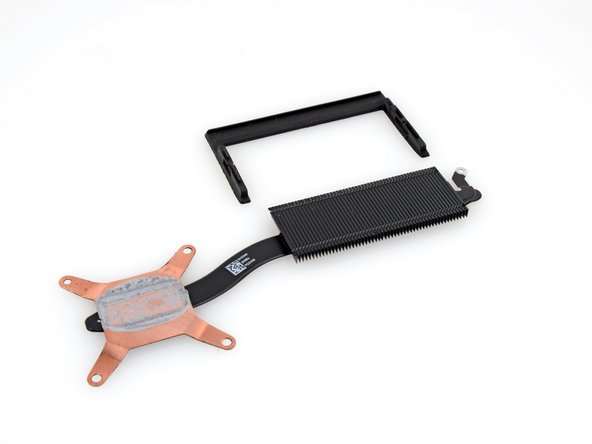
Sacamos con nuestro spudge algunas cubiertas de tornillo pegajosas y de espuma y remueve el disipador de calor para encontrarnos con... pasta térmica pegajosa.
-
El CPU y GPU comparten la misma matriz a la derecha y el southbridge (PCH) a la izquierda.
Occurs to me that replacing thermal paste would be 6 out of 10 repairability. Do you concur?
The GPU does not make any contact with the heat spreader. It will have a sudden death leaving the main board as a wreck. Stupid design.
Typing this on a well-worn 7 year-old Late 2013 MacBook Pro and my GPU hasn’t died yet
-
-
-
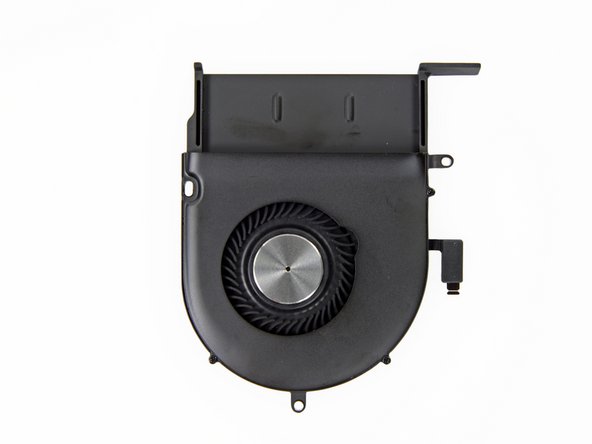
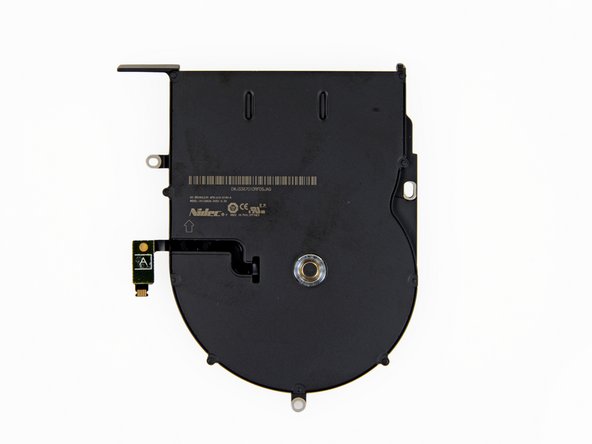
Con el disipador de calor fuera, es hora de enfriarse. Bueno, es hora de sacar el ventilador.
-
El ventilador Nidec sin escobillas no nos arrastra con sus nuevas innovaciones, pero apreciamos el esfuerzo que hace para que las cosas no hiervan.
-
-
-
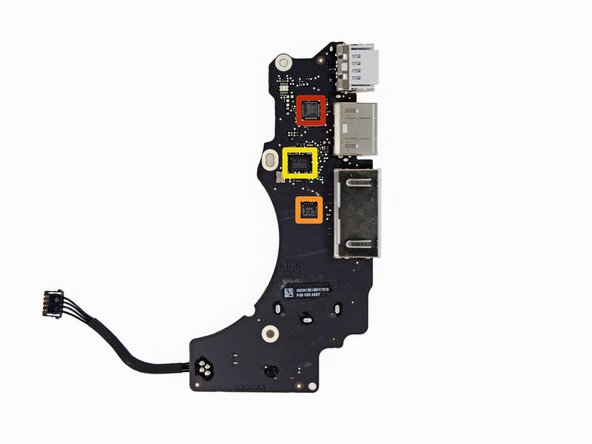
Estamos llegando a la cuestión del asunto cuando sale la placa de E/S para inspección.
-
Circuitos integrados incluidos:
-
Repetidor de limpieza de fluctuación HDMI Parade Technology PS8401A
-
NXP Semiconductors PCA9501 8-bit Expansor E/S con 2-kbit EEPROM integrado
-
Controlador de Lector de Tarjeta SDXC Genesys Logic GL3219
Hey hello,
Have question about the pins on the Logic Board you have 5 of it totally they are with spring like a button where are they for? 1 of mine is broken can that be the reason my mac is not booting any more?
Regards,
Base
Flexible ground contact with the rear case. Macbook should boot without them, as it can boot without the rear case.
-
-
-
Algunos conectores míseros están entre nosotros y la liberación total de la placa lógica. Nos ocupamos de ellos con dureza.
-
Los secretos de MBP pueden correr, pero no se pueden esconder. Además, realmente no pueden correr. Esto podría ser una actualización genial, sin embargo.
-
-
-
Aquí viene, el componente que todos hemos estado esperando:¡la placa lógica! Esto es lo que tenemos en circuitos integrados:
-
Procesador Intel SR18A Core i5-4258U
-
Micron D9PXV 4 Gb (512 MB) DDR3L SDRAM (total de 8 * 512 MB = 4 GB)
-
Cirrus 4208-CRZ T Low Power HD Audio Codec
-
Controlador Thunderbolt 2 Intel DSL5520
-
Semiconductor Fairchild DD18BB 220A
-
Texas Instruments 58872D TI 37 CF61 E4
-
K03P0 2L4 62DP
-
-
-
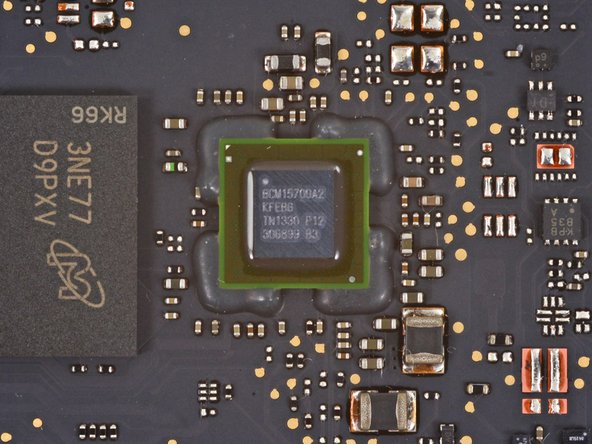
Lado trasero de la placa lógica:
-
Micron D9PXV 4 Gb (512 MB) DDR3L SDRAM
-
MXIC MX25L6406E 64M-bit CMOS Serial Flash
-
Microcontrolador Texas Instruments Stellaris LM4FS1EH
-
Sistema en chip programable Cypress CY8C24794-24LTXI
-
P13WVR 12612NEE
-
Broadcom BCM15700A2
-
Linear Technology LT3957 B29255
-
-
-
Próximo en salir es el puerto MagSafe 2.
-
Estamos contentos de ver que el adaptador de potencia reside en su conector propio, lo que significa que si necesitas reemplazarlo, no necesitarás reemplazar partes extras.
-
Si bien aun tiene la misma tecnología MagSafe 2, el conector ha sido actualizado levemente de las versiones previas.
-
Volando por encima de los componentes, llegamos al mic dual—escondido bajo una cubierta de goma. El tiempo de espiar se acabo, mic, has sido descubierto.
-
-
-
No se preocupen. Atacamos con el iOpener. ¡Es muy efectivo!
-
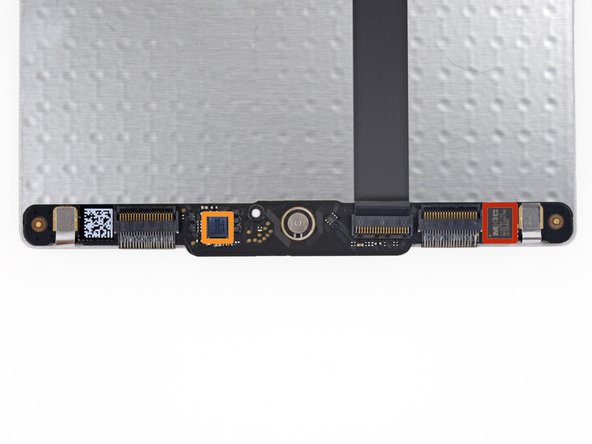
Bajo esta armadura metálica robusta, encontramos casi el mismo panel táctil como en la edición 2012.
-
Los circuitos integrados incluyen:
-
Macronix MX25L2006E 16M-bit CMOS Serial Flash
-
Broadcom BCM5976 Controlador de Pantalla Táctil (como se encuentra en versiones anteriores y el iPhone 5)
-
-
-
La goma negra usualmente esconde los tornillos de bisagra de la pantalla y algo de adhesivo nuevo.
-
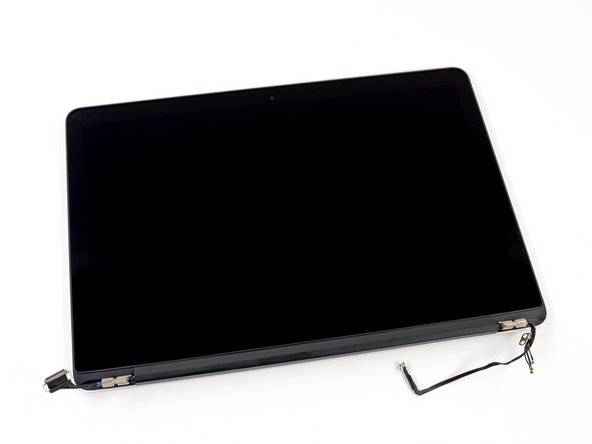
Dejamos la pantalla con una advertencia, pero si te mueres por ver dentro, ¿qué te parece una ráfaga del pasado?
-
Esta pantalla, como la de sus predecesores, puede reemplazarse como una ensamblaje. No hay forma de deshacerse de este chico malo.
-
-
-
Puntaje de reparabilidad de MacBook Pro con Pantalla de Retina 13" de Finales de 2013: 1 de 10 (10 es lo más fácil de reparar)
-
Los tornillos patentados Pentalobe continúan haciendo innecesariamente difícil la apertura del dispositivo.
-
El ensamblaje de batería está totalmente, y de forma muy sólida, pegado a la caja, lo que complica el reemplazo. Adicionalmente, la batería ahora cubre los tornillos y el cable que sujetan el panel táctil en su lugar. Es imposible reemplazar el panel táctil sin remover la batería primero.
-
La pantalla de retina es una unidad fusionada sin vidrio protector. Si cualquier cosa falla dentro de la pantalla, se tendrá que reemplazar el ensamblaje completo ($$$).
-
La RAM está soldada a la placa lógica como en la MacBook Air. Paga por la actualización ahora o quédate atascado con 4GB para siempre. No hay forma de actualizar.
-
La SSD patentada tiene ahora un formato PCIe, pero todavía no es un drive estándar. Crucen los dedos para drives futuros compatibles. Por ahora, estás clavado con lo que tienes.
Heng,
From the Ars Technica review of this iFixit teardown: "the CPU and GPU on one long die and the chipset in a second, smaller die". From the iFixit photo the CPU/GPU chip has the thermal goop on it to connect to the heat sink and the chip set does not. This makes sense as the CPU/GPU die is a much bigger power/thermal hog than the chip set.
I have the same model (128G). My technician says he can take out the 128G and put a 512, 8G RAM or a 256, 8G RAM. Is this true?
yes it is possible... you can do it by yourself... you have just to follow the guide until the step 7, replace your 128 gb ssd with another one...
be careful to buy the right ssd... on the very top of this page there is the bottom "PARTS", there you can find the ssd and chose the one that you prefer! when you have to reinstall the OS X, no problem because at the first start you can download it directly from the apple server!
Giorgio -
Thanks Giorgio,
I needed the assurance. This means a lot. Thanks again
-


다음 번역가들에게 특별히 감사 드립니다:
95%

Mariana Roca님은 저희가 세상을 수리하는데 동참하신 분입니다! 기여하시겠습니까?
번역 시작하기 ›
댓글 31개
Not sure if this is something you guys at iFixit have considered as far as environmental impact is concerned (and I could be wrong here as i don't know the process myself). If something needs to be replaced on an Apple product and is returned under warranty or Apple care then the entire unit is replaced for the customer. The defective unit is then repaired, refurbished and resold to the consumer at a refurbished price. That still results in that particular piece of technology being out there in use and not on a scrap heap.
Again I'm not sure if I am missing something in the process here but this seems like a decent way to keep technology in circulation and off the scrap heap, at least if it's covered under warranty or apple care.
Hello Garreth!
I think what’s missing is the ability to fix it yourself to save some cash when it’s out of warranty.
Abdoz A -
I just had to change my 2011 macbook pro 13 inch battery as it was getting pitiful, if there is no way of easily changing the battery it will probably be the last macbook I buy
Is the CPU user replaceable or is it soldered onto the board?
Thanks Apple. Not only are Mac OS and iOS converging but you are turning your laptops into iDevices, ensuring consumers will buy new laptops when they realize that 4 gigs of RAM and/or a 128 GB SSD are not sufficient to run certain apps.
Surely it should not be so difficult to make SDRAM slots and a SSD slot accessible and your designers should be able to come up with a way that will not mess up the aestetics.
Add a 5 YO kid, a sick Lego mini-figure (from now, the patient), an ambulance to move the patient and a hospital, and it will end up in...
YES! A BROKEN SCREEN! My MBPr13 Late 2013 was the hospital, he laid the patient on top of keys 9 and 0 and "closed the chamber". A 700$ hit. Realized how it happened, because of the small circle marks left on the keyboard protector
It's possible to have two hard drives on this model?
Arnold Roa - 답글
well, at part 20, you have wrong angle at your SSD, it should be....
I've owned stores in florida and ohio. I'm old. I must say though, throughout the years mac and microsoft have earned the epithet of being nothing more than profiteering low-down capitalists that we ought to put down permanently (for a myriad of reasons). Linux is the closest thing to an answer I've yet to find out there (ironically barely a hint of being an option in this "free-trade" system of plutocracy which has us all scrambling between rocks and hard places).
As for mac, they earn a higher level of distrust. Why would the enterprising entity want to use unorthodox screw heads if not for manipulation for higher proceeds? We all know the answer but dare not break free from the mold to point our customers in a better direction. Why would an entity want to keep its own customers from accessing (changing/replacing) their own battery or upgrading their own ram or replacing their own drive?). Racketeering with a stolen op sys; Imagine buying a house only to be locked out later. Thanks ifixit
Why for there are 9 indentical DDR3L SDRAM chips if there are only 8 and 16 GB RAM models? if each chip is 512MB so it results in 8.5 GB RAM instead of 8. Is this a rescue one like the spare wheel on a car?
Do you carry the replacement display for this model, i can’t seem to find it on your site
Hi Omar, here is the product page. They’re currently out of stock, but you can be added to the notify list.
I am not going to lie, but the whole time I was reading this teardown process I was laughing out loud the whole time. The Harry Potter references were just spot on! Thank for fantastic teardown.