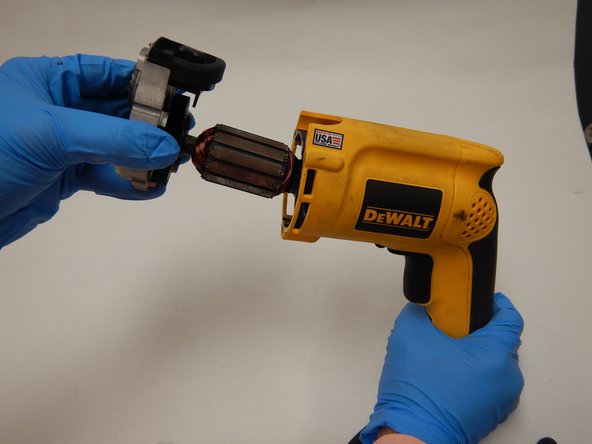
주요 콘텐츠로 건너뛰기

Dewalt DW511 Hammer Drill Gearcase Replacement

필요한 것

  1. Dewalt DW511 Hammer Drill Gearcase Replacement, Back Cover: 1 단계, 이미지 1/3 Dewalt DW511 Hammer Drill Gearcase Replacement, Back Cover: 1 단계, 이미지 2/3 Dewalt DW511 Hammer Drill Gearcase Replacement, Back Cover: 1 단계, 이미지 3/3
    • Remove three 19 mm T20 Torx screws from the back of the drill.

  2. Dewalt DW511 Hammer Drill Gearcase Replacement: 2 단계, 이미지 1/3 Dewalt DW511 Hammer Drill Gearcase Replacement: 2 단계, 이미지 2/3 Dewalt DW511 Hammer Drill Gearcase Replacement: 2 단계, 이미지 3/3
    • Place an opening tool in the groove line of the handle and pop the back loose.

    • Grab the drill with two hands and pull the cover off.

  3. Dewalt DW511 Hammer Drill Gearcase Replacement, Power Cord: 3 단계, 이미지 1/2 Dewalt DW511 Hammer Drill Gearcase Replacement, Power Cord: 3 단계, 이미지 2/2
    • Firmly grab the body of the trigger.

    • Slowly pull the trigger until the entire body is out and only attached by wires.

  4. Dewalt DW511 Hammer Drill Gearcase Replacement: 4 단계, 이미지 1/3 Dewalt DW511 Hammer Drill Gearcase Replacement: 4 단계, 이미지 2/3 Dewalt DW511 Hammer Drill Gearcase Replacement: 4 단계, 이미지 3/3
    이 단계에 사용된 도구:
    Tweezers
    $4.99
    구매
    • With sharp point tweezers, push the little metal flap up in the hole holding the wire.

    • Clamp the wire with blunt tweezers, and slowly pull the wire out.

  5. Dewalt DW511 Hammer Drill Gearcase Replacement: 5 단계, 이미지 1/3 Dewalt DW511 Hammer Drill Gearcase Replacement: 5 단계, 이미지 2/3 Dewalt DW511 Hammer Drill Gearcase Replacement: 5 단계, 이미지 3/3
    • With a pair of blunt nose tweezers, grab the white wire.

    • Carefully wiggle the wire loose.

    • Pull the wire slowly until it comes out.

  6. Dewalt DW511 Hammer Drill Gearcase Replacement: 6 단계, 이미지 1/1
    • With both wires free, the power cord is free from the trigger body.

  7. Dewalt DW511 Hammer Drill Gearcase Replacement, Brushes: 7 단계, 이미지 1/3 Dewalt DW511 Hammer Drill Gearcase Replacement, Brushes: 7 단계, 이미지 2/3 Dewalt DW511 Hammer Drill Gearcase Replacement, Brushes: 7 단계, 이미지 3/3
    • Use an opening tool to lift up the spring holding down the brush.

    • Remove the brush from its holding.

  8. Dewalt DW511 Hammer Drill Gearcase Replacement: 8 단계, 이미지 1/2 Dewalt DW511 Hammer Drill Gearcase Replacement: 8 단계, 이미지 2/2
    이 단계에 사용된 도구:
    Tweezers
    $4.99
    구매
    • With a pair of blunt nose tweezers, grab the red wire.

    • Carefully wiggle the wire loose.

    • Pull the wire slowly until it comes out.

  9. Dewalt DW511 Hammer Drill Gearcase Replacement, Lever Assembly: 9 단계, 이미지 1/3 Dewalt DW511 Hammer Drill Gearcase Replacement, Lever Assembly: 9 단계, 이미지 2/3 Dewalt DW511 Hammer Drill Gearcase Replacement, Lever Assembly: 9 단계, 이미지 3/3
    • Remove two 45 mm T20 Torx screws.

    • Remove one 30 mm T20 Torx screw.

  10. Dewalt DW511 Hammer Drill Gearcase Replacement: 10 단계, 이미지 1/1
    • Pull off the top case and set it aside.

  11. Dewalt DW511 Hammer Drill Gearcase Replacement: 11 단계, 이미지 1/3 Dewalt DW511 Hammer Drill Gearcase Replacement: 11 단계, 이미지 2/3 Dewalt DW511 Hammer Drill Gearcase Replacement: 11 단계, 이미지 3/3
    • Grab the gear case cover and gently pull it out just enough to where it exposes the lever assembly.

    • It is important that the brushes are removed before you do this step or you may damage your brushes.

    • The lever assembly can now be lifted out.

  12. Dewalt DW511 Hammer Drill Gearcase Replacement: 12 단계, 이미지 1/1
    • With the old lever assembly removed you can now replace it with a new one.

  13. Dewalt DW511 Hammer Drill Gearcase Replacement, Gearcase: 13 단계, 이미지 1/3 Dewalt DW511 Hammer Drill Gearcase Replacement, Gearcase: 13 단계, 이미지 2/3 Dewalt DW511 Hammer Drill Gearcase Replacement, Gearcase: 13 단계, 이미지 3/3
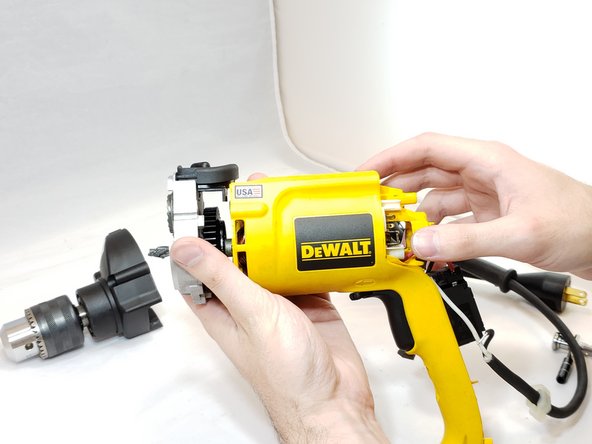
    • Hold the hammer drill tool firmly by the handle.

    • Gently separate the gear case unit from the hammer drill body.

  14. Dewalt DW511 Hammer Drill Gearcase Replacement: 14 단계, 이미지 1/3 Dewalt DW511 Hammer Drill Gearcase Replacement: 14 단계, 이미지 2/3 Dewalt DW511 Hammer Drill Gearcase Replacement: 14 단계, 이미지 3/3
    • The metallic alloy gear case is attached to the armature and removes as a unit. Separation of the gear case from the armature requires specialized hand tools.

    • The third photo shows a gear behind the chuck that interlocks to the gear case.

    • The plastic housing is prone to damage if excessive force is applied during the removal of the gear.

결론

To reassemble your device, follow these instructions in reverse order.

Andrew Grayson Crawford

회원 가입일: 10/01/20

241 평판

안내서 3개 작성하였습니다

댓글 0개

댓글 쓰기

조회 통계:

24 시간 전: 0

7일 전: 2

30일 전: 11

전체 시간: 383