주요 콘텐츠로 건너뛰기

Dexcom G6 Receiver Motherboard Replacement

필요한 것

  1. Dexcom G6 Receiver Motherboard Replacement, Display and Front Bezel: 1 단계, 이미지 1개 중 1개
    • Unscrew the 6 Torx T5 screws from the back of the device

  2. Dexcom G6 Receiver Motherboard Replacement: 2 단계, 이미지 2개 중 1개 Dexcom G6 Receiver Motherboard Replacement: 2 단계, 이미지 2개 중 2개
    • Use a spudger to lift up the screen assembly ribbon cable flap, then remove the ribbon cable.

    • Screen Information: Model AM0310R-04 Lot # NHT18080052

  3. Dexcom G6 Receiver Motherboard Replacement, Charging Port: 3 단계, 이미지 1개 중 1개
    • Using a spudger, unplug the Charging Port connector from the motherboard.

  4. Dexcom G6 Receiver Motherboard Replacement: 4 단계, 이미지 1개 중 1개
    • Remove the 2 silver Torx T5 screws holding the charging port down.

  5. Dexcom G6 Receiver Motherboard Replacement: 5 단계, 이미지 1개 중 1개
    • Remove the Charging Port Assembly from the motherboard.

  6. Dexcom G6 Receiver Motherboard Replacement, Motherboard: 6 단계, 이미지 1개 중 1개
    • Remove the silver Torx T5 screw holding the motherboard down.

  7. Dexcom G6 Receiver Motherboard Replacement: 7 단계, 이미지 2개 중 1개 Dexcom G6 Receiver Motherboard Replacement: 7 단계, 이미지 2개 중 2개
    • Using a spudger, carefully remove the battery connector on the left side of the motherboard.

  8. Dexcom G6 Receiver Motherboard Replacement: 8 단계, 이미지 1개 중 1개
    • Using a spudger, carefully pry up the motherboard to remove it.

결론

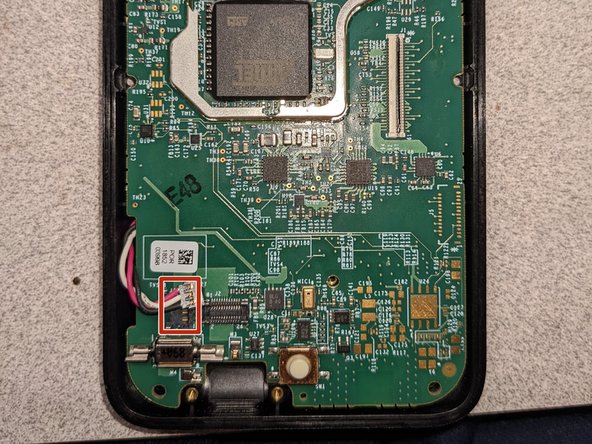
To reassemble your device, follow these instructions in reverse order.

작성자

1다른 기여자 명과 함께

Andrew S

회원 가입일: 07/30/21

15,453 평판

안내서 8개를 작성함

2가이드 댓글

do you know of anyone that can fix these items

Rick MacDonald - 답글

anyone out there fix these items

Rick MacDonald - 답글

댓글 쓰기

조회 통계:

지난 24시간: 0

지난 7일: 11

지난 30일: 25

전체 시간: 1,105