주요 콘텐츠로 건너뛰기

Direct-Pull Cantilever Brake ("V-Brake") Maintenance

필요한 것

  1. Direct-Pull Cantilever Brake ("V-Brake") Maintenance, Direct-Pull Cantilever Brake ("V-Brake") Maintenance: 1 단계, 이미지 1/3 Direct-Pull Cantilever Brake ("V-Brake") Maintenance, Direct-Pull Cantilever Brake ("V-Brake") Maintenance: 1 단계, 이미지 2/3 Direct-Pull Cantilever Brake ("V-Brake") Maintenance, Direct-Pull Cantilever Brake ("V-Brake") Maintenance: 1 단계, 이미지 3/3
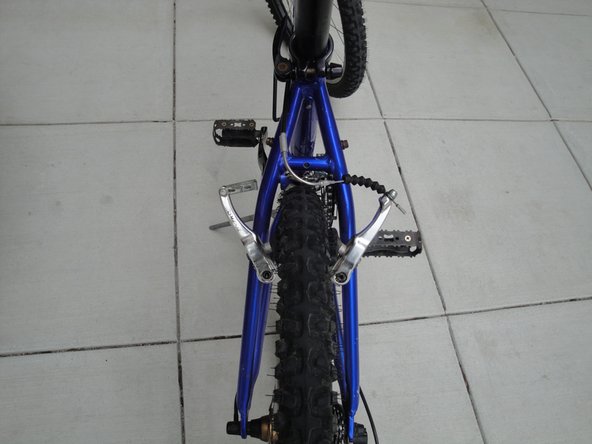
    • Squeeze the calipers together, and remove the brake cable.

  2. Direct-Pull Cantilever Brake ("V-Brake") Maintenance: 2 단계, 이미지 1/3 Direct-Pull Cantilever Brake ("V-Brake") Maintenance: 2 단계, 이미지 2/3 Direct-Pull Cantilever Brake ("V-Brake") Maintenance: 2 단계, 이미지 3/3
    • Loosen the break caliper bolt, and remove the brake caliper.

  3. Direct-Pull Cantilever Brake ("V-Brake") Maintenance: 3 단계, 이미지 1/2 Direct-Pull Cantilever Brake ("V-Brake") Maintenance: 3 단계, 이미지 2/2
    • Inspect the brake pad. If the pad has worn down past the “wear line”, then it needs to be replaced.

  4. Direct-Pull Cantilever Brake ("V-Brake") Maintenance: 4 단계, 이미지 1/3 Direct-Pull Cantilever Brake ("V-Brake") Maintenance: 4 단계, 이미지 2/3 Direct-Pull Cantilever Brake ("V-Brake") Maintenance: 4 단계, 이미지 3/3
    • Clean and lubricate the parts as necessary before reattaching the caliper arms.

    • Bolt the caliper arms back on while making sure the the pin on the back side of the caliper arm lines back up with the one of the holes in the frame. Each side should be in the same hole.

  5. Direct-Pull Cantilever Brake ("V-Brake") Maintenance: 5 단계, 이미지 1/2 Direct-Pull Cantilever Brake ("V-Brake") Maintenance: 5 단계, 이미지 2/2
    • Reattach the brake cable to the calipers

  6. Direct-Pull Cantilever Brake ("V-Brake") Maintenance: 6 단계, 이미지 1/2 Direct-Pull Cantilever Brake ("V-Brake") Maintenance: 6 단계, 이미지 2/2
    • Loosen the brake pad bolt.

  7. Direct-Pull Cantilever Brake ("V-Brake") Maintenance: 7 단계, 이미지 1/2 Direct-Pull Cantilever Brake ("V-Brake") Maintenance: 7 단계, 이미지 2/2
    • Get an ordinary piece of paper, and fold it twice over.

    • Place the sheet of paper between the brake pad and the rim in the position shown.

  8. Direct-Pull Cantilever Brake ("V-Brake") Maintenance: 8 단계, 이미지 1/3 Direct-Pull Cantilever Brake ("V-Brake") Maintenance: 8 단계, 이미지 2/3 Direct-Pull Cantilever Brake ("V-Brake") Maintenance: 8 단계, 이미지 3/3
    • Align the brake pad so that it is flush with the rim, with no part touching the rubber of the tire.

    • Have somebody clamp down very tightly on the brakes.

    • Tighten the brake pad bolt in place.

  9. Direct-Pull Cantilever Brake ("V-Brake") Maintenance: 9 단계, 이미지 1/3 Direct-Pull Cantilever Brake ("V-Brake") Maintenance: 9 단계, 이미지 2/3 Direct-Pull Cantilever Brake ("V-Brake") Maintenance: 9 단계, 이미지 3/3
    • Tighten/loosen the tension adjustment screws on each the caliper arm to adjust the resting distance of each brake pad, so that each pad is equally distant from the rim. Tightening the screw will shift the caliper outward from the bike, loosening it will shift it inward.

    • Tighten/loosen the brake adjuster on the handle bars such that when you clamp down on the brakes, the brake lever stops before hitting the handle bar. This will set the distance between the brake pads and the rim.

    • Tighten the lock nut on the brake adjuster to permanently set its position.

결론

To reassemble your device, follow these instructions in reverse order.

다른 한 분이 해당 안내서를 완성하였습니다.

Brett Hartt

회원 가입일: 04/12/10

127,876 평판

안내서 143개 작성하였습니다

iFixit iFixit 회원

Staff

135 회원들

안내서 16,732개 작성하였습니다

댓글 0개

댓글 쓰기

조회 통계:

24 시간 전: 0

7일 전: 2

30일 전: 6

전체 시간: 6,010