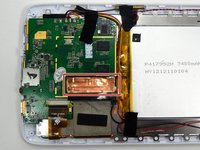
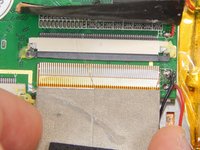
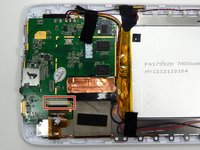
주요 콘텐츠로 건너뛰기

Disassembling Arnova 7K G3 Logic Board Ribbon Connectors

필요한 것

  1. Disassembling Arnova 7K G3 Logic Board Ribbon Connectors, Rear Cover: 1 단계, 이미지 3개 중 1개 Disassembling Arnova 7K G3 Logic Board Ribbon Connectors, Rear Cover: 1 단계, 이미지 3개 중 2개 Disassembling Arnova 7K G3 Logic Board Ribbon Connectors, Rear Cover: 1 단계, 이미지 3개 중 3개
    • Remove four 5 mm Phillips #00 screws from each corner of the tablet.

  2. Disassembling Arnova 7K G3 Logic Board Ribbon Connectors: 2 단계, 이미지 2개 중 1개 Disassembling Arnova 7K G3 Logic Board Ribbon Connectors: 2 단계, 이미지 2개 중 2개
    • Place the iFixit opening tool in the notches between the cases and pull the covers apart.

  3. Disassembling Arnova 7K G3 Logic Board Ribbon Connectors: 3 단계, 이미지 1개 중 1개
    • Repeat step two until 3/4 of the rear cover is unlatched.

    • Proceed to remove the rear cover by gently pulling it apart by hand.

  4. Disassembling Arnova 7K G3 Logic Board Ribbon Connectors, Disassembling Arnova 7K G3 Logic Board Ribbon Connectors: 4 단계, 이미지 2개 중 1개 Disassembling Arnova 7K G3 Logic Board Ribbon Connectors, Disassembling Arnova 7K G3 Logic Board Ribbon Connectors: 4 단계, 이미지 2개 중 2개
    이 단계에 사용된 도구:
    Tweezers
    $4.99
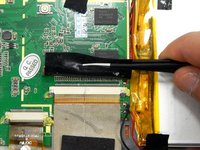
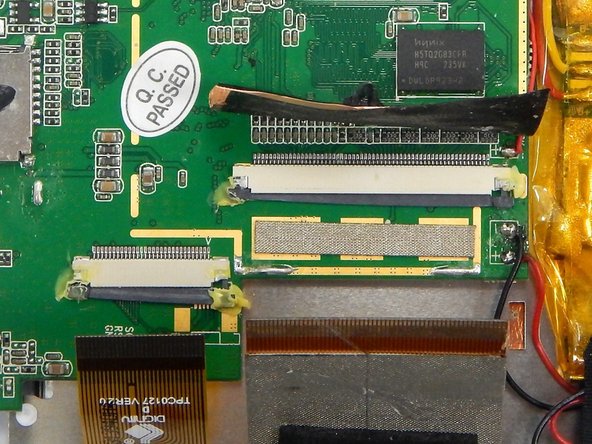
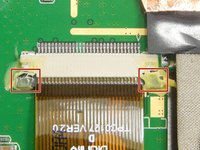
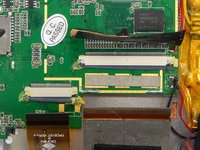
    • Peel the copper tape covering the ribbon connector with a set of tweezers.

  5. Disassembling Arnova 7K G3 Logic Board Ribbon Connectors: 5 단계, 이미지 3개 중 1개 Disassembling Arnova 7K G3 Logic Board Ribbon Connectors: 5 단계, 이미지 3개 중 2개 Disassembling Arnova 7K G3 Logic Board Ribbon Connectors: 5 단계, 이미지 3개 중 3개
    • Locate the two gray pins on the ribbon connector.

    • Grab the first pin with tweezers and gently pull it towards the ribbon. Repeat the step.

    • Gently pull the ribbon cable out of the connection port.

  6. Disassembling Arnova 7K G3 Logic Board Ribbon Connectors: 6 단계, 이미지 3개 중 1개 Disassembling Arnova 7K G3 Logic Board Ribbon Connectors: 6 단계, 이미지 3개 중 2개 Disassembling Arnova 7K G3 Logic Board Ribbon Connectors: 6 단계, 이미지 3개 중 3개
    • Locate the ribbon connector two.

    • Locate the pins of ribbon connector two. Repeat step two for unlocking the pins.

    • Gently pull the ribbon out of the connection port.

결론

To reassemble your device, follow these instructions in reverse order.

작성자

5다른 기여자 명과 함께

Kue

회원 가입일: 03/18/15

301 평판

안내서 3개를 작성함

Michigan Tech, Team 1-2, Lauer Spring 2015 Michigan Tech, Team 1-2, Lauer Spring 2015 회원

MTU-LAUER-S15S1G2

2 회원들

안내서 10개를 작성함

0가이드 댓글

댓글 쓰기

조회 통계:

지난 24시간: 0

지난 7일: 3

지난 30일: 11

전체 시간: 436