주요 콘텐츠로 건너뛰기

이 안내서에는 최근 변경 사항이 더 있습니다. 최신 비검증 버전으로 전환하십시오.

Disassembling Dell Vostro V13

필요한 것

  1. Disassembling Dell Vostro V13, Disassembling any part from hard drive to motherboard: 1 단계, 이미지 1/3 Disassembling Dell Vostro V13, Disassembling any part from hard drive to motherboard: 1 단계, 이미지 2/3 Disassembling Dell Vostro V13, Disassembling any part from hard drive to motherboard: 1 단계, 이미지 3/3
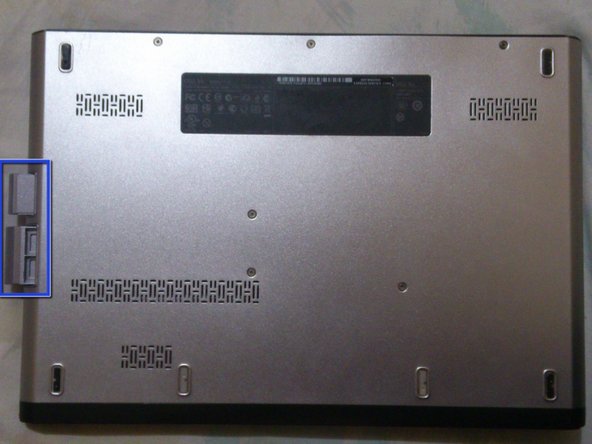
    • Remove the two (2) dummy cards from the laptop.

    • Using a Phillips head screwdriver, unscrew the six (6) screws from the bottom of the laptop.

    • Unscrew the two (2) screws from the back of the laptop, located at the extreme left and right of the back panel.

    • Slide bottom cover forward and lift upwards to remove. You may need to use a strong spudger to force a gap along the base edge from the ethernet port on the right, to the kensington port on the left.

  2. Disassembling Dell Vostro V13: 2 단계, 이미지 1/1
    • Unscrew the four (4) screws from the battery.

    • Carefully remove the battery connector. It is a ribbon cable that is clamped down. Flick the black clamp up using the edge nearest the battery. The ribbon cable is now free to move for the next step.

    • Lift the battery upwards, to remove.

  3. Disassembling Dell Vostro V13: 3 단계, 이미지 1/2 Disassembling Dell Vostro V13: 3 단계, 이미지 2/2
    • Unscrew the four (4) screws from the hard drive enclosure.

    • Gently lift the hard drive at a small angle upwards and slide backwards to remove.

    • To avoid damaging the port, GENTLY lift the hard drive at a SMALL angle upward, when removing it!

  4. Disassembling Dell Vostro V13: 4 단계, 이미지 1/2 Disassembling Dell Vostro V13: 4 단계, 이미지 2/2
    • Using a plastic opening tool, pry open the top panel, with the power switch, starting with the right bottom edge closer to the keyboard.

    • Unclip and remove the ribbon from the panel.

    • Always be careful when removing ribbons! Try not to unnecessarily bend them and pull them with excess force!

  5. Disassembling Dell Vostro V13: 5 단계, 이미지 1/2 Disassembling Dell Vostro V13: 5 단계, 이미지 2/2
    • Unscrew the two (2) screws from the keyboard.

    • Gently lift the keyboard upwards and push towards the screen to remove.

    • Remove the ribbon from the board.

  6. Disassembling Dell Vostro V13: 6 단계, 이미지 1/2 Disassembling Dell Vostro V13: 6 단계, 이미지 2/2
    • Remove all the ribbons from the board.

    • Always be careful when removing ribbons! Try not to unnecessarily bend them and pull them with excess force!

    • Unscrew the one (1) screw from the audio card and lift upward to remove.

  7. Disassembling Dell Vostro V13: 7 단계, 이미지 1/2 Disassembling Dell Vostro V13: 7 단계, 이미지 2/2
    • Unscrew the six (6) screws from the memory card reader.

    • Make sure that a hand is placed underneath to hold the memory hand reader while unscrewing, so it would not fall.

    • Remove the cable from the CMOS battery.

  8. Disassembling Dell Vostro V13: 8 단계, 이미지 1/1
    • Using a small plastic opening tool, gently lift and remove the two (2) antenna cables from the wireless card.

    • Unscrew the one (1) screw.

    • The wireless card should pop up.

    • Gently slide the card forward to remove.

  9. Disassembling Dell Vostro V13: 9 단계, 이미지 1/2 Disassembling Dell Vostro V13: 9 단계, 이미지 2/2
    • Unscrew the six (6) screws from the motherboard.

    • Unscrew the two (2) screws from the fan.

    • Gently lift the motherboard upward and then slide forward to remove.

    • Be extremely careful with the motherboard! Damage to any of the components on it would cause the laptop to malfunction!

  10. Disassembling Dell Vostro V13: 10 단계, 이미지 1/1
    • Press the two (2) metal clips on the side.

    • The RAM will pop up.

    • Pull forward to remove.

  11. Disassembling Dell Vostro V13: 11 단계, 이미지 1/1
    • Unscrew the four (4) screws from the heat sink.

    • Unscrew the one (1) screw from the fan.

    • Pull the heat sink with the fan upward to remove.

결론

To reassemble your device, follow these instructions in reverse order.

다른 11명이 해당 안내서를 완성하였습니다.

Kevin Dookharan

회원 가입일: 08/23/12

383 평판

안내서 1개 작성함

댓글 2개

is the CPU removable?

Trevor Vuong - 답글

No, it's not. All laptops have soldered ballpoint CPUs and GPUs.

Chris Yang - 답글

댓글 쓰기

조회 통계:

24 시간 전: 1

7일 전: 18

30일 전: 55

전체 시간: 37,867