주요 콘텐츠로 건너뛰기

Disassembling KDDI Kyocera A5521K Keyboard

필요한 것

  1. Disassembling KDDI Kyocera A5521K Keyboard, Disassembling KDDI Kyocera A5521K Battery: 1 단계, 이미지 1/3 Disassembling KDDI Kyocera A5521K Keyboard, Disassembling KDDI Kyocera A5521K Battery: 1 단계, 이미지 2/3 Disassembling KDDI Kyocera A5521K Keyboard, Disassembling KDDI Kyocera A5521K Battery: 1 단계, 이미지 3/3
    • Turn the phone over to expose the battery cover.

    • Apply pressure to the back of the battery cover to slide it down.

    • The battery cover is now separate from the phone.

  2. Disassembling KDDI Kyocera A5521K Keyboard: 2 단계, 이미지 1/3 Disassembling KDDI Kyocera A5521K Keyboard: 2 단계, 이미지 2/3 Disassembling KDDI Kyocera A5521K Keyboard: 2 단계, 이미지 3/3
    • Remove the battery by pushing it up and out from the bottom.

    • The battery, cover, and phone should now be separated.

  3. Disassembling KDDI Kyocera A5521K Keyboard, Back Plate: 3 단계, 이미지 1/2 Disassembling KDDI Kyocera A5521K Keyboard, Back Plate: 3 단계, 이미지 2/2
    • Remove the four screws with the Y0 screwdriver.

  4. Disassembling KDDI Kyocera A5521K Keyboard: 4 단계, 이미지 1/2 Disassembling KDDI Kyocera A5521K Keyboard: 4 단계, 이미지 2/2
    • Remove the black, rubber screw caps towards the top of the back of the phone to reveal two additional screws.

    • Remove the two screws with a Y0 screwdriver.

  5. Disassembling KDDI Kyocera A5521K Keyboard: 5 단계, 이미지 1/3 Disassembling KDDI Kyocera A5521K Keyboard: 5 단계, 이미지 2/3 Disassembling KDDI Kyocera A5521K Keyboard: 5 단계, 이미지 3/3
    • Rotate the phone 180 degrees.

    • Carefully separate the back plate from the remainder of the phone.

    • The back plate should now be detached from the rest of the phone.

  6. Disassembling KDDI Kyocera A5521K Keyboard, Keyboard: 6 단계, 이미지 1/3 Disassembling KDDI Kyocera A5521K Keyboard, Keyboard: 6 단계, 이미지 2/3 Disassembling KDDI Kyocera A5521K Keyboard, Keyboard: 6 단계, 이미지 3/3
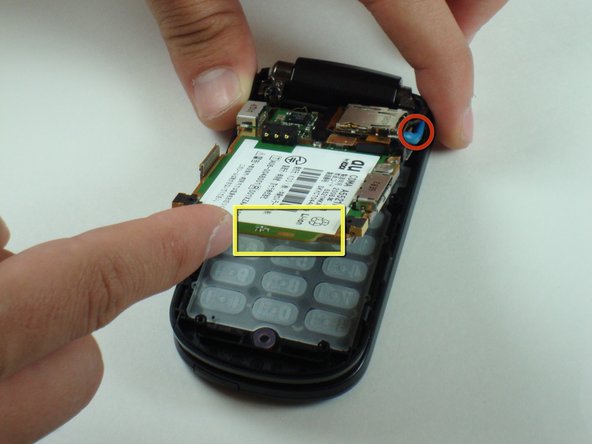
    • Lift up the bottom of the logic board.

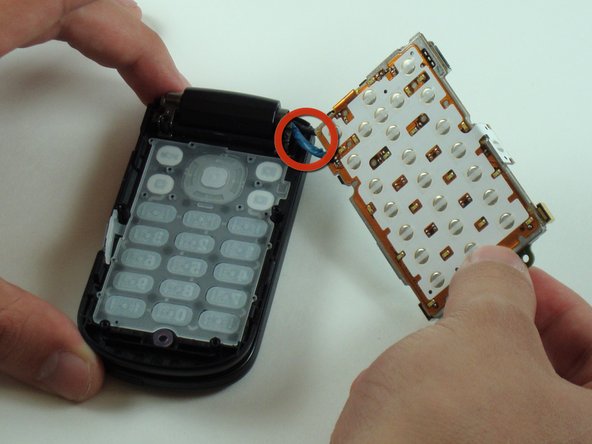
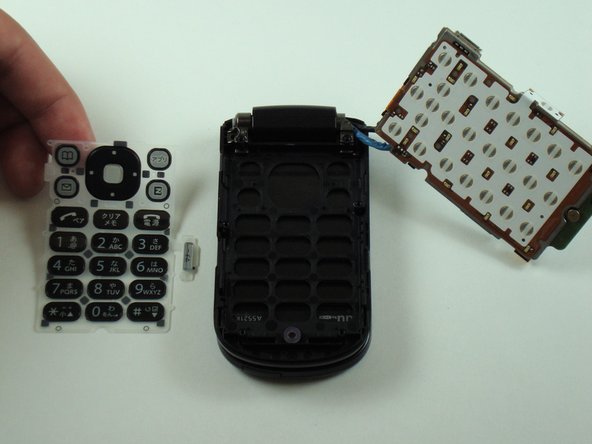
    • Carefully remove the logic board from the lower half of the phone.

    • The logic board is connected to the remainder of the phone by two cables at the upper right corner indicated by the red circle. Do not damage the cables.

  7. Disassembling KDDI Kyocera A5521K Keyboard: 7 단계, 이미지 1/2 Disassembling KDDI Kyocera A5521K Keyboard: 7 단계, 이미지 2/2
    • Gently lift the keyboard up with a spudger.

    • The keyboard is now separate from the remainder of the phone and can be easily removed.

결론

To reassemble your device, follow these instructions in reverse order.

Dominic Grisafe

회원 가입일: 04/15/10

157 평판

안내서 10개 작성하였습니다

Cal Poly, Team 28-25, Regan Spring 2010 Cal Poly, Team 28-25, Regan Spring 2010 회원

CPSU-REGAN-S10S28G25

4 회원들

안내서 20개 작성하였습니다

댓글 0개

댓글 쓰기

조회 통계:

24 시간 전: 1

7일 전: 2

30일 전: 4

전체 시간: 1,322