주요 콘텐츠로 건너뛰기

이 안내서에는 최근 변경 사항이 더 있습니다. 최신 비검증 버전으로 전환하십시오.

Disassembling Macintosh IIsi Power Supply

필요한 것

  1. Disassembling Macintosh IIsi Power Supply, Top Case: 1 단계, 이미지 1/2 Disassembling Macintosh IIsi Power Supply, Top Case: 1 단계, 이미지 2/2
    • Start by turning the computer around, and remove this #0 Phillips Screw.

    • There may or may not be a Phillips #0 screw here, depending on whether or not the computer has ever been serviced.

  2. Disassembling Macintosh IIsi Power Supply: 2 단계, 이미지 1/3 Disassembling Macintosh IIsi Power Supply: 2 단계, 이미지 2/3 Disassembling Macintosh IIsi Power Supply: 2 단계, 이미지 3/3
    • Now lift these two clips, and slowly pivot the case up.

    • You can now seperate the top of the computer from the rest of the machine.

  3. Disassembling Macintosh IIsi Power Supply, Floppy Drive: 3 단계, 이미지 1/3 Disassembling Macintosh IIsi Power Supply, Floppy Drive: 3 단계, 이미지 2/3 Disassembling Macintosh IIsi Power Supply, Floppy Drive: 3 단계, 이미지 3/3
    • The "SuperDrive" is mounted similarly to the hard drive, and positioned right next to it.

    • Push these two tabs out, and lift the drive up.

  4. Disassembling Macintosh IIsi Power Supply: 4 단계, 이미지 1/3 Disassembling Macintosh IIsi Power Supply: 4 단계, 이미지 2/3 Disassembling Macintosh IIsi Power Supply: 4 단계, 이미지 3/3
    • Flip the drive so it is on top of the power supply, and remove the "Red-Ribbon" cable.

    • 1.44MB floppy drives need a ribbon cable with a red stripe on one side. 400KB floppy drives use a ribbon cable with a yellow stripe on one side. 800KB floppy drives can use a red, or yellow striped cable.

    • This drive was manufactured by Sony in 1990.

  5. Disassembling Macintosh IIsi Power Supply, System Fan: 5 단계, 이미지 1/1
    • The fan recieves power from two contacts on the logic board and has no connector.

  6. Disassembling Macintosh IIsi Power Supply: 6 단계, 이미지 1/3 Disassembling Macintosh IIsi Power Supply: 6 단계, 이미지 2/3 Disassembling Macintosh IIsi Power Supply: 6 단계, 이미지 3/3
    • In all of the years that I have worked on this machine, I have found no good way to remove the fan.

    • The best way to start, is to push in here on the side of the fan.

    • Being careful not to exert too much force, try to push in, and wiggle the fan outward as such. (2nd Photo)

    • You can now lift the fan all the way out, and remove it.

    • The Fan Power Contacts on the Logic Board:

  7. Disassembling Macintosh IIsi Power Supply, Power Supply: 7 단계, 이미지 1/2 Disassembling Macintosh IIsi Power Supply, Power Supply: 7 단계, 이미지 2/2
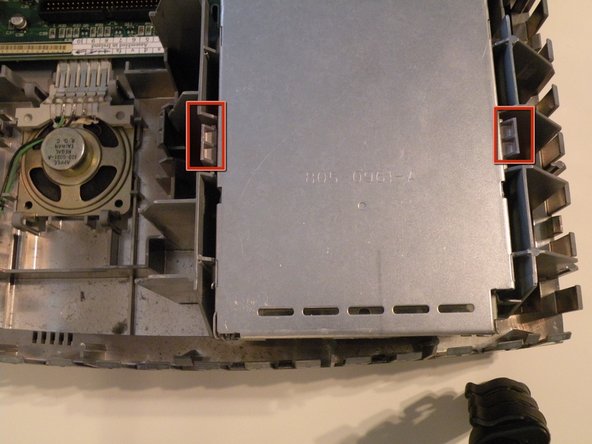
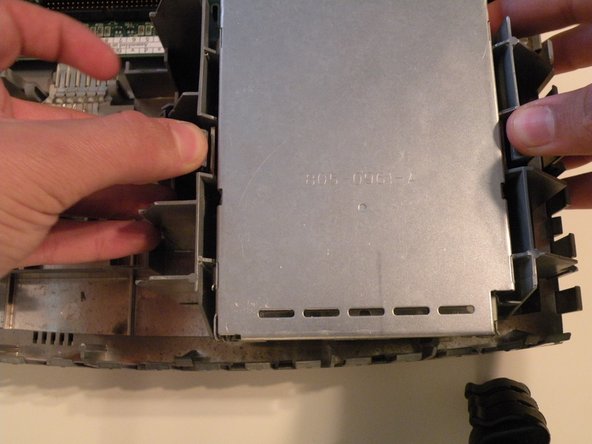
    • To remove the power supply, squeeze these two tabs and lift the front up.

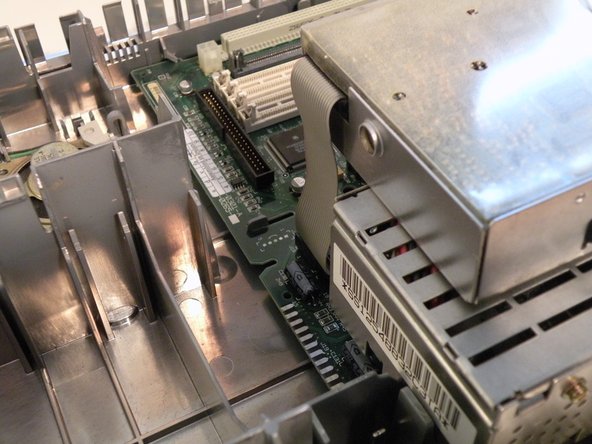
    • On the back of the power supply, there is a tab that also must be pressed to remove the power supply fully. You can then lift it out all the way. A firm tug may be necessary to seperate the power connector.

  8. Disassembling Macintosh IIsi Power Supply: 8 단계, 이미지 1/2 Disassembling Macintosh IIsi Power Supply: 8 단계, 이미지 2/2
    • Information on the power supply:

    • It was made by Sony in 1990, and uses a 10-Pin power connector.

결론

To reassemble your device, follow these instructions in reverse order.

다른 2명이 해당 안내서를 완성하였습니다.

Chris Green

회원 가입일: 10/11/09

36,978 평판

안내서 49개 작성하였습니다

Master Techs Master Techs 회원

Community

322 회원들

안내서 2,528개 작성하였습니다

댓글 한 개

I was looking for the schematic for the power supply APS-06 pictured here. The information above would be a little helpful if one was really unaware of anything electromechanical,… otherwise, it’s all pretty obvious I think.

nikitesla - 답글

댓글 쓰기

조회 통계:

24 시간 전: 0

7일 전: 2

30일 전: 10

전체 시간: 3,538