주요 콘텐츠로 건너뛰기

Disassembling Nokia 1110i (RH-93) made in Hongrie

필요한 것

  1. Disassembling Nokia 1110i (RH-93) made in Hongrie, Phone: 1 단계, 이미지 3개 중 1개 Disassembling Nokia 1110i (RH-93) made in Hongrie, Phone: 1 단계, 이미지 3개 중 2개 Disassembling Nokia 1110i (RH-93) made in Hongrie, Phone: 1 단계, 이미지 3개 중 3개
    • Switch off the device to avoid shocks while disassembling.

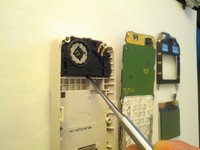
    • Turn the device face down and press on the small button at the bottom . Slide the back case down.

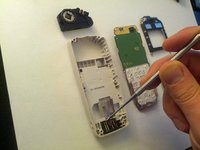
    • To remove the battery, use your finger to insert it in the groove and pull the battery out.

  2. Disassembling Nokia 1110i (RH-93) made in Hongrie: 2 단계, 이미지 3개 중 1개 Disassembling Nokia 1110i (RH-93) made in Hongrie: 2 단계, 이미지 3개 중 2개 Disassembling Nokia 1110i (RH-93) made in Hongrie: 2 단계, 이미지 3개 중 3개
    • To remove the protective cover, use the tool shown and press the grey button at the left bottom.

    • The front cover ejects as shown. Remove it carefully to avoid damage.

    • The keypad case can be removed easily. Pull it up off the device.

    • Use a T6 Torx screwdriver to remove the screws.

  3. Disassembling Nokia 1110i (RH-93) made in Hongrie: 3 단계, 이미지 3개 중 1개 Disassembling Nokia 1110i (RH-93) made in Hongrie: 3 단계, 이미지 3개 중 2개 Disassembling Nokia 1110i (RH-93) made in Hongrie: 3 단계, 이미지 3개 중 3개
    이 단계에 사용된 도구:
    Tweezers
    $4.99
    • Find this channel at the top of your device.

    • Use a pair of tweezers to remove it carefully without harming the surroundings.

    • Insert the spudger into the section to remove the module.

  4. Disassembling Nokia 1110i (RH-93) made in Hongrie: 4 단계, 이미지 2개 중 1개 Disassembling Nokia 1110i (RH-93) made in Hongrie: 4 단계, 이미지 2개 중 2개
    • Use the spudger to remove the module casing safely.

    • Your device is successfully disassembled.

결론

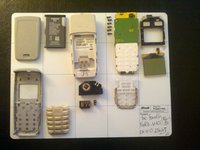
To reassemble your device, follow these instructions in reverse order.

다른 14명이 해당 안내서를 완성하였습니다.

작성자

7다른 기여자 명과 함께

JDU TV

회원 가입일: 09/15/13

3,273 평판

안내서 5개를 작성함

댓글 0개

댓글 쓰기

조회 통계:

지난 24시간: 0

지난 7일: 6

지난 30일: 19

전체 시간: 3,872