주요 콘텐츠로 건너뛰기
수리 커뮤니티 가입 - 계정 만들기

Disassembling Samsung Galaxy Ace Logic Board

필요한 것

  1. Disassembling Samsung Galaxy Ace Logic Board, Logic Board: 1 단계, 이미지 2개 중 1개 Disassembling Samsung Galaxy Ace Logic Board, Logic Board: 1 단계, 이미지 2개 중 2개
    • Remove the battery cover and the battery

  2. Disassembling Samsung Galaxy Ace Logic Board: 2 단계, 이미지 2개 중 1개 Disassembling Samsung Galaxy Ace Logic Board: 2 단계, 이미지 2개 중 2개
    • Remove the 7 silver screws with a Phillips #000 screw driver.

    • Sometimes the green one could be a little difficult. Use a tweezer for get it out.

  3. Disassembling Samsung Galaxy Ace Logic Board: 3 단계, 이미지 3개 중 1개 Disassembling Samsung Galaxy Ace Logic Board: 3 단계, 이미지 3개 중 2개 Disassembling Samsung Galaxy Ace Logic Board: 3 단계, 이미지 3개 중 3개
    • Lift gently the back cover from the screen assembly from the bottom.

  4. Disassembling Samsung Galaxy Ace Logic Board: 4 단계, 이미지 2개 중 1개 Disassembling Samsung Galaxy Ace Logic Board: 4 단계, 이미지 2개 중 2개
    • Use a flat tweezer for take off the flexible on/off button from the frame.

    • Be careful, the flexible is very delicate; it could be cut if you go too fast.

  5. Disassembling Samsung Galaxy Ace Logic Board: 5 단계, 이미지 3개 중 1개 Disassembling Samsung Galaxy Ace Logic Board: 5 단계, 이미지 3개 중 2개 Disassembling Samsung Galaxy Ace Logic Board: 5 단계, 이미지 3개 중 3개
    • Use a flat tweezer and take off gently Flexible volume button from the left side.

    • Do the same for the right side.

    • Then lift the flex slowly, if you go fast you may cut the cable.

  6. Disassembling Samsung Galaxy Ace Logic Board: 6 단계, 이미지 1개 중 1개
    • Lift the microphone from the logic board.

  7. Disassembling Samsung Galaxy Ace Logic Board: 7 단계, 이미지 3개 중 1개 Disassembling Samsung Galaxy Ace Logic Board: 7 단계, 이미지 3개 중 2개 Disassembling Samsung Galaxy Ace Logic Board: 7 단계, 이미지 3개 중 3개
    • Lift the sensor/earpiece cable with the opening tool.

    • Don't force, you may damage the soldering.

  8. Disassembling Samsung Galaxy Ace Logic Board: 8 단계, 이미지 3개 중 1개 Disassembling Samsung Galaxy Ace Logic Board: 8 단계, 이미지 3개 중 2개 Disassembling Samsung Galaxy Ace Logic Board: 8 단계, 이미지 3개 중 3개
    • Lift the logic board from the right side.

    • Use the removal tool to unplug the display cable from the logic board.

    • You can now separate the Logic board from the display assembly.

  9. Disassembling Samsung Galaxy Ace Logic Board: 9 단계, 이미지 2개 중 1개 Disassembling Samsung Galaxy Ace Logic Board: 9 단계, 이미지 2개 중 2개
    • Use the removal tool to unclip the camera module from the Logic board.

  10. Disassembling Samsung Galaxy Ace Logic Board: 10 단계, 이미지 3개 중 1개 Disassembling Samsung Galaxy Ace Logic Board: 10 단계, 이미지 3개 중 2개 Disassembling Samsung Galaxy Ace Logic Board: 10 단계, 이미지 3개 중 3개
    • Use the removal tool or a spudger to unplug speaker module cable

    • And separate the speaker module from Logic board.

    • Be caution, the module is fixed by plastic teeth to the Logic board. Don't force, just make little wave-movements and the speaker comes on his own.

  11. Disassembling Samsung Galaxy Ace Logic Board: 11 단계, 이미지 1개 중 1개
    • Now you can work with the Logic board.

결론

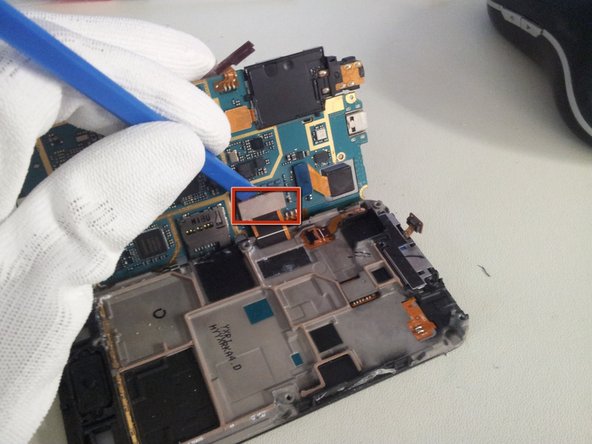
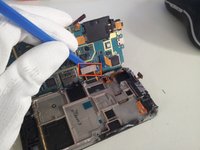
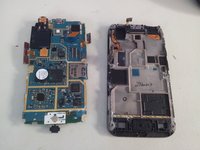
To reassemble your device, follow these instructions in reverse order.

다른 34명이 해당 안내서를 완성하였습니다.

작성자

2다른 기여자 명과 함께

finster

회원 가입일: 08/17/11

1,986 평판

안내서 1개를 작성함

2가이드 댓글

Thanks for the post. This is really Helpful

Dave Dayanan - 답글 공유

im curently selling one thx to you

Kyle at work - 답글 공유

댓글 쓰기

조회 통계:

지난 24시간: 5

지난 7일: 29

지난 30일: 87

전체 시간: 27,379