주요 콘텐츠로 건너뛰기

이 버전에는 잘못된 편집 사항이 있을 수 있습니다. 최신 확인된 스냅샷으로 전환하십시오.

필요한 것

  1. 이 단계는 번역되지 않았습니다. 번역을 도와주십시오

    : 1 단계, 이미지 1/1
    • The rear panel is secured to the front case and can simply be pried apart without damage.

  2. 이 단계는 번역되지 않았습니다. 번역을 도와주십시오

    : 2 단계, 이미지 1/1
    • Carefully, wedge the plastic opening tool in-between the seam that separates both halves of the tablet.

  3. 이 단계는 번역되지 않았습니다. 번역을 도와주십시오

    : 3 단계, 이미지 1/1
    • Run the plastic opening tool along the seam looking for the clips and lift up on the rear panel.

  4. 이 단계는 번역되지 않았습니다. 번역을 도와주십시오

    : 4 단계, 이미지 1/1
    • The rear panel should come completely off.

  5. 이 단계는 번역되지 않았습니다. 번역을 도와주십시오

    : 5 단계, 이미지 1/1
    • Remove any black static tape that may be covering the motherboard.

  6. 이 단계는 번역되지 않았습니다. 번역을 도와주십시오

    : 6 단계, 이미지 1/2 : 6 단계, 이미지 2/2
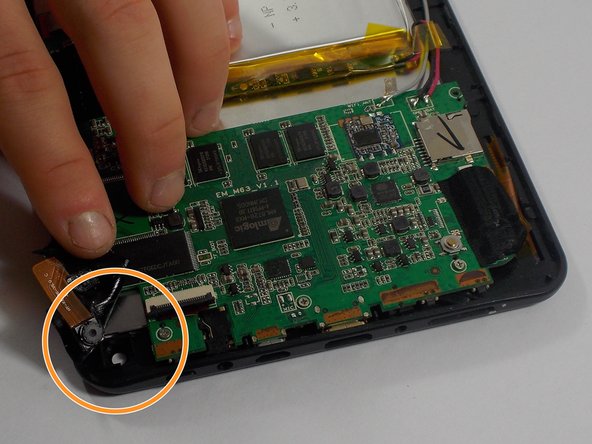
    • The camera is taped in place.

    • Use the flat end of a spudger to disconnect the front-facing camera cable from its socket on the motherboard.

    • Our cable had previously been cut but yours can be disconnected by lifting up on the black section of the socket, as shown by the arrow, and pulling the cable out.

    • Simply, pull back the tape and remove the camera.

  7. 이 단계는 번역되지 않았습니다. 번역을 도와주십시오

    : 7 단계, 이미지 1/2 : 7 단계, 이미지 2/2
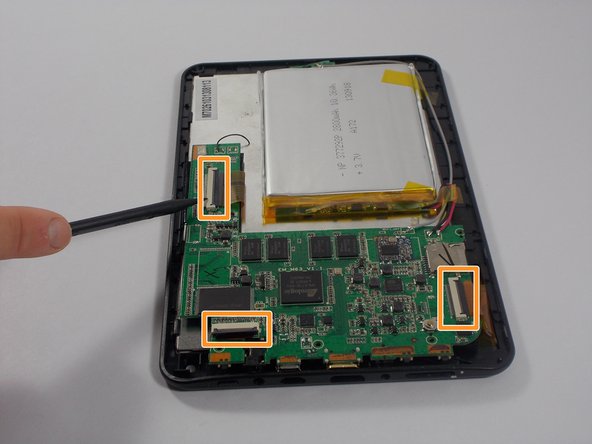
    • Use a Phillips Head Screwdriver size 0.

    • Remove the four screws holding the motherboard inplace.

    • Using the flat end of a spudger or tweezers, remove the three cables connected to the motherboard.

    • The cables can be disconnected by lifting up on the black section of the socket.

    • Once the lever is lifted, pull out the cable by gently tugging on it.

  8. 이 단계는 번역되지 않았습니다. 번역을 도와주십시오

    : 8 단계, 이미지 1/1
    • Using wire cutters, cut only the gray wire.

  9. 이 단계는 번역되지 않았습니다. 번역을 도와주십시오

    : 9 단계, 이미지 1/1
    • Using a metal spudger, carefully pry the battery away from the digitizer.

    • Be careful not to damage the battery.

    • At this point, the battery and the motherboard will still be connected although it is not shown in the image.

  10. 이 단계는 번역되지 않았습니다. 번역을 도와주십시오

    : 10 단계, 이미지 1/1
    • The back of the digitizer is attached along the edge by 12 plastic clips.

  11. 이 단계는 번역되지 않았습니다. 번역을 도와주십시오

    : 11 단계, 이미지 1/1
    • The best way to remove the digitizer is to use a plastic tool and pull back the clips so that it can lift out.

    • Be gentle and be sure not to break any of the clips.

  12. 이 단계는 번역되지 않았습니다. 번역을 도와주십시오

    : 12 단계, 이미지 1/2 : 12 단계, 이미지 2/2
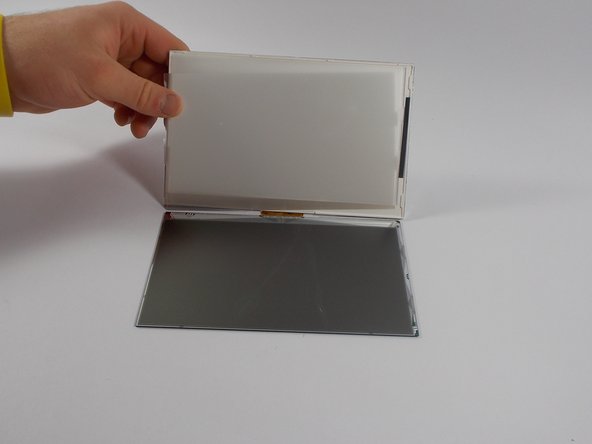
    • The digitizer can now be removed and replaced.

  13. 이 단계는 번역되지 않았습니다. 번역을 도와주십시오

    : 13 단계, 이미지 1/2 : 13 단계, 이미지 2/2
    • Soldering will be required to connect the new digitizer.

    • Any remaining wire left from the old digitizer will need to be removed from the motherboard.

    • Take care not to burn yourself or damage the motherboard, wires, or new digitizer while soldering.

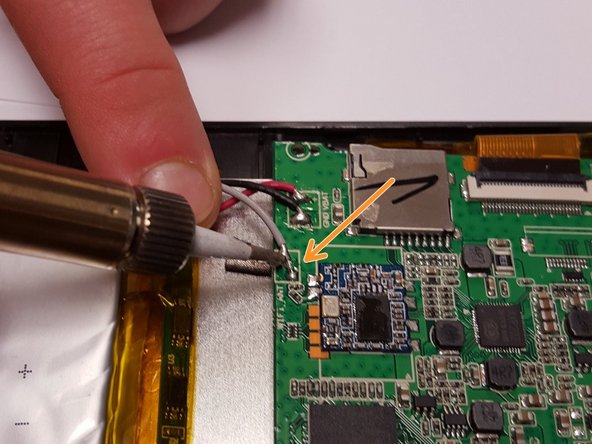
    • Solder the new digitizer to the soldering point shown within the image.

    • Using wire strippers, strip the end of the gray wire connected to the new digitizer about a 1/8".

    • Solder the gray wire to the soldering point on the motherboard as shown within the image.

결승점

다른 2명이 해당 안내서를 완성하였습니다.

mike pelosi

회원 가입일: 10/30/15

682 평판

안내서 6개 작성하였습니다

UMass Dartmouth, Team 1-2, Miles Fall 2015 UMass Dartmouth, Team 1-2, Miles Fall 2015 회원

UMASSD-MILES-F15S1G2

4 회원들

안내서 12개 작성하였습니다

댓글 0개

댓글 쓰기

조회 통계:

24 시간 전: 0

7일 전: 2

30일 전: 2

전체 시간: 612