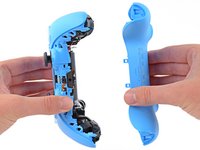
주요 콘텐츠로 건너뛰기

DualSense Controller v2 Rear Case Replacement

필요한 것

  1. DualSense Controller v2 Rear Case Replacement, Unclip the right end of the middle trim: 1 단계, 이미지 1/2 DualSense Controller v2 Rear Case Replacement, Unclip the right end of the middle trim: 1 단계, 이미지 2/2
    • Disconnect and power down your controller before you begin.

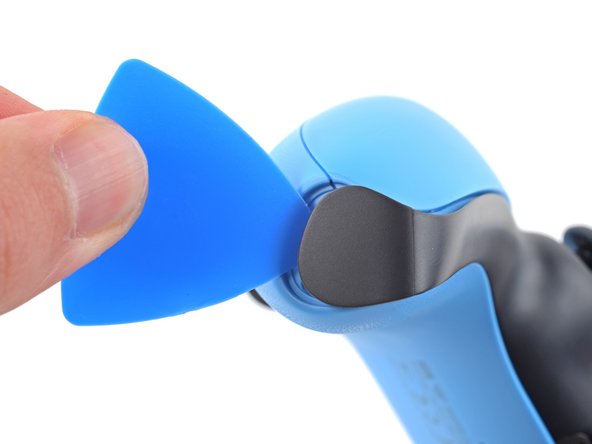
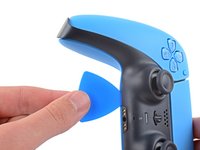
    • Insert an opening pick underneath the middle trim at the bottom-right corner of the controller to release the clips securing it to the case.

  2. DualSense Controller v2 Rear Case Replacement, Unclip the lower-right edge of the middle trim: 2 단계, 이미지 1/3 DualSense Controller v2 Rear Case Replacement, Unclip the lower-right edge of the middle trim: 2 단계, 이미지 2/3 DualSense Controller v2 Rear Case Replacement, Unclip the lower-right edge of the middle trim: 2 단계, 이미지 3/3
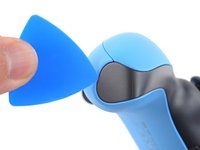
    • Slide the opening pick along the lower-right edge of the middle trim to release the clips securing it to the case.

  3. DualSense Controller v2 Rear Case Replacement, Unclip the left end of the middle trim: 3 단계, 이미지 1/2 DualSense Controller v2 Rear Case Replacement, Unclip the left end of the middle trim: 3 단계, 이미지 2/2
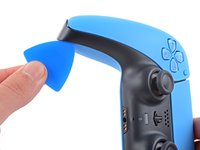
    • Insert an opening pick underneath the middle trim at the bottom-left corner of the controller to release the clips securing it to the case.

  4. DualSense Controller v2 Rear Case Replacement, Unclip the lower-left edge of the middle trim: 4 단계, 이미지 1/3 DualSense Controller v2 Rear Case Replacement, Unclip the lower-left edge of the middle trim: 4 단계, 이미지 2/3 DualSense Controller v2 Rear Case Replacement, Unclip the lower-left edge of the middle trim: 4 단계, 이미지 3/3
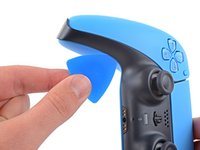
    • Slide the opening pick along the lower-left edge of the middle trim to release the clips securing it to the case.

  5. DualSense Controller v2 Rear Case Replacement, Remove the middle trim: 5 단계, 이미지 1/3 DualSense Controller v2 Rear Case Replacement, Remove the middle trim: 5 단계, 이미지 2/3 DualSense Controller v2 Rear Case Replacement, Remove the middle trim: 5 단계, 이미지 3/3
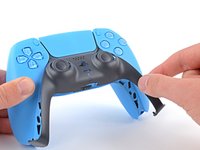
    • Use your fingers to lift up the bottom edge of the middle trim to release the remaining clips.

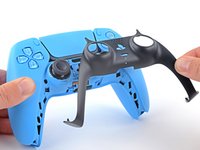
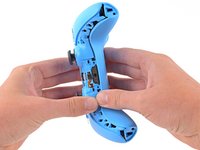
    • Lift the middle trim over the joysticks to remove it.

    • During reassembly, position the middle trim into place and press along all edges to engage the clips securing it to the controller.

  6. DualSense Controller v2 Rear Case Replacement, Remove the L1 button: 6 단계, 이미지 1/3 DualSense Controller v2 Rear Case Replacement, Remove the L1 button: 6 단계, 이미지 2/3 DualSense Controller v2 Rear Case Replacement, Remove the L1 button: 6 단계, 이미지 3/3
    • Insert the flat end of your spudger into the gap above the L1 button.

    • Cover the button with your thumb to prevent it from ejecting across the room.

    • Pry the spudger upward to remove the L1 button.

  7. DualSense Controller v2 Rear Case Replacement, Remove the R1 button: 7 단계, 이미지 1/3 DualSense Controller v2 Rear Case Replacement, Remove the R1 button: 7 단계, 이미지 2/3 DualSense Controller v2 Rear Case Replacement, Remove the R1 button: 7 단계, 이미지 3/3
    • Insert the flat end of your spudger into the gap above the R1 button.

    • Cover the button with your thumb to prevent it from ejecting across the room.

    • Pry the spudger upward to remove the R1 button.

  8. DualSense Controller v2 Rear Case Replacement, Remove the case screws: 8 단계, 이미지 1/1
    • Use a Phillips screwdriver to remove the two 6.5 mm screws securing the bottom corners of the lower case.

  9. DualSense Controller v2 Rear Case Replacement: 9 단계, 이미지 1/1
    • Use a Phillips screwdriver to remove the two 6.5 mm screws behind the L1 and R1 buttons.

  10. DualSense Controller v2 Rear Case Replacement, Unclip the rear case: 10 단계, 이미지 1/3 DualSense Controller v2 Rear Case Replacement, Unclip the rear case: 10 단계, 이미지 2/3 DualSense Controller v2 Rear Case Replacement, Unclip the rear case: 10 단계, 이미지 3/3
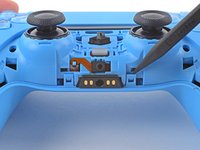
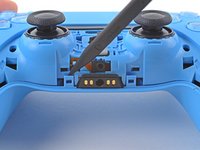
    • Use the pointed edge of a spudger to unclip the two clips on either side of the headset jack.

  11. DualSense Controller v2 Rear Case Replacement, Remove the rear case: 11 단계, 이미지 1/2 DualSense Controller v2 Rear Case Replacement, Remove the rear case: 11 단계, 이미지 2/2
    • Use your hands to carefully pull the rear case off of the controller.

    • During reassembly, make sure the red and black vibration motor wires are not pinched between the front and rear case.

결론

To reassemble your device, follow these instructions in reverse order.

Take your e-waste to an R2 or e-Stewards certified recycler.

Repair didn’t go as planned? Try some basic troubleshooting, or ask our Answers community for help.

다른 2명이 해당 안내서를 완성하였습니다.

Sam Omiotek

회원 가입일: 02/25/19

73,262 평판

안내서 288개 작성하였습니다

댓글 0개

댓글 쓰기

조회 통계:

24 시간 전: 2

7일 전: 13

30일 전: 90

전체 시간: 691