이 버전에는 잘못된 편집 사항이 있을 수 있습니다. 최신 확인된 스냅샷으로 전환하십시오.
필요한 것
-
이 단계는 번역되지 않았습니다. 번역을 도와주십시오
-
Using the Phillips #00 Screwdriver, remove the four 6.0 mm screws securing the rear cover to the controller.
-
-
이 단계는 번역되지 않았습니다. 번역을 도와주십시오
-
Beginning with the left handle:
-
Pinch the left handle of the controller to introduce an opening.
-
Wedge a plastic opening tool into the opening and slide it up towards the joystick.
-
Pull down on tool to pry open the casing.
-
Repeat these steps for the right handle.
-
-
이 단계는 번역되지 않았습니다. 번역을 도와주십시오
-
Wedge a plastic opening tool into the case-splittings and pull down to crack open the casing near the following buttons:
-
Share button
-
Options button
-
Split the plastic covers of the controller apart, taking note that they will still be attached by circuit board ribbons.
-
2 Trigger Springs
-
1 Grey Reset Button Extension
-
-
-
이 단계는 번역되지 않았습니다. 번역을 도와주십시오
-
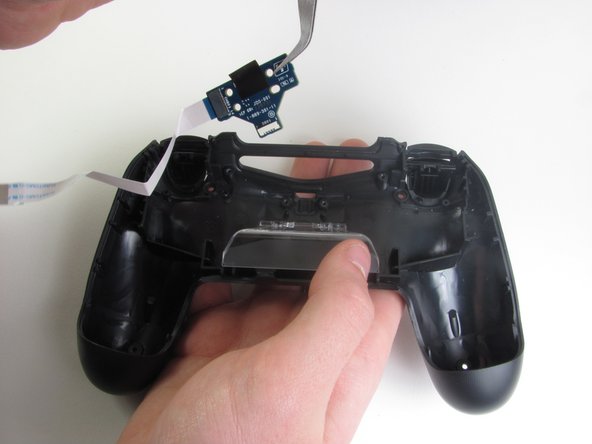
Detach the motherboard ribbon connecting the two sides of the controller by using your fingers.
-
After the two halves are separated, place the top of the controller off to the side.
-
-
이 단계는 번역되지 않았습니다. 번역을 도와주십시오
-
Remove the two screws holding the sub-assembly together. Then use the blunt forceps to grab the 2 inch black plastic connector labeled in the picture with the red box.
-
Use the blunt forceps to grab the 2 inch white piece of plastic labeled with the orange box.
-
-
이 단계는 번역되지 않았습니다. 번역을 도와주십시오
-
With the clear piece of plastic pushed in, take the transparent white piece out from the top of the controller.
-
Use the Philips #00 Screwdriver to unscrew the two 4.0 mm screws that attach the charging port to the rear cover.
-
-
이 단계는 번역되지 않았습니다. 번역을 도와주십시오
-
With the blunt forceps remove the top part of the black tape connecting the charging port to the plastic portion of the controller.
-
Grab the PCB of the charging port from the side and pull upwards slowly to remove from the controller.
-


다른 95명이 해당 안내서를 완성하였습니다.
팀

Cal Poly, Team 6-21, Maness Winter 2014 Cal Poly, Team 6-21, Maness Winter 2014 회원
CPSU-MANESS-W14S6G21
4 회원들
안내서 40개 작성하였습니다
댓글 32개
Looking for a new charging port .?