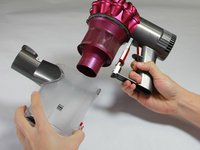
주요 콘텐츠로 건너뛰기

Dyson V6 Motorhead Collection Bin Replacement

  1. Dyson V6 Motorhead Collection Bin Replacement, Connection Tubing: 1 단계, 이미지 1/3 Dyson V6 Motorhead Collection Bin Replacement, Connection Tubing: 1 단계, 이미지 2/3 Dyson V6 Motorhead Collection Bin Replacement, Connection Tubing: 1 단계, 이미지 3/3
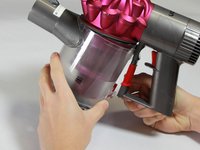
    • Depress the button releasing an end of the connection tubing.

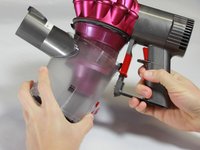
    • Pull the connection tubing away from the bottom vacuum head.

  2. Dyson V6 Motorhead Collection Bin Replacement: 2 단계, 이미지 1/3 Dyson V6 Motorhead Collection Bin Replacement: 2 단계, 이미지 2/3 Dyson V6 Motorhead Collection Bin Replacement: 2 단계, 이미지 3/3
    • Depress the last button, freeing the connection tubing.

    • Pull connection tubing away from the upper vacuum head.

  3. Dyson V6 Motorhead Collection Bin Replacement, Collection Bin: 3 단계, 이미지 1/2 Dyson V6 Motorhead Collection Bin Replacement, Collection Bin: 3 단계, 이미지 2/2
    • Pull down on the red release tab.

    • When the tab is fully engaged, the bottom of the bin should open.

  4. Dyson V6 Motorhead Collection Bin Replacement: 4 단계, 이미지 1/2 Dyson V6 Motorhead Collection Bin Replacement: 4 단계, 이미지 2/2
    • Pull down on the release tab a second time, this time the collection bin should release from the upper vacuum head.

  5. Dyson V6 Motorhead Collection Bin Replacement: 5 단계, 이미지 1/3 Dyson V6 Motorhead Collection Bin Replacement: 5 단계, 이미지 2/3 Dyson V6 Motorhead Collection Bin Replacement: 5 단계, 이미지 3/3
    • Pull the collection bin away from the upper vacuum head.

결론

To reassemble your device, follow these instructions in reverse order.

Addie Hedge

회원 가입일: 01/24/17

710 평판

안내서 5개 작성하였습니다

Cal Poly, Team 22-6, Maness Winter 2017 Cal Poly, Team 22-6, Maness Winter 2017 회원

CPSU-MANESS-W17S22G6

4 회원들

안내서 5개 작성하였습니다

댓글 0개

댓글 쓰기

조회 통계:

24 시간 전: 0

7일 전: 6

30일 전: 14

전체 시간: 3,190