주요 콘텐츠로 건너뛰기

Dyson V6 Motorhead Motor Replacement

필요한 것

  1. Dyson V6 Motorhead Motor Replacement, Collection Bin: 1 단계, 이미지 1/2 Dyson V6 Motorhead Motor Replacement, Collection Bin: 1 단계, 이미지 2/2
    • Pull down on the red release tab.

    • When the tab is fully engaged, the bottom of the bin should open.

  2. Dyson V6 Motorhead Motor Replacement: 2 단계, 이미지 1/2 Dyson V6 Motorhead Motor Replacement: 2 단계, 이미지 2/2
    • Pull down on the release tab a second time, this time the collection bin should release from the upper vacuum head.

  3. Dyson V6 Motorhead Motor Replacement: 3 단계, 이미지 1/3 Dyson V6 Motorhead Motor Replacement: 3 단계, 이미지 2/3 Dyson V6 Motorhead Motor Replacement: 3 단계, 이미지 3/3
    • Pull the collection bin away from the upper vacuum head.

  4. Dyson V6 Motorhead Motor Replacement, Motor: 4 단계, 이미지 1/1
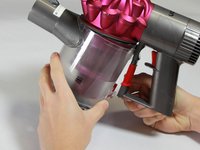
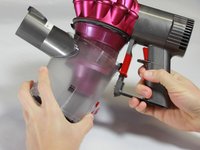
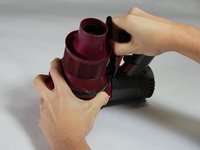
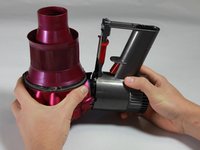
    • Identify the two white components between the vacuum handle and the attached component.

  5. Dyson V6 Motorhead Motor Replacement: 5 단계, 이미지 1/2 Dyson V6 Motorhead Motor Replacement: 5 단계, 이미지 2/2
    • Insert each arm of the tweezer into each white component area and squeeze simultaneously to release the motor from the attached component.

  6. Dyson V6 Motorhead Motor Replacement: 6 단계, 이미지 1/2 Dyson V6 Motorhead Motor Replacement: 6 단계, 이미지 2/2
    • Detach the motor from the remaining motor head assembly.

결론

To reassemble your device, follow these instructions in reverse order.

다른 10명이 해당 안내서를 완성하였습니다.

Addie Hedge

회원 가입일: 01/24/17

710 평판

안내서 5개 작성하였습니다

Cal Poly, Team 22-6, Maness Winter 2017 Cal Poly, Team 22-6, Maness Winter 2017 회원

CPSU-MANESS-W17S22G6

4 회원들

안내서 5개 작성하였습니다

댓글 2개

really good can understand and not too technical

kelvin - 답글

I am terrible at fixing things and this helped me put my vacuum back together after it fell and the motor detached from the handle. Thank you!!!

Chris Tadda - 답글

댓글 쓰기

조회 통계:

24 시간 전: 0

7일 전: 12

30일 전: 57

전체 시간: 18,770