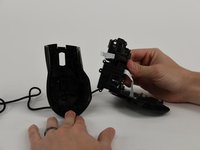
주요 콘텐츠로 건너뛰기

EVGA x17 Disassembly and Cleaning

필요한 것

  1. EVGA x17 Disassembly and Cleaning, EVGA x17 Disassembly and Cleaning: 1 단계, 이미지 1개 중 1개
    • Remove the mouse skates to reveal 5 screws.

  2. EVGA x17 Disassembly and Cleaning: 2 단계, 이미지 1개 중 1개
    • Use a Phillips #00 screwdriver to remove the 5 screws that secure the bottom panel

  3. EVGA x17 Disassembly and Cleaning: 3 단계, 이미지 1개 중 1개
    • Remove the weight chamber cover and clean with a Q-tip or soft fabric.

  4. EVGA x17 Disassembly and Cleaning: 4 단계, 이미지 1개 중 1개
    • Slowly slide a spudger into and around the bottom of the panel, prying until a "popping" sound is heard.

    • Use a Q-tip or soft fabric to clean the bottom panel.

  5. EVGA x17 Disassembly and Cleaning: 5 단계, 이미지 1개 중 1개
    • Remove the 13 screws on the interior.

    • There are 2 Phillips truss-head tapping screws, large circular heads, and the 11 Phillips screws from the interior.

  6. EVGA x17 Disassembly and Cleaning: 6 단계, 이미지 2개 중 1개 EVGA x17 Disassembly and Cleaning: 6 단계, 이미지 2개 중 2개
    • Once all screws are removed, carefully slide the middle section out and clean with a Q–tip or soft fabric.

    • Clean the top panel with a Q-tip or soft fabric.

    • Optional: you can remove clickers as well and clean them.

    • Remove the smaller sized cross head screws from the piece labeled A29N001-C V1.0 RU 94V-0. Remove truss head tapping screws from the side of the mouse wheel.

    • Remove 4 screws from the piece labeled AZAC001-A V1.0.

  7. EVGA x17 Disassembly and Cleaning: 8 단계, 이미지 1개 중 1개
    • Pull transistor from the side of the mouse wheel.

  8. EVGA x17 Disassembly and Cleaning: 9 단계, 이미지 1개 중 1개
    • Carefully slide a spudger between the opaque plastic that holds the scroll wheel in place.

    • Pry the plastic away from the wheel, allowing for the scroll wheel to be removed.

  9. EVGA x17 Disassembly and Cleaning: 10 단계, 이미지 2개 중 1개 EVGA x17 Disassembly and Cleaning: 10 단계, 이미지 2개 중 2개
    • Remove the scroll wheel cover and replace plastic wheel (or cover if that appears to be the issue.) Clean both with Q-tip or soft fabric.

결론

To reassemble your device, follow these instructions in reverse order.

다른 한 분이 해당 안내서를 완성하였습니다.

작성자

4다른 기여자 명과 함께

Melanie

회원 가입일: 09/11/23

210 평판

안내서 1개를 작성함

1가이드 댓글

Thanks for this walkthrough!

Tim Sharp - 답글

댓글 쓰기

조회 통계:

지난 24시간: 3

지난 7일: 19

지난 30일: 97

전체 시간: 3,021