이 버전에는 잘못된 편집 사항이 있을 수 있습니다. 최신 확인된 스냅샷으로 전환하십시오.
필요한 것
-
이 단계는 번역되지 않았습니다. 번역을 도와주십시오
-
Power down your device.
-
Place the small suction cup on a corner of the screen and lightly pull up to expose a seam between the screen and case.
-
-
이 단계는 번역되지 않았습니다. 번역을 도와주십시오
-
Insert the plastic opening tool into the seam near the corner of the device.
-
Slowly slide the tool around the perimeter of the device, gradually prying up the screen.
-
-
이 단계는 번역되지 않았습니다. 번역을 도와주십시오
-
When the screen is free of all spring clips and adhesive, slowly open the device like a clam shell with the hinge being the left hand side of the device.
-
Safely place the device back on the table by laying the screen face down.
-
-
이 단계는 번역되지 않았습니다. 번역을 도와주십시오
-
Disconnect the ribbon cable by placing a plastic opening tool under the black plastic tab that is on the opposite side of the port as the ribbon cable.
-
Pry upward until the black tab moves 90 degrees, and gently pull the ribbon cable out of the port.
-
-
-
이 단계는 번역되지 않았습니다. 번역을 도와주십시오
-
Place a plastic opening tool under the white plastic tab on one of the ribbon cable ports.
-
Pry upward until the black tab moves 90 degrees, and gently pull the ribbon cable out of the port.
-
Repeat the previous process to remove the other ribbon cable.
-
-
이 단계는 번역되지 않았습니다. 번역을 도와주십시오
-
Remove the battery (secured by six screws and a white wire connector) by following the removal portion of this battery replacement guide.
-
-
이 단계는 번역되지 않았습니다. 번역을 도와주십시오
-
Orient your device so that the lock and volume buttons and the attached components are on the top left.
-
-
이 단계는 번역되지 않았습니다. 번역을 도와주십시오
-
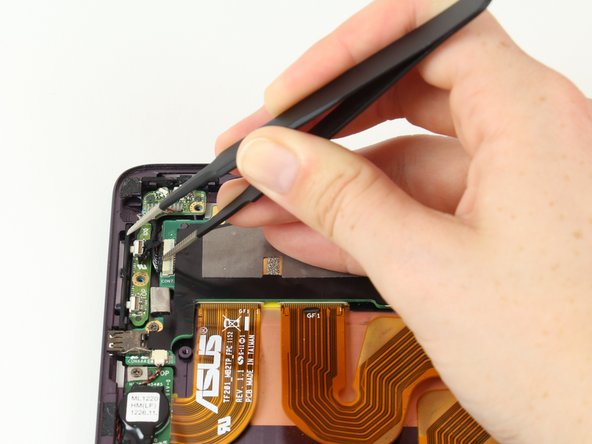
Use tweezers to pull back the strip of black tape covering the connection between the electronic portion of the lock and volume buttons and the motherboard.
-
Push the black part out of the white part of the connection using tweezers.
-
-
이 단계는 번역되지 않았습니다. 번역을 도와주십시오
-
The electronic portion of the lock and volume buttons should now be free to move. Lift it gently using tweezers, and set it aside.
-
-
이 단계는 번역되지 않았습니다. 번역을 도와주십시오
-
Press down on the lock button from the outside of your device using your finger.
-
Use tweezers to pull the lock button upwards from the inside of the device, while keeping your finger pressed from the outside.
-
Pull the lock button free from the device and set it aside.
-


다른 한 분이 해당 안내서를 완성하였습니다.
팀

Cal Poly, Team 10-1, Livingston SU 2016 Cal Poly, Team 10-1, Livingston SU 2016 회원
CPSU-LIVINGSTON-SU16S10G1
1 회원
안내서 6개 작성하였습니다