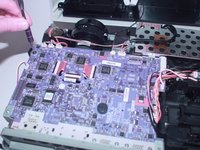
주요 콘텐츠로 건너뛰기

Epson PowerLite 822 Plus Projector Lens Replacement

필요한 것

  1. Epson PowerLite 822 Plus Projector Lens Replacement, Motherboard: 1 단계, 이미지 1개 중 1개
    • Flip the projector over.

    • Remove all 8 screws on the bottom of the projector.

  2. Epson PowerLite 822 Plus Projector Lens Replacement: 2 단계, 이미지 2개 중 1개 Epson PowerLite 822 Plus Projector Lens Replacement: 2 단계, 이미지 2개 중 2개
    • Now, flip the projector back over and pry the top of it open revealing the inside of the projector.

  3. Epson PowerLite 822 Plus Projector Lens Replacement: 3 단계, 이미지 2개 중 1개 Epson PowerLite 822 Plus Projector Lens Replacement: 3 단계, 이미지 2개 중 2개
    • Use the spudger to disconnect it from the motherboard.

  4. Epson PowerLite 822 Plus Projector Lens Replacement: 4 단계, 이미지 2개 중 1개 Epson PowerLite 822 Plus Projector Lens Replacement: 4 단계, 이미지 2개 중 2개
    • Using your finger gently move back and forth the JST cable that connects the top to the motherboard.

    • Now completely take off the top of the projector.

  5. Epson PowerLite 822 Plus Projector Lens Replacement: 5 단계, 이미지 2개 중 1개 Epson PowerLite 822 Plus Projector Lens Replacement: 5 단계, 이미지 2개 중 2개
    • Remove the 3 screws that secure the motherboard in place.

  6. Epson PowerLite 822 Plus Projector Lens Replacement: 6 단계, 이미지 3개 중 1개 Epson PowerLite 822 Plus Projector Lens Replacement: 6 단계, 이미지 3개 중 2개 Epson PowerLite 822 Plus Projector Lens Replacement: 6 단계, 이미지 3개 중 3개
    • Gently move back and forth the 11 JST connectors until they come out.

  7. Epson PowerLite 822 Plus Projector Lens Replacement: 7 단계, 이미지 2개 중 1개 Epson PowerLite 822 Plus Projector Lens Replacement: 7 단계, 이미지 2개 중 2개
    • With the spudger lift the red plastic tabs from their connectors.

  8. Epson PowerLite 822 Plus Projector Lens Replacement: 8 단계, 이미지 3개 중 1개 Epson PowerLite 822 Plus Projector Lens Replacement: 8 단계, 이미지 3개 중 2개 Epson PowerLite 822 Plus Projector Lens Replacement: 8 단계, 이미지 3개 중 3개
    • Lift the motherboard and disconnect the JST connector underneath.

  9. Epson PowerLite 822 Plus Projector Lens Replacement: 9 단계, 이미지 1개 중 1개
    • Now, the motherboard is completely removed from the projector and you are ready to replace it.

  10. Epson PowerLite 822 Plus Projector Lens Replacement, Projector Lens: 10 단계, 이미지 3개 중 1개 Epson PowerLite 822 Plus Projector Lens Replacement, Projector Lens: 10 단계, 이미지 3개 중 2개 Epson PowerLite 822 Plus Projector Lens Replacement, Projector Lens: 10 단계, 이미지 3개 중 3개
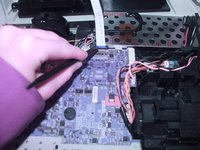
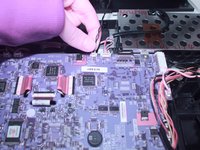
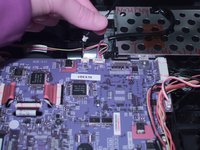
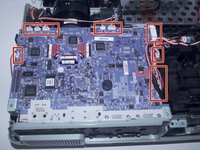
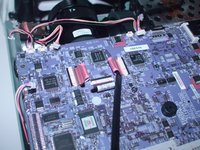
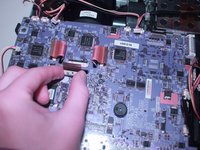
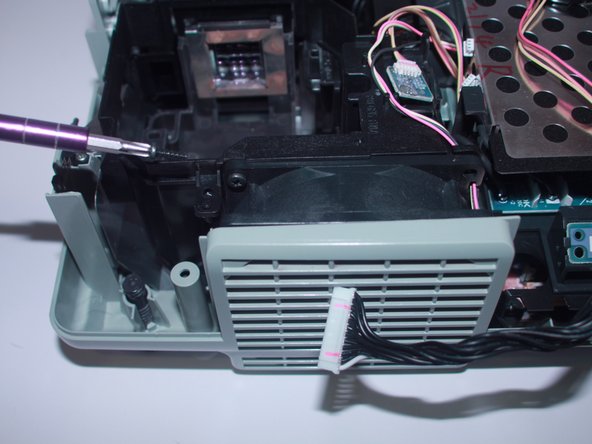
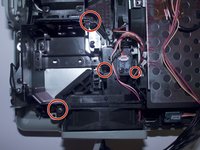
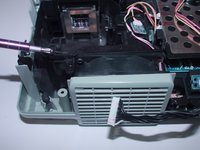
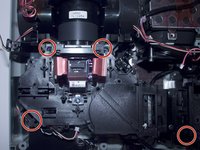
    • Use a Phillips #2 screwdriver to remove the four 6 mm screws that hold together the fan bracket.

  11. Epson PowerLite 822 Plus Projector Lens Replacement: 11 단계, 이미지 2개 중 1개 Epson PowerLite 822 Plus Projector Lens Replacement: 11 단계, 이미지 2개 중 2개
    • Use a Phillips #2 screwdriver to remove the four 6 mm screws that secure the projector.

  12. Epson PowerLite 822 Plus Projector Lens Replacement: 12 단계, 이미지 2개 중 1개 Epson PowerLite 822 Plus Projector Lens Replacement: 12 단계, 이미지 2개 중 2개
    • Pull out the loose projector and it is ready to be replaced.

결론

To reassemble your device, follow these instructions in reverse order.

작성자

2다른 기여자 명과 함께

Emma Richey

회원 가입일: 03/21/22

915 평판

안내서 5개를 작성함

0가이드 댓글

댓글 쓰기

조회 통계:

지난 24시간: 1

지난 7일: 4

지난 30일: 7

전체 시간: 166