주요 콘텐츠로 건너뛰기

Eureka 1660SP Pole Extender Button Spring Replacement

필요한 것

  1. Eureka 1660SP Pole Extender Button Spring Replacement, Motor Housing: 1 단계, 이미지 1/2 Eureka 1660SP Pole Extender Button Spring Replacement, Motor Housing: 1 단계, 이미지 2/2
    • Before you start, make sure your vacuum is unplugged the power outlet.

    • Press and hold down the black button below the handle while pulling the pole out.

  2. Eureka 1660SP Pole Extender Button Spring Replacement: 2 단계, 이미지 1/2 Eureka 1660SP Pole Extender Button Spring Replacement: 2 단계, 이미지 2/2
    • Press the black separator switch to separate the top and bottom halves of the vacuum.

  3. Eureka 1660SP Pole Extender Button Spring Replacement: 3 단계, 이미지 1/3 Eureka 1660SP Pole Extender Button Spring Replacement: 3 단계, 이미지 2/3 Eureka 1660SP Pole Extender Button Spring Replacement: 3 단계, 이미지 3/3
    • Use a #2 Phillips head screwdriver to remove six 13.9mm screws from the side of the motor housing (top half) as shown.

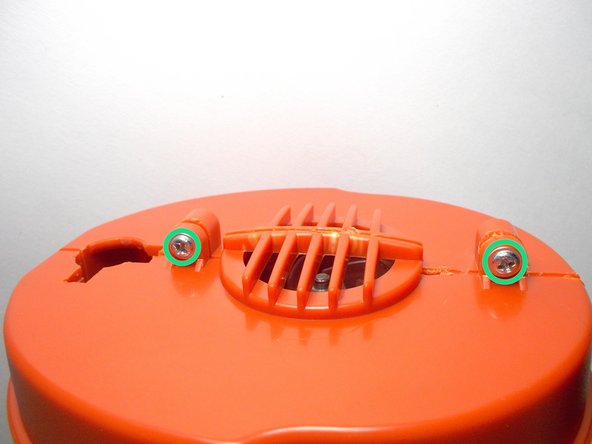
    • Remove two 14.1mm screws from the front face of the housing. You are now all set to open the housing.

    • Keep a watchful eye on the two screws from the front face. These two have additional collars to their necks and will not fit in any of the other holes, yet no other screw will fit in their spots without the collar.

  4. Eureka 1660SP Pole Extender Button Spring Replacement, Pole Extender Button Spring: 4 단계, 이미지 1/1
    • Pull out the button and the spring attached to it.

    • Swap the old spring with a new one.

  5. Eureka 1660SP Pole Extender Button Spring Replacement: 5 단계, 이미지 1/1
    • Insert the new spring and button back into the right slot as shown in the picture.

결론

To reassemble your device, follow these instructions in reverse order.

Nikhila Vijaybhaskar

회원 가입일: 09/24/13

242 평판

안내서 2개 작성하였습니다

UMass Dartmouth, Team 1-1, Gulbrandsen Fall 2013 UMass Dartmouth, Team 1-1, Gulbrandsen Fall 2013 회원

UMASSD-GULBRANDSEN-F13S1G1

3 회원들

안내서 12개 작성하였습니다

댓글 0개

댓글 쓰기

조회 통계:

24 시간 전: 0

7일 전: 1

30일 전: 3

전체 시간: 300