주요 콘텐츠로 건너뛰기

Eureka SuctionSeal 2.0 Pet Brush Roll Replacement

필요한 것

  1. Eureka SuctionSeal 2.0 Pet Brush Roll Replacement, Dust Cup: 1 단계, 이미지 1/2 Eureka SuctionSeal 2.0 Pet Brush Roll Replacement, Dust Cup: 1 단계, 이미지 2/2
    • Place the device upright with the brush roller closest to you.

    • Pull up on the latch at the top of the dust cup.

    • Tilt the top of the dust cup forward and pull towards yourself, removing the container from the device.

  2. Eureka SuctionSeal 2.0 Pet Brush Roll Replacement, Brush Roll Cover: 2 단계, 이미지 1/2 Eureka SuctionSeal 2.0 Pet Brush Roll Replacement, Brush Roll Cover: 2 단계, 이미지 2/2
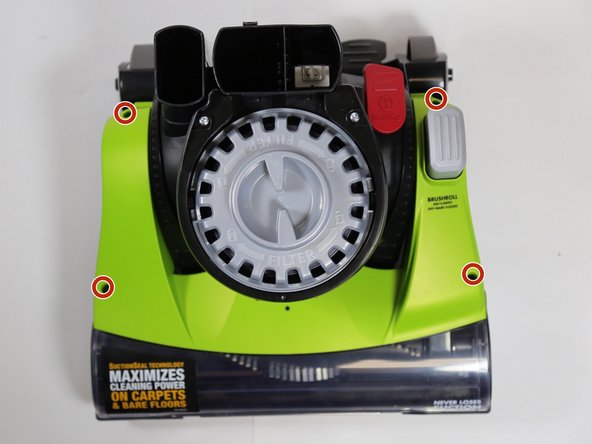
    • Locate the gray exhaust filter cover at the top of the vacuum's base.

    • Grip the two tabs in the middle of the filter cover and rotate counter-clockwise.

    • Lift the cover away from the vacuum.

  3. Eureka SuctionSeal 2.0 Pet Brush Roll Replacement: 3 단계, 이미지 1/3 Eureka SuctionSeal 2.0 Pet Brush Roll Replacement: 3 단계, 이미지 2/3 Eureka SuctionSeal 2.0 Pet Brush Roll Replacement: 3 단계, 이미지 3/3
    • Pull up and unhook the two front tower latches using two fingers. These are located at the base of the tower.

    • Pull up and unhook the latch on the back of the tower.

    • Firmly lift the vacuum tower up and out of its stand.

    • The exhaust filter cover can be replaced once the tower is removed. It will not affect the steps.

  4. Eureka SuctionSeal 2.0 Pet Brush Roll Replacement: 4 단계, 이미지 1/2 Eureka SuctionSeal 2.0 Pet Brush Roll Replacement: 4 단계, 이미지 2/2
    • Remove the four 20mm screws on the top of the vacuum head's cover using a JIS 1 screwdriver.

  5. Eureka SuctionSeal 2.0 Pet Brush Roll Replacement: 5 단계, 이미지 1/2 Eureka SuctionSeal 2.0 Pet Brush Roll Replacement: 5 단계, 이미지 2/2
    • Turn the vacuum head so that the back is facing you.

    • Press the handle release pedal.

    • Rotate the top of the motor cover down while pressing on the pedal release.

    • The motor cover should rotate from an upright position back towards the ground, as it would if the handle were still attached.

  6. Eureka SuctionSeal 2.0 Pet Brush Roll Replacement: 6 단계, 이미지 1/3 Eureka SuctionSeal 2.0 Pet Brush Roll Replacement: 6 단계, 이미지 2/3 Eureka SuctionSeal 2.0 Pet Brush Roll Replacement: 6 단계, 이미지 3/3
    • Locate the two tabs on the back of the cover.

    • Pull up on the tabs and lift the cover away from the device.

  7. Eureka SuctionSeal 2.0 Pet Brush Roll Replacement, Belt Latch Assembly: 7 단계, 이미지 1/2 Eureka SuctionSeal 2.0 Pet Brush Roll Replacement, Belt Latch Assembly: 7 단계, 이미지 2/2
    • Locate the belt latch assembly. It will be on your right when the brush roll is facing you.

    • Remove the two 20mm screws using a JIS 1 screwdriver.

  8. Eureka SuctionSeal 2.0 Pet Brush Roll Replacement: 8 단계, 이미지 1/1
    • Lift up on the belt latch assembly and remove it from the vacuum.

  9. Eureka SuctionSeal 2.0 Pet Brush Roll Replacement, Brush Roll: 9 단계, 이미지 1/3 Eureka SuctionSeal 2.0 Pet Brush Roll Replacement, Brush Roll: 9 단계, 이미지 2/3 Eureka SuctionSeal 2.0 Pet Brush Roll Replacement, Brush Roll: 9 단계, 이미지 3/3
    • Grab the brush roll on both ends.

    • Lift up on the right side of the brush roll.

    • Lift up on the left side of the brush roll, completely removing it from its frame.

    • Separate the brush roll from the belt and remove the brush roll from the vacuum.

결론

To reassemble your device, follow these instructions in reverse order.

다른 한 분이 해당 안내서를 완성하였습니다.

Anna Snyder

회원 가입일: 10/02/17

336 평판

안내서 3개 작성하였습니다

Cal Poly, Team S4-G5, Livingston Fall 2017 Cal Poly, Team S4-G5, Livingston Fall 2017 회원

CPSU-LIVINGSTON-F17S4G5

3 회원들

안내서 16개 작성하였습니다

댓글 0개

댓글 쓰기

조회 통계:

24 시간 전: 0

7일 전: 3

30일 전: 12

전체 시간: 1,029