주요 콘텐츠로 건너뛰기

Fairphone 2 Rear Camera Module Replacement

필요한 것

  1. Fairphone 2 Rear Camera Module Replacement, Slim Case: 1 단계, 이미지 1/3 Fairphone 2 Rear Camera Module Replacement, Slim Case: 1 단계, 이미지 2/3 Fairphone 2 Rear Camera Module Replacement, Slim Case: 1 단계, 이미지 3/3
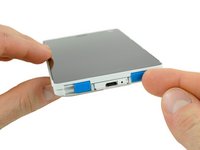
    • Pick a corner of your slim case and get between the two parts with your thumb's fingernails.

    • Pull up the back part of the slim case to separate the small snap fit connections.

    • Remove the back part of the slim case.

  2. Fairphone 2 Rear Camera Module Replacement: 2 단계, 이미지 1/3 Fairphone 2 Rear Camera Module Replacement: 2 단계, 이미지 2/3 Fairphone 2 Rear Camera Module Replacement: 2 단계, 이미지 3/3
    • Get in between the front part of the slim case and the phone's body with your thumb nail.

    • Separate the snap fit connectors on the front part by pulling it to the side and pushing against the display.

  3. Fairphone 2 Rear Camera Module Replacement: 3 단계, 이미지 1/1
    • Remove the front part of the slim case.

  4. Fairphone 2 Rear Camera Module Replacement, Battery: 4 단계, 이미지 1/3 Fairphone 2 Rear Camera Module Replacement, Battery: 4 단계, 이미지 2/3 Fairphone 2 Rear Camera Module Replacement, Battery: 4 단계, 이미지 3/3
    • Push the battery toward the top of the phone.

    • Pull the battery out away from the phone.

  5. Fairphone 2 Rear Camera Module Replacement, Display Assembly: 5 단계, 이미지 1/3 Fairphone 2 Rear Camera Module Replacement, Display Assembly: 5 단계, 이미지 2/3 Fairphone 2 Rear Camera Module Replacement, Display Assembly: 5 단계, 이미지 3/3
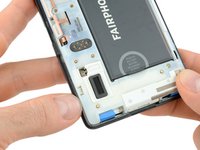
    • After taking out the battery you can unlock the display assembly.

    • Flip the two blue switches to the inner position.

    • Slide the display assembly towards the bottom of the phone.

    • Another possible way of sliding the display assembly open.

  6. Fairphone 2 Rear Camera Module Replacement: 7 단계, 이미지 1/1
    • Take off the display assembly.

  7. Fairphone 2 Rear Camera Module Replacement, Rear Camera Module: 8 단계, 이미지 1/2 Fairphone 2 Rear Camera Module Replacement, Rear Camera Module: 8 단계, 이미지 2/2
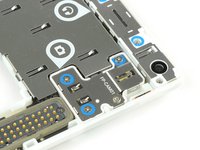
    • Remove the three Phillips #0 screws of the module which are nicely marked by the blue circles.

    • Now the module should stand off a little bit due to the pogo pins underneath.

  8. Fairphone 2 Rear Camera Module Replacement: 9 단계, 이미지 1/1
    • Take out the whole module.

결론

To reassemble your device, follow these instructions in reverse order.

Information on what to do with the old module can be found on the FairPhone support page and in the FairPhone forum.

다른 71명이 해당 안내서를 완성하였습니다.

Tobias Isakeit

회원 가입일: 03/31/14

117,296 평판

안내서 188개 작성하였습니다

Master Techs Master Techs 회원

Community

322 회원들

안내서 2,521개 작성하였습니다

댓글 22개

Alles gut - hat wunderbar funktioniert, insbesondere dank des Videos für Schritt 4

Walter Strohschein - 답글

Heel snelle levering van mijn nieuwe camera!

Het was ons (mijn man) vast niet gelukt zonder de goede begeleidende filmpjes! 

Betty Bol

Betty - 답글

die Variante mit slim case ist noch nicht berücksichtigt

Ansonsten: super Anleitung

W. Koch - 답글

Hat prima funktioniert dank einfacher Anleitung und einfacher Bauweise.

Christian Heider - 답글

Geschafft! - Schritt 4 war beim Slim Case nicht so einfach, aber nach ein paar Minuten hatte ich es raus. Ich frage mich bloss, was ich nun mit der alten Kamera mache..? Kann man die zurückschicken? Gibt es dazu irgendwelche Infos? Danke für die Anleitung und allfällige Infos bezüglich “Zukunft der alten Kamera” ;-) !

Claudia Serena Herrmann - 답글

댓글 쓰기

조회 통계:

24 시간 전: 2

7일 전: 4

30일 전: 10

전체 시간: 121,702