주요 콘텐츠로 건너뛰기

이 버전에는 잘못된 편집 사항이 있을 수 있습니다. 최신 확인된 스냅샷으로 전환하십시오.

필요한 것

  1. 이 단계는 번역되지 않았습니다. 번역을 도와주십시오

    : 1 단계, 이미지 1/3 : 1 단계, 이미지 2/3 : 1 단계, 이미지 3/3
    • There is a small indentation in the side of the phone near the bottom of the back cover.

    • With the indentation as leverage, use your fingernail to pry the bottom portion of the back cover from the phone.

  2. 이 단계는 번역되지 않았습니다. 번역을 도와주십시오

    : 2 단계, 이미지 1/3 : 2 단계, 이미지 2/3 : 2 단계, 이미지 3/3
    • Slide the back cover down and remove it from the phone.

  3. 이 단계는 번역되지 않았습니다. 번역을 도와주십시오

    : 3 단계, 이미지 1/3 : 3 단계, 이미지 2/3 : 3 단계, 이미지 3/3
    • There is a small indentation in the back of the phone just below the battery.

    • Use a fingernail in this indentation to push the battery toward the top of the phone

    • Pull the battery out away from the phone.

  4. 이 단계는 번역되지 않았습니다. 번역을 도와주십시오

    : 4 단계, 이미지 1/1
    • Remove the battery from your Fairphone.

  5. 이 단계는 번역되지 않았습니다. 번역을 도와주십시오

    : 5 단계, 이미지 1/3 : 5 단계, 이미지 2/3 : 5 단계, 이미지 3/3
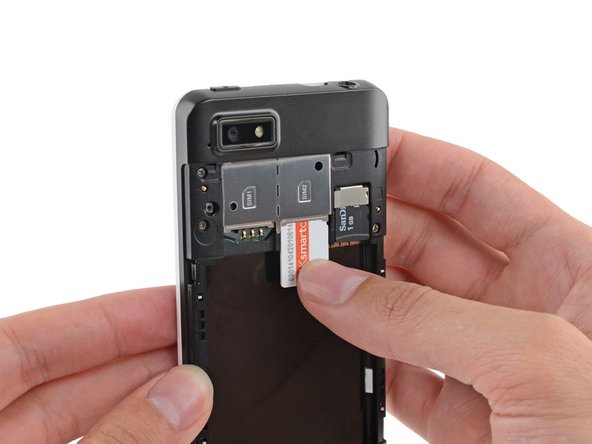
    • Use your finger to slide the SIM card straight down out of its tray.

    • Remove the SIM card from your Fairphone.

    • Repeat this procedure if you have a second SIM card.

    • Be sure to remove all SIM cards before servicing your phone.

  6. 이 단계는 번역되지 않았습니다. 번역을 도와주십시오

    : 6 단계, 이미지 1/2 : 6 단계, 이미지 2/2
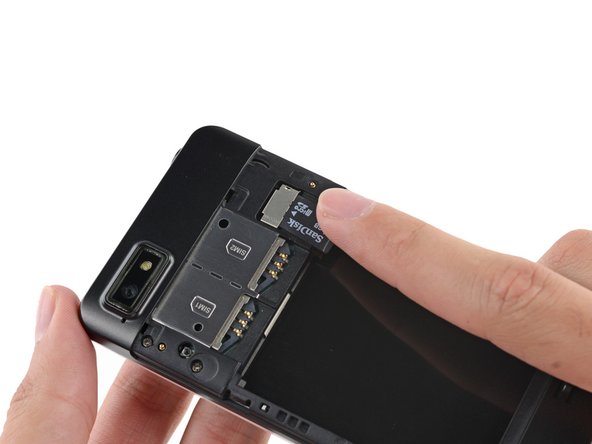
    • If you have a microSD card, use your finger to slide it straight out of its slot.

    • Remove the microSD card from your phone.

결승점

다른 한 분이 해당 안내서를 완성하였습니다.

Sam Goldheart

회원 가입일: 10/18/12

466,301 평판

안내서 538개 작성하였습니다

iFixit iFixit 회원

Staff

137 회원들

안내서 17,457개 작성하였습니다

댓글 0개

댓글 쓰기

조회 통계:

24 시간 전: 3

7일 전: 29

30일 전: 142

전체 시간: 8,766