필요한 것
-
-
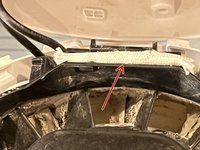
The red arrow indicates the area where we'll focus our cleaning efforts.
-
Start by powering the fan on. Then, switch it to the highest setting.
-
Use compressed air aimed at the crevice toward the back part of the fan (where the arrow is pointing). Keep shooting compressed air in at various angles up and down the slots until dust stops coming out.
-
Try the heating function to see if the error is still there. If this doesn’t work, proceed to the next steps.
-
-
-
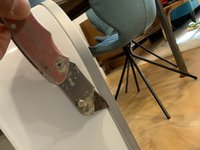
To begin, take off the D-shaped screw cover located at the bottom of the oval by pulling it upwards. Once you remove the cover, you'll see a T8 screw that needs to be unscrewed to move forward.
-
-
-
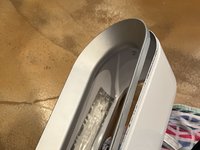
To unlock the top part from the bottom part, twist it 15 degrees counterclockwise. The cylindrical base can be tough to grip, so use a belt as a strap wrench instead.
-
-
-
-
If you're having trouble working with the cables, you can try removing the fan core from the tilt stage. To do this, unscrew the four T8 screws located beneath the fan core (two screws are visible at each of the maximum tilt positions). This will allow you to separate the fan core and make it easier to work with the cables.
-
-
-
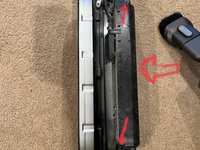
Two T8 screws hold down the cover over this. The blade connectors have a little tab lock that must be pushed while pulling them apart.
-
The black wire is for the temperature sensors.
-
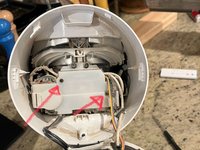
The white wire is for power (disconnects near the base, under a woven sleeve that slides out of the way. You don't need to touch the heatsink). The servo connector pulls apart easily.
-
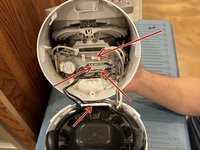
The arrows show the 4 places to disconnect the wires so you can separate the top from the bottom. The white connectors under the sheath may also have a tiny lock tab that you need to push in while pulling them apart. Make sure to take note of how the wires run before take off the cover.
-
Make sure to mark the black wires before disconnecting so that reconnect them correctly when putting it back together. (Photos in reverse order).
-
-
-
There are two bolts holding the servo down (removed in this photo), and two holding the white plate down. It is not necessary to remove these, but might make things a little easier a couple steps from now.
-
-
-
Use a boxcutter to repeatedly score around the sides and top of the outside trim, in order to gain access to the heater cores. This is glued in place, but around the bottom it is a small amount of glue, so if you completely separate the top and sides you can break the glue at the bottom. The air slot core with heaters will slide out.
-
Once you remove the silver face plate, the black and white part you see simply lifts out from the back white shell.
-
-
-
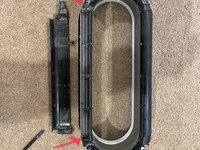
Remove the two bolts (small arrows) then lift the heater slot cover (black plastic) from the side where the big arrows is pointing. You can then remove the heater cores (2nd picture). They can be turned out without bending any of the tabs. The same is true of the temperature sensors. The caked on (and toasted) dust can simply be vacuumed off.
-
You are done. Reverse the step to reassemble. I recommend white electric tape to put the part back on that you had to remove with the knife.
-


To reassemble your device, follow these instructions in reverse order. Tape the air slot assembly to the outside of the outer housing, or simply ziptie the top of the loop.
다른 8명이 해당 안내서를 완성하였습니다.
13가이드 댓글
Hey, thanks for posting this. I used it as a general guide for my Dyson AM01 which also was throwing an error when using the heat function. Opened it up expecting to find and least some dust on the heating elements… and to my surprise and annoyance they were basically clean.
Any thoughts or other ideas? Not sure if there is a temp sensor incorrectly reporting the temperature of the heating elements that I can try to replace?
Thanks
Hi All, thanks for the walkthrough on opening up the heating elements. Same as David, I put up filters around the air intake since day 1 of owning the unit and the elements are clean without any clogs. (Confirmed once I opened up the unit).
I still get the H2 error whenever I use the heating function, I noticed that if I turn it to around 23-24C with the lowest fan speed, the H2 error may not come on. And often time I cannot increase fan speed probably due to some issues with the circuit board or components. I'm suspecting that the H2 error may be due to electrical/component failures because I have 2 units and both experienced H2 error.... I'm suspecting that they were built to have a life timer or something, and when the time comes, it'd fail no matter what.
Did some digging around on the components and it seems that the 2 components next to each heating elements are thermal switch and thermal fuse, I think that's just for safety purpose and they're not heat or flow sensors.
I'm stuck on step 7 since I don't know exactly where to cut. Is the air slot trim the silver/gray part on the outside? Is there any way more pictures could be provided? Thanks!
It is the outer grey rim that needs to be separated from the white body. See edits to the instructions for photos and details.
Adrian -