소개
As they age, Bose Companion speakers start making extremely loud crackles and pops when the volume is adjusted. The noise is created by the breakdown of lubricant in the control pod’s potentiometer. This can be fixed with a few sprays of electrical contact cleaner.
I’ve had my speakers for 17 years. I applied this fix for the first time after popping started at year 12. Five years later, the popping started again. I took pictures this time.
필요한 것
-
-
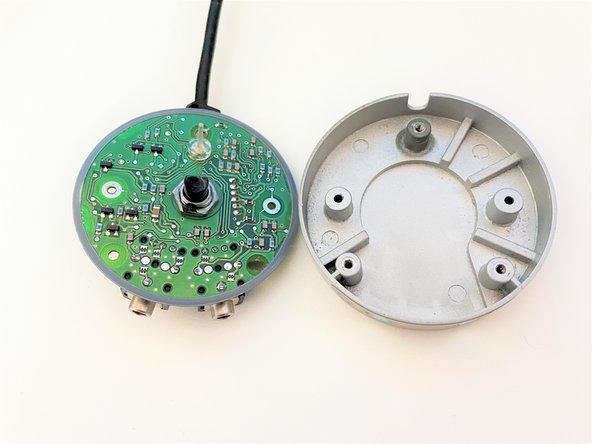
With the control pod unplugged, flip over the base pod and peel off the grippy rubber pad.
-
If you're careful, there will be enough glue left on the pad to stick if back on when reassembling. If not, you'll need to use double sided tape.
-
A metal spudger may be helpful here.
-
-
-
Use a Torx T5 screwdriver to remove both screws that attach the touch surface to the base.
-
Remove the touch surface. It should just fall out.
-
Reassembly Tip: The light tube highlighted in blue goes into the touch surface channel highlighted in orange. This directs the on/off status light on the control board to the surface of the pod.
-
-
-
-
The rubber volume dial is glued onto the potentiometer, which acts as the dial's hub.
-
Slowly and carefully drill through the center of the dial. You only need to drill down a few millimeters. Drill a couple of millimeters at a time, stopping along the way to try to jiggle the dial loose.
-
Selecting a drill bit: I recommend a 1/4" drill bit, but a bit with a slightly larger diameter will allow you to be less precise about finding dead-center. However, if you go too big, you'll turn the "D" shape of the ring and potentiometer (second photo) into an "O". This will make re-attachment difficult.
-
-
-
Use a #1 Phillips screwdriver to remove the three screws attaching the control board to the pod's base.
-
Lift the control board and wire out of the base.
-
Lift off the light tube and place it with your screws, otherwise it may go flying off in the next step.
-
Reassembly Tips: Make sure the light tower is back in place before reattaching the volume control knob. Also, ensure that the curved part of the wire's strain relief is facing the bottom of the puck.
-
-
-
Spray the top and bottom of the potentiometer with an electrical contact cleaner. Apply a few short bursts on each side, then spin knob back and forth all the way a few times. Spray both sides again, then spin the knob again. This will help spread the cleaner around and dissolve the gunk.
-
I used DeoxIT D5, but any cleaning and lubricating electrical contact cleaner will work.
-
Where to spray: On the top (first photo), spray in between the plastic knob and the metal ring. On the bottom, spray the base and the sides. The cleaner will work its way in through holes in the case.
-
Cleanup and overspray: Don't worry if the cleaner gets all over the PCB. The propellant will evaporate quickly and the leftover oil helps protect the contacts. Remove pooled/excess cleaner by dabbing with a paper towel. Don't wipe -- you'll get lint everywhere. Compressed air can help blast off excess cleaner, but wear safety glasses!
-


To reassemble your pod, follow this guide in reverse order. DeoxIT lists a 2-minute dry time, so you'll be able to use your speakers by the time you finish with reassembly.
To reassemble your pod, follow this guide in reverse order. DeoxIT lists a 2-minute dry time, so you'll be able to use your speakers by the time you finish with reassembly.
다른 6명이 해당 안내서를 완성하였습니다.

댓글 18개
Thanks for posting this. I had the dreaded loud pops and crackles for years. I did it slightly different than you, but probably wouldn't have tried at all if I hadn't found your step by step guide. I didn't peel the bottom pad off, I found the two screw locations and just made two holes in the pad to remove the screws. I didn't want to drill the center, so I sprayed D5 through the two holes in the circuit board where the light post goes and hoped it got to the volume pot underneath. It did. After reassembly it was completely silent. I also used rubbing alcohol to remove the deteriorated & tacky rubber coating on the volume ring, which left a nice looking shiny metal surface. Thanks very much for your post!
Hi John,
I have the similar problem with my Companion 50. Can I use WD40 instead D5? Will that evaporate on its own?
Subrata Dey: I wouldn't. WD-40 will attract dust. Honestly, I'm starting to think that D5 does, as well, since it leaves behind lubricant. The crackling is back on my knob. I'm going to test cleaning with WD-40's Specialist Electrical Contact Cleaner Spray. I'll update this guide if it works better.
elahd -
Many thanks for your posts. I thought it was just my set of Bose speakers. Great sounding and long lasting speakers and you have just helped me extend their life as I have had this crackling for the last 5 years.
I’ve had terribly loud pops for 10+ years. Have to remember to tap them off before turning the knob or you risk giving yourself a heart attack from the scare. I looked years ago for a tutorial and couldn’t find anything. Excited to give this a try!