주요 콘텐츠로 건너뛰기

이 안내서에는 최근 변경 사항이 더 있습니다. 최신 비검증 버전으로 전환하십시오.

Fujitsu LIFEBOOK P7010D Hard Drive Replacement

필요한 것

  1. Fujitsu LIFEBOOK P7010D Hard Drive Replacement, Battery: 1 단계, 이미지 1/1
    • Place the laptop upside down on a table.

  2. Fujitsu LIFEBOOK P7010D Hard Drive Replacement: 2 단계, 이미지 1/1
    • Locate the battery (the grey block). Find the two tabs on one end of the battery near the side of the laptop.

    • Using your fingers, press both tabs down at once until they are fully depressed.

  3. Fujitsu LIFEBOOK P7010D Hard Drive Replacement: 3 단계, 이미지 1/1
    • While holding the tabs down, slowly pivot the battery up.

    • The battery is now free and safe to pull out.

  4. Fujitsu LIFEBOOK P7010D Hard Drive Replacement, Disc Drive: 4 단계, 이미지 1/3 Fujitsu LIFEBOOK P7010D Hard Drive Replacement, Disc Drive: 4 단계, 이미지 2/3 Fujitsu LIFEBOOK P7010D Hard Drive Replacement, Disc Drive: 4 단계, 이미지 3/3
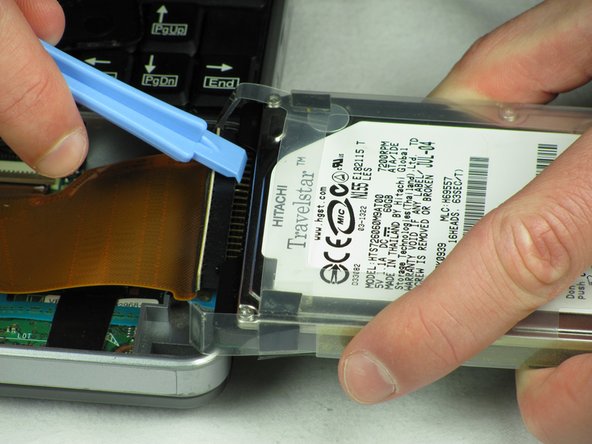
    • Push the tab down as far as possible using your finger or plastic opening tool to unlock the disc drive.

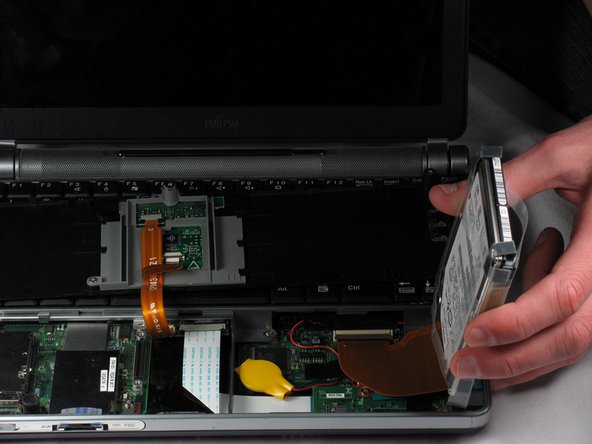
    • While still holding the tab down, use your other hand to pull out the disc drive straight out of its place.

  5. Fujitsu LIFEBOOK P7010D Hard Drive Replacement, Hard Drive: 5 단계, 이미지 1/2 Fujitsu LIFEBOOK P7010D Hard Drive Replacement, Hard Drive: 5 단계, 이미지 2/2
    • Unscrew two 2.4mm screws at the bottom using a Phillips #0.

    • Also unscrew another 2.4mm screw in the same line as the first two, located at the disc drive's opening and closest to the bottom right corner.

  6. Fujitsu LIFEBOOK P7010D Hard Drive Replacement: 6 단계, 이미지 1/2 Fujitsu LIFEBOOK P7010D Hard Drive Replacement: 6 단계, 이미지 2/2
    • Flip the computer so that the top is facing upwards.

    • Open the computer

    • The cover is connected to a strip at the bottom, be careful not to yank the cover out.

    • Use a spudger to lift the bottom black cover on both sides at any point.

    • For the proceeding steps, put on your anti-static wrist strap on and clip the metal clip to something metal and grounded to protect the delicate circuitry inside the computer.

  7. Fujitsu LIFEBOOK P7010D Hard Drive Replacement: 7 단계, 이미지 1/3 Fujitsu LIFEBOOK P7010D Hard Drive Replacement: 7 단계, 이미지 2/3 Fujitsu LIFEBOOK P7010D Hard Drive Replacement: 7 단계, 이미지 3/3
    • Flip the cover over and sit it on the keyboard.

    • The hard drive is also connected with a strip, do not yank it out.

    • Mind the tab at the bottom when pulling it out.

    • Lift the hard drive towards you and pull it out like you did with the battery.

  8. Fujitsu LIFEBOOK P7010D Hard Drive Replacement: 8 단계, 이미지 1/3 Fujitsu LIFEBOOK P7010D Hard Drive Replacement: 8 단계, 이미지 2/3 Fujitsu LIFEBOOK P7010D Hard Drive Replacement: 8 단계, 이미지 3/3
    • Flip the hard drive to the side.

    • The pins that connect hard drive are extremely fragile. Take care in handling the next few steps.

    • Hold the hard drive and use a spudger, preferably a wider one, to remove the black pin holder at the side where it touches the hard drive.

    • Wiggle the black pin holder little by little on each side until the holder comes off.

결론

To reassemble your device, follow these instructions in reverse order.

다른 3명이 해당 안내서를 완성하였습니다.

Nicholas Ross

회원 가입일: 01/20/12

186 평판

안내서 7개 작성하였습니다

Cal Poly, Team 10-31, Amido Winter 2012 Cal Poly, Team 10-31, Amido Winter 2012 회원

CPSU-AMIDO-W12S10G31

5 회원들

안내서 18개 작성하였습니다

댓글 0개

댓글 쓰기

조회 통계:

24 시간 전: 2

7일 전: 4

30일 전: 20

전체 시간: 5,319