이 버전에는 잘못된 편집 사항이 있을 수 있습니다. 최신 확인된 스냅샷으로 전환하십시오.
필요한 것
-
이 단계는 번역되지 않았습니다. 번역을 도와주십시오
-
Locate the battery (the grey block). Find the two tabs on one end of the battery near the side of the laptop.
-
Using your fingers, press both tabs down at once until they are fully depressed.
-
-
이 단계는 번역되지 않았습니다. 번역을 도와주십시오
-
While holding the tabs down, slowly pivot the battery up.
-
The battery is now free and safe to pull out.
-
-
-
이 단계는 번역되지 않았습니다. 번역을 도와주십시오
-
Push the tab down as far as possible using your finger or plastic opening tool to unlock the disc drive.
-
While still holding the tab down, use your other hand to pull out the disc drive straight out of its place.
-
-
이 단계는 번역되지 않았습니다. 번역을 도와주십시오
-
On the bottom of the laptop, find the bottom-plate screw holes. They are located near the disc drive. Parallel to them is a 2.4mm screw.
-
After locating the 2.4mm screw, use a Phillips #0 screwdriver to unscrew.
-
-
이 단계는 번역되지 않았습니다. 번역을 도와주십시오
-
Flip the laptop over and open it facing you.
-
Use a spudger to lift the bottom black cover on both sides.
-
-
이 단계는 번역되지 않았습니다. 번역을 도와주십시오
-
Once the black cover is lifted, flip it and set it on the keyboard.
-
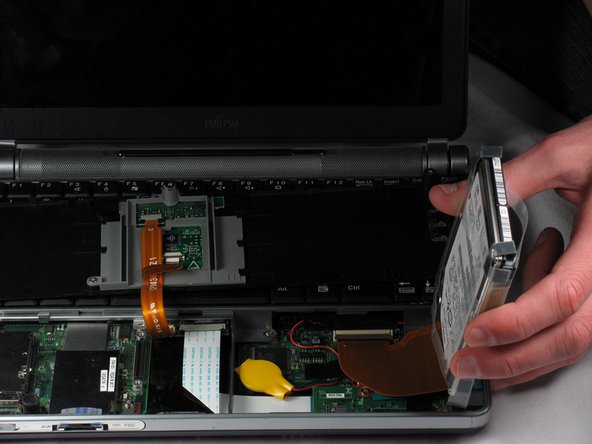
Locate the hardware disc on the right side and gently lift it out. Place it on the side of the laptop.
-
-
이 단계는 번역되지 않았습니다. 번역을 도와주십시오
-
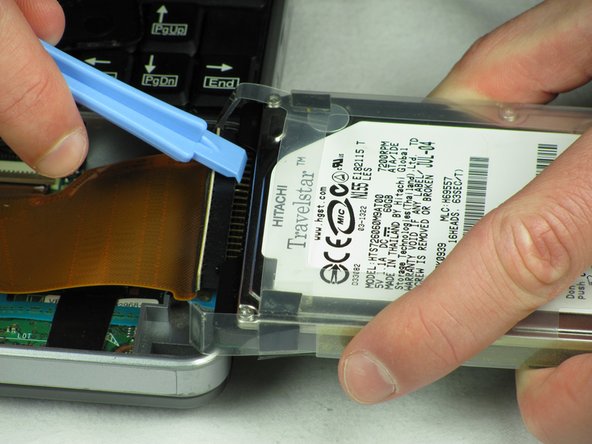
Flip the hard drive on its side.
-
Hold the hard drive and use a spudger, preferably a wider one, to remove the black pin holder on the side where it touches the hard drive.
-
Gently wiggle the black pin holder back and forth, on each side, until the holder comes off.
-


다른 3명이 해당 안내서를 완성하였습니다.

팀

Cal Poly, Team 10-31, Amido Winter 2012 Cal Poly, Team 10-31, Amido Winter 2012 회원
CPSU-AMIDO-W12S10G31
5 회원들
안내서 18개 작성하였습니다