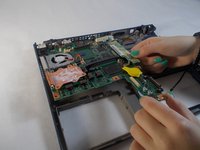
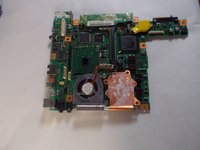
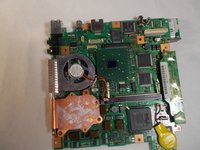
주요 콘텐츠로 건너뛰기

Fujitsu Lifebook S6120 Fan Replacement

필요한 것

  1. Fujitsu Lifebook S6120 Fan Replacement, Battery: 1 단계, 이미지 1/3 Fujitsu Lifebook S6120 Fan Replacement, Battery: 1 단계, 이미지 2/3 Fujitsu Lifebook S6120 Fan Replacement, Battery: 1 단계, 이미지 3/3
    • To prevent injury, make sure the laptop is unplugged and turned off before removing the battery.

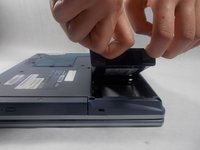
    • Push the two tabs in towards the laptop.

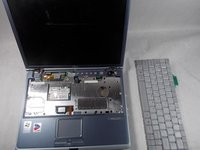
    • Lift the battery up and out from the frame of the laptop.

  2. Fujitsu Lifebook S6120 Fan Replacement, Hinge Cover: 2 단계, 이미지 1/2 Fujitsu Lifebook S6120 Fan Replacement, Hinge Cover: 2 단계, 이미지 2/2
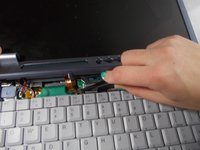
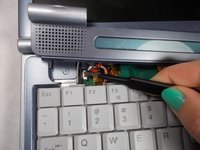
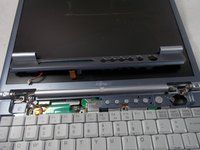
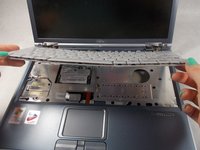
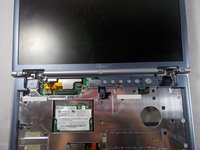
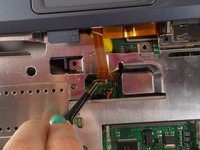
    • Use a plastic opening tool to lift the back of the hinge cover on the left and right sides of the computer.

  3. Fujitsu Lifebook S6120 Fan Replacement: 3 단계, 이미지 1/1
    • Lift the hinge cover.

    • The hinge cover is connected to the motherboard by a ribbon cable. To prevent damage, lift hinge cover slowly.

  4. Fujitsu Lifebook S6120 Fan Replacement: 4 단계, 이미지 1/3 Fujitsu Lifebook S6120 Fan Replacement: 4 단계, 이미지 2/3 Fujitsu Lifebook S6120 Fan Replacement: 4 단계, 이미지 3/3
    • Use the tweezers to disconnect the ribbon cable from the motherboard.

  5. Fujitsu Lifebook S6120 Fan Replacement: 5 단계, 이미지 1/3 Fujitsu Lifebook S6120 Fan Replacement: 5 단계, 이미지 2/3 Fujitsu Lifebook S6120 Fan Replacement: 5 단계, 이미지 3/3
    • With the tweezers detach hinge cover cables from the motherboard.

    • Remove hinge cover.

  6. Fujitsu Lifebook S6120 Fan Replacement, Keyboard: 6 단계, 이미지 1/3 Fujitsu Lifebook S6120 Fan Replacement, Keyboard: 6 단계, 이미지 2/3 Fujitsu Lifebook S6120 Fan Replacement, Keyboard: 6 단계, 이미지 3/3
    • Lift keyboard enough to show the ribbon cable.

    • The keyboard has a ribbon cable attached to the motherboard. Lift keyboard carefully to prevent damage.

  7. Fujitsu Lifebook S6120 Fan Replacement: 7 단계, 이미지 1/3 Fujitsu Lifebook S6120 Fan Replacement: 7 단계, 이미지 2/3 Fujitsu Lifebook S6120 Fan Replacement: 7 단계, 이미지 3/3
    • Use a plastic opening tool to release the ribbon cable from the motherboard.

  8. Fujitsu Lifebook S6120 Fan Replacement, PCI Adapter: 8 단계, 이미지 1/3 Fujitsu Lifebook S6120 Fan Replacement, PCI Adapter: 8 단계, 이미지 2/3 Fujitsu Lifebook S6120 Fan Replacement, PCI Adapter: 8 단계, 이미지 3/3
    • Push the secure clips outward.

    • The Adapter should pop up.

  9. Fujitsu Lifebook S6120 Fan Replacement: 9 단계, 이미지 1/3 Fujitsu Lifebook S6120 Fan Replacement: 9 단계, 이미지 2/3 Fujitsu Lifebook S6120 Fan Replacement: 9 단계, 이미지 3/3
    • Use tweezers to remove the wires from the Adapter.

  10. Fujitsu Lifebook S6120 Fan Replacement: 10 단계, 이미지 1/2 Fujitsu Lifebook S6120 Fan Replacement: 10 단계, 이미지 2/2
    • Take out the Adapter and carefully pull the wires out from the metal casing.

  11. Fujitsu Lifebook S6120 Fan Replacement, Motherboard: 11 단계, 이미지 1/2 Fujitsu Lifebook S6120 Fan Replacement, Motherboard: 11 단계, 이미지 2/2
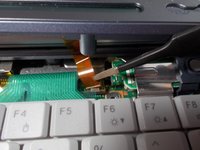
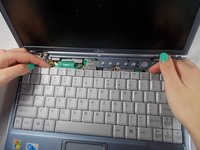
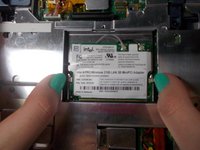
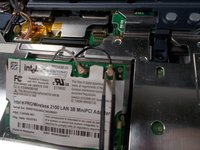
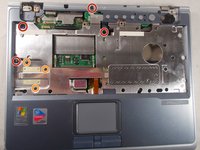
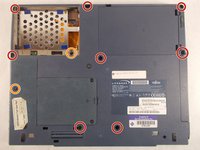
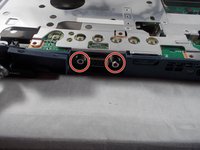
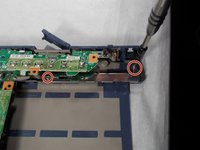
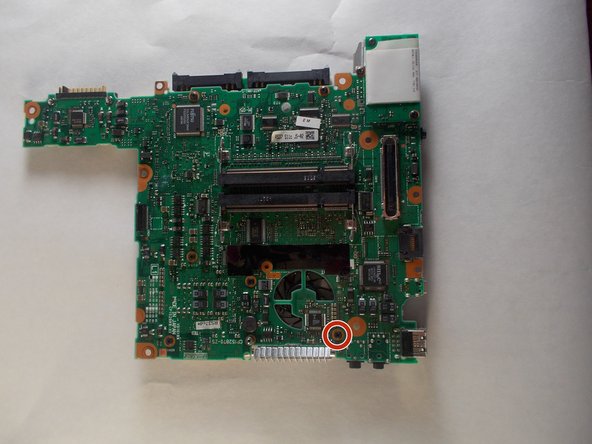
    • Use a Philips head #0 to remove the 5mm screws.

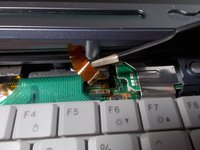
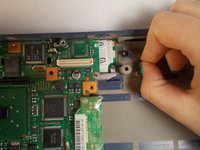
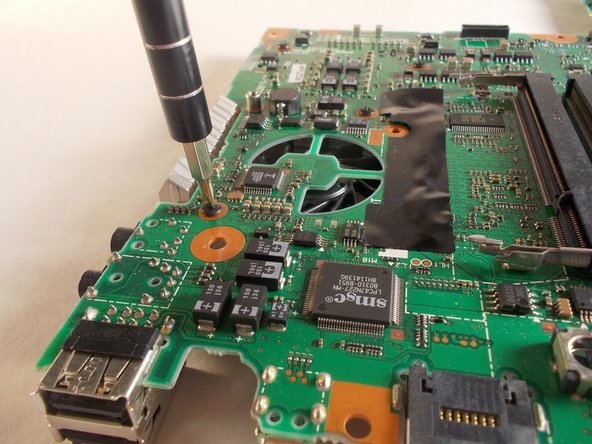
    • Use a Philips head #00 to remove the 4mm screws.

  12. Fujitsu Lifebook S6120 Fan Replacement: 12 단계, 이미지 1/1
    • Lift up the plastic frame from the base to expose the ribbon attached to the motherboard.

  13. Fujitsu Lifebook S6120 Fan Replacement: 13 단계, 이미지 1/2 Fujitsu Lifebook S6120 Fan Replacement: 13 단계, 이미지 2/2
    • Remove the ribbon from the motherboard with a pair of tweezers.

  14. Fujitsu Lifebook S6120 Fan Replacement: 14 단계, 이미지 1/3 Fujitsu Lifebook S6120 Fan Replacement: 14 단계, 이미지 2/3 Fujitsu Lifebook S6120 Fan Replacement: 14 단계, 이미지 3/3
    • Use a 5mm nut driver to unscrew the nuts.

  15. Fujitsu Lifebook S6120 Fan Replacement: 15 단계, 이미지 1/2 Fujitsu Lifebook S6120 Fan Replacement: 15 단계, 이미지 2/2
    • Pull the ribbon tab up and off the motherboard.

  16. Fujitsu Lifebook S6120 Fan Replacement: 16 단계, 이미지 1/1
    • Remove the metal plate covering the motherboard.

  17. Fujitsu Lifebook S6120 Fan Replacement: 17 단계, 이미지 1/2 Fujitsu Lifebook S6120 Fan Replacement: 17 단계, 이미지 2/2
    • Remove the 3.5mm screws with a Philips head #0.

    • Remove the metal bracket and other pieces that rely on it for structure.

  18. Fujitsu Lifebook S6120 Fan Replacement: 18 단계, 이미지 1/2 Fujitsu Lifebook S6120 Fan Replacement: 18 단계, 이미지 2/2
    • Pinch your fingers around the base of the connector and pull it out.

  19. Fujitsu Lifebook S6120 Fan Replacement: 19 단계, 이미지 1/2 Fujitsu Lifebook S6120 Fan Replacement: 19 단계, 이미지 2/2
    • Lift the motherboard off the plastic base.

  20. Fujitsu Lifebook S6120 Fan Replacement, Fan: 20 단계, 이미지 1/3 Fujitsu Lifebook S6120 Fan Replacement, Fan: 20 단계, 이미지 2/3 Fujitsu Lifebook S6120 Fan Replacement, Fan: 20 단계, 이미지 3/3
    • Using a Philips head size #0 remove the 3mm screw on the back of the motherboard.

  21. Fujitsu Lifebook S6120 Fan Replacement: 21 단계, 이미지 1/3 Fujitsu Lifebook S6120 Fan Replacement: 21 단계, 이미지 2/3 Fujitsu Lifebook S6120 Fan Replacement: 21 단계, 이미지 3/3
    • Using tweezers detach the cable from the motherboard.

  22. Fujitsu Lifebook S6120 Fan Replacement: 22 단계, 이미지 1/2 Fujitsu Lifebook S6120 Fan Replacement: 22 단계, 이미지 2/2
    • The fan can now be removed from the motherboard.

결론

To reassemble your device, follow these instructions in reverse order.

Jessi Gallant

회원 가입일: 03/19/18

899 평판

안내서 7개 작성하였습니다

UMass Dartmouth, Team S5-G5, Peak Spring 2018 UMass Dartmouth, Team S5-G5, Peak Spring 2018 회원

UMASSD-PEAK-S18S5G5

3 회원들

안내서 18개 작성하였습니다

댓글 0개

댓글 쓰기

조회 통계:

24 시간 전: 0

7일 전: 2

30일 전: 4

전체 시간: 626